Lazy Girl’s Guide to Freezing Spinach

the lazy girls guide to freezing spinach

I love buying spinach at Costco in the 40 oz bags.  It’s good quality and cheap, and it’s a LOT of spinach.  I use it in my eggs, salads, lasagna, smoothies, stir fries, you name it.  Sometimes I still can’t get through the whole bag before it spoils.

fresh_spinach__40

While the official method for freezing spinach involves blanching it.  I’ve had really good luck, just throwing the bag in the freezer.  (I just toss it in when I’m tired of eating spinach.) Once it’s frozen I mash the bag to break the leaves into pieces. Then it’s easy to throw into a recipe.

The idea behind blanching Spinach is to kill the enzymes that continue the ripening process. Freezing slows down but doesn’t stop or kill the enzyme process.  As long as you use it up within a couple of months and don’t try to store it for years, you’ll be fine.

The benefit besides the ease, is that it PRESERVES the enzymes that aid in the digestion process.  Now toss that into your morning smoothie :).

Batch Cooking Ground Beef in Your Slow Cooker

I first figured out this worked on a desperate day when I didn’t have a kitchen. The no kitchen season of our lives lasted almost a year and I relied on my slow cooker and electric griddle for making almost everything.

Since then, I’ve reused this method changing the seasoning to suit the dish.  Taco seasoning for batch taco meat. Italian seasoning for pizza or spaghetti. Read more

The Easiest Shredded Chicken for Your Freezer

Chicken salad, enchiladas, tostadas, tetrazzini, chicken spaghetti, pot pie, taquitos, quesadillas.  They all start with shredded  chicken.  When there’s a recipe sized bag ready to go in the freezer, the rest of the meal doesn’t seem so hard.

I bought frozen grilled chicken pieces from Aldi yesterday.  My stress level had come to that. It was kind of gross and expensive.  Not completely awful, but nothing like home marinated and grilled chicken. If your stress level makes frozen grilled chicken a necessity, no judgement here.  But there is a simple way to have prepped chicken at home.

Fill your slow cooker up to 3/4 full with chicken breasts, then pour water into the spaces until it comes just even with the top of the chicken. Season with salt, pepper, celery seed, garlic powder, and onion powder. Slow cook for 4-5 hours.  Remove chicken from the broth and let it cool until cool enough to handle.

Drop a breast or 2 (enough for your typical recipe) into a quart size freezer baggie, press out all the air and seal.  Then mush it around with your fingers until it is all shredded up.  Moosh the chicken flat, and freeze it.  Simple, right?

You also have all that great chicken broth.  If you use it up within the week, you can put it in a pitcher in your fridge.  (We rarely have juice, so it’s safe at our house.  If you often have lovely pitchers of stuff in your fridge, you should probably label it.  Or hide around the corner with a video camera…..)

For those of you who need recipes.  Here you go:

Easy Shredded Chicken for Your Freezer

Ingredients

  • 2 lb chicken breasts
  • 8 cups water
  • 3 tsp salt
  • 1 tsp black pepper
  • 1 tsp onion powder
  • 1 tsp garlic powder
  • 1/2 tsp celery seed

Instructions

  1. Combine everything in a 5 quart slow cooker.
  2. Cook on high for 4-5 hours. (No need to thaw the chicken first.)
  3. Remove chicken from broth and cool until cool enough to handle.
  4. Place 2 small or 1 large chicken chicken breast into each freezer bag and shred by mooshing the outside of the bag with your fingers.
  5. Remove all the air and freeze flat.
http://www.groceryshrink.com/the-secret-to-easy-shredded-chicken-for-your-freezer/

P.S.  For those of you who are wondering, most brands of freezer bags are BPA free.  I specifically checked Ziploc brand and Up and Up brands, but several others are safe too.


Day 1: Summer Here We Come

Storm Clouds

Today is our first Monday of summer vacation.  I’m a barrel of mixed feelings about school being out.  I love having the kids home and the sound of stirring in the lego bin as they search for that perfect piece. We are making different education choices for next year and I am mourning the change.  I’m not ready to talk about it publicly yet.  Soon, I hope.  For now, I want my friends to know we weren’t offended or upset in any way.

1217406_28114914

I’m still trying to figure out the whole summer vacation thing. In the past, I’ve written a summer bucket list and then had terrible Mommy guilt when I didn’t do much of it.  Last year I made a list of things I wanted to do around Kansas City, one a week. We did 2 things, then adrenal fatigue had me mostly bed bound the rest of the summer.

1442196_33585767

I want to be a fun mom.  I look at the pictures on facebook of families doing things together, like eating in a restaurant, going to the trampoline park, or in an extreme case, taking a girls’ trip to England….and I feel a little small inside.  It’s dumb to compare, I know.  But I do it anyway–it comes naturally.

I hope my kids tell their therapist that I really loved them.  That they know I tried.

SONY DSC

I need summer to be as restful as possible.  School is hard.  Teaching; spelling lists, math facts, reading charts, reports and posters, fund raisers, and things to sign x 5  nearly puts me under.  Then we also have ballet class, soccer teams, basketball teams, violin lessons and piano lessons.  Plus Zion’s League and YAChoir for the High School one; Zioneers for the Middle School ones; Young Adults for the parents; Priesthood classes, Gatekeeper training; and family visits for the Daddy who also helps lead the Trailblazers group….and takes the boys to Boy Scouts too.  There’s Handmaidens and Lamplighters for the girls.  The only night we can be home as a family is Wednesday night, and the church would prefer we come to prayer service instead.  We don’t usually go. I have stay at home guilt on those nights, but if anyone walked a day in my shoes, they wouldn’t judge.

We’ve talked about limiting activities more.  We haven’t come up with a perfect solution.  The kids each have special needs that make a certain activity important for their development. The ones that aren’t crucial for congnitive and physical development are the church activities–and that feels kind of wrong to quit.  So we stay with the crazy and ask ourselves often if we’re doing the right thing.

1446129_36471881-2

This summer I have no bucket list. The 4 oldest kids will each go to a summer camp.  I will take the children to a family camp (we call it Reunion) while my husband stays back to earn money and hold down the fort.  We are going tent camping in the Rocky Mountains at some point.  And there’s a week of Bible School for the little ones.  There will be a lot of time just at home though.  If I can keep the screens off until 3pm, I will consider it a win, plus minimal fighting, and maybe cleaning once a month week.

1443880_76577189-2

Maybe we’ll air up the bike tires and send restless kids out into the neighborhood.  And a summer membership to a local pool.  That was a good thing last year.  I have a few house projects I’d like to squeeze in, but I’m hoping to find lots of peaceful moments.  Lots of peaceful moments.

1443142_16441598


My mediation:

Drop Thy still dews of quietness.

May all our strivings cease.

Take from our souls the strain and stress,

And let our ordered lives confess the beauty of Thy peace.

John Greenleaf Whittier

Finishing Touches on the Master Bedroom

master bedroom 3

Our bedroom was a dreary place.  It was hopeless.  Short of knocking out the wall and adding extra windows, I was lost on how to breathe life into the space.  I allowed things to pile up around me in a clutter that didn’t have any business in a marriage retreat. The room was already gross….I didn’t see the need to protect it. It became the dumping ground for the whole house.

Master bedroom before

I was wrong.  Clutter is the enemy of peace. Even removing the pictures on the walls and the large bed frame allowed me to see the potential in the space much clearer.

Master bedroom quiet

Without spending a dime, it was easy to rip up the old carpet, pop up the tack strip and pull the staples.

master bedroom painted

Fresh paint on the walls and trim, plus paint on the floor, made a clean slate for even better things. White trim made the room feel fresh.

master bedroom painted floor

nightstand in progress

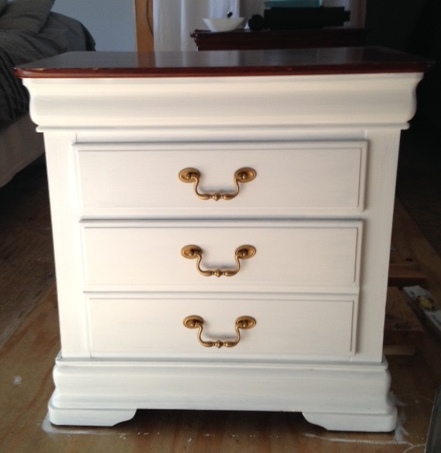
Having to use what we already had, was a lovely limitation.  If I had the budget to buy anything I wanted, it would have been very hard to make a decision.  Instead, I spruced up our old furniture with a little paint.
painted nightstand

That same limitation gave us our gold lamps.

New lamps

Before I spent any money, I put all the things I was thinking about together in a power point collage, just to make sure it would look ok together.

Master bedroom mood board

 Our old ceiling fan could only take a 25 watt bulb, so we switched it out for a standard fixture with a little personality.

Master Bedroom After

Layering in furniture and texture with the jute rug and curtains, cozied up the space and started to make it feel finished.

master bedroom 1

More texture comes from the faux bamboo blinds (They are $1.50 placemats and a $6 runner from Ikea thumbtacked over the windows.) and  faux sheep rugs ($12 Ikea rugs that I whipped stitched together) by the beds.  They collect dirt like I was afraid of, but clean up nicely with a toss through the dryer.

master bedroom 7

The gold tones and wood tones, plus the natural color of the placemats and jute rug add warmth and keep the mostly white space from being too sterile.master bedroom 6

Pillows add softness while the variation in shape make it visually interesting.  The long pillow is from Ikea and the square pillow forms are from pillow cubes.  I prefer to use feather pillows because they NEVER lose their fluff.  Feather pillows are the only pillows I’ve found that can be tossed and fluffed back to perfection every time.master bedroom 6-2

The peacock pillow cover is from Amazon and I’m waiting on the rest of my order to come to finish up the pillows on the couch and the bed. The white pillow on the sofa is still naked :).
master bedroom 5

The wood picture frame and carved wooden turtle (a gift from our friend in Hawaii) plus the plant, add warmth and life to the corner.  Plus mirrors on every surface we could manage them bounce the limited light around and really brighten things up.master bedroom 4

The white shams on the bed are filled with King feather pillows also from Pillow Cubes. Look at the difference between non-feather and feather pillows. I have a tutorial on sewing easy pillow covers here and plan to use it for the pillows that will end up on the bed. (The photo below also shows the difference between no dust ruffle and the no sew dust ruffle.)

Feather pillow cubes

I pulled way back to show you this final picture to try to capture the piece of plywood on the floor and the white curtains on the wall.  Under the plywood is a large hole where a sunken bathtub used to be, and behind the curtains (sheets thumbtacked to the ceiling) are studs, pipes, wires and insulation.  I can’t fix those two things right now. That lovely limitation almost prevented me from trying to change the room at all. The truth is I hardly notice them now.

master bedroom 2

I couldn’t make this room perfect, but my imperfect efforts still blessed my family.

 Pillow cubes provided the feather pillows for this post. All opinions are my own.

No Sew Bedskirt

When we were redoing our room last month, I was surprised how many little details make a space feel finished.  The bedskirt is one of those.

Master Bedroom After

Our previous bed had a wooden frame that hid the box springs.  We were ready for a new look, so kept the headboard only and put the bed on metal rails.  I needed a fast, frugal solution for hiding the box springs.

I found an easy answer in 2 twin flat sheets from Walmart. ($4.88 each.)  1 sheet would have done it, but then there would have been sewing involved.

Here’s a quick video, explaining how it works.  Something more permanent could be made with velcro and hot glue.  I plan to do that soon.  The pins work well, but my kids come and stand by the bed to talk to me in the night and step on the bed skirt–which pulls out the pins… Changing the sheets was easier than I thought.  Just by remembering the skirt was a little fragile I could work around it without pulling it all apart.


master bedroom 1

Moss Covered Monogram

In the Cozy Minimalist class, I learned that plants breathe life into the room.  My family room is land locked and light deprived.  Real plants wouldn’t survive a week in this space, so a little creativity is in order. (The plants in the picture are fake IKEA plants.  Cute…but too small for the space?  I’m looking for a frugal way to overflow that shelf with green.)

painted fireplace moss letter

After some looking around pinterest, I thought a moss covered letter  on the new painted fireplace would be perfect.  The space above my fireplace isn’t huge–22 inches total.  So I opted with a 15 inch letter.  I could have gone SUPER frugal and cut a letter out of cardboard.  In the end I paid $5 to have a ready made letter because I wanted the depth.  you can see the side of it from the front door and it looks better to be thick and sturdy.

The fireplace still looks bare, so I’m thinking about garland options. Maybe I’ll make this when we drive to Colorado. Or this.

moss letter 9

This project took me 1 hour including driving to Hobby Lobby to get the letter $5 (50% off from $9.99.) And the moss sheet $6 (40% off coupon from $9.99.)  I also used scissors and a marker.  The project would have gone faster, but those sheets are extremely sticky and I kept getting caught in it like a mouse in a sticky trap.  I regret my decision not to film it, because I think it would have gone viral for how ridiculous it was….you’ve been warned.

moss letter a

Unfold your moss sheet and place your letter in the center.  I drew the lines on it with the marker and cut along it with scissors.  Then peeled off all the paper backing.

moss letter b

I pressed the letter onto the sticky moss.  At this point, it’s good to mention that you want the RIGHT side of your letter face down.  This is pretty important if your letter is directional, like a B.  Thank goodness that C’s are good both directions because I wasn’t super careful.  As you go, SAVE YOUR SCRAPS.  You’ll need them until the very end.  Then if you want, you can throw the mess away.

moss letter c

Then I started pressing up the moss and sticking it around the outside, trimming off the excess so it would lay flat agains the wall.  Where it curved, I snipped it to the letter then folded it up overlapping the excess while keeping it smooth. The cool thing about this project is the moss is so forgiving.  If you end up with a hole you can just stick a scrap in it and no one will be able to tell.

moss letter d

To go around the inside curves I snipped it like the outside, but this time instead of overlapping it left gaps of triangles. moss letter 1

moss letter 2

I just cut little triangle scraps and stuck them in to fill in the gaps.

moss letter 3

The corner ended up with a triangle flap.  I just cut it off flush.

moss covered letter 7

TaDa!

moss covered letter 5

I went super fancy on the hanger and hot glued a paper clip to the back. It’s such a lightweight piece that a paperclip is just the right thing.

Fireplace and moss letter

When Spending Money Saves Money

My mom is amazing.  She was my Skylarks and Orioles leader, and Den Mother for my brother.  She taught Sunday school and led the junior church.  She cooked a sit down meal for us every night and made breakfast almost every morning. While we waited for the bus she read Uncle Arthur bedtime stories so we would have a good dose of values before school. She formed a family worship group where we would gather in homes with other families and have child centered Bible lessons. She sewed all of my clothes and did craft shows and had garage sales to bring in extra money.  She made sure I could cook and sew and clean and care for children before I left home.  And took time to really listen to me.

She was so busy giving us the best childhood ever that home decor wasn’t high on her priority list. Who can blame her?  It took awhile to realize that I was interested in interior design. I would visit well done spaces and wish I could put something together like that.  Everything I attempted looked like a different hot mess than the one I started with.

living room 12301

Decorating disaster circa 2009

I remember the first time I ever painted a room.  I had 2 kids under the age of 3 and could only paint in 10 minute spurts while I cared for them.  I used ziplock baggies to keep everything fresh for the weeks it took me to finish one room.  But the feeling of accomplishment and freshness from that experience germinated an interest in interior design that has grown larger and larger.

I had to experience a lot of decorating failures before I figured out the things that I like.  Things like light and bright neutral walls that allow accessories to take the spotlight.  White trim! Fewer, larger pieces of art and a minimalistic style.  I spent years devouring home decor blogs, magazines and books.  Even after those years of following the experts, no room in my house felt quite right.

When the Nester announced her Cozy Minimalist decorating class, I wanted to sign up right away.  I’ve learned more from her blog over the years than all my other sources put together.  I paused at the $89 price tag.  Then I realized if I was going to keep working on my fixer-upper, room by room, this class could save me from wasting money on the wrong things.  If I only learned one new thing that averted a buying disaster, the class would pay for itself.  So I signed up.  YES! My frugal self paid $89 for a virtual class and admitted it publicly.

master bedroom 6-2

It was the best decision ever.  For one thing, it gave me the courage and steps I needed to turn my master bedroom disaster into a serene space.  I did the whole thing with cash I gathered from selling clutter around the house. The space isn’t done, because spaces are never done.   There will always be tweaking and changes to make, but I don’t have that feeling that something is “off” like before.

I didn’t spend less on decorating stuff before I took the class, and when I was done I still had a space I didn’t love. The class changed the types of things I shop for and ultimately saved me from buying the wrong things.  It paid for itself by showing me how to use what I have and then focus my shopping in the right direction.

That $89 class is now available as a self-study course for just $39.  PLUS you can get $10 off if you follow this link and use Angela Coffman in the referral box.

Here are more pictures of what other students in the class were able to do.

If home decor isn’t your thing, but you need to do your own decorating anyway, you need this class.  It’s 4 sessions of step by step how to go from hot mess to cozy and well put together.  This class taught me more in 4 weeks than 4 years of research did previously. It sure beat trying to figure out the decorating thing on my own.

The Risk of Painting Brick


There are a lot of things I love about our family room.  It’s open concept so we can see the kitchen from our comfy sofa.  It’s big with lots of options for furniture placement.  It has yummy hand scraped hardwood floors and French doors leading out to a sunroom and deck.family-room-2015
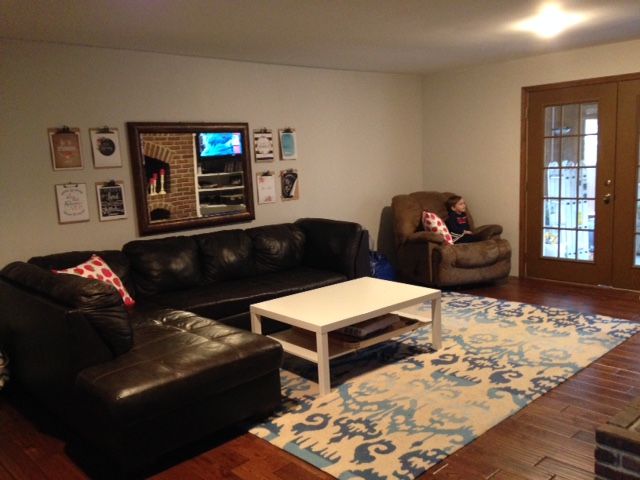
The room has a unique fireplace that was constructed from the bricks removed during the demolition of the old stock yards in downtown Kansas City.  The bricks are a good color tone with enough variation to give texture and interest without being gaudy.
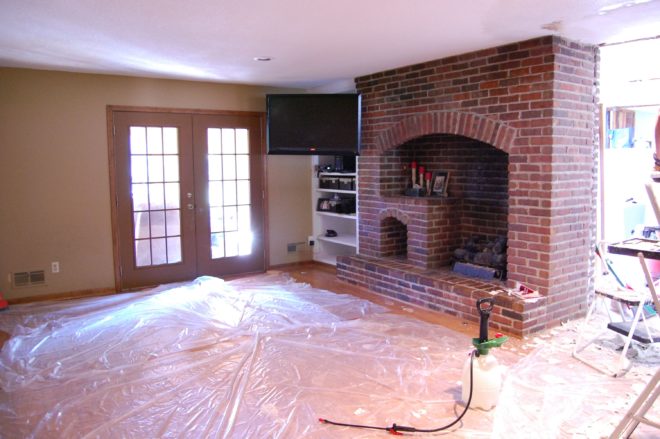
fireplace-before

The room is dark.  It’s landlocked and even during the lightest part of the day, needs a light on for normal activity.   Even with the lights on it feels dark.

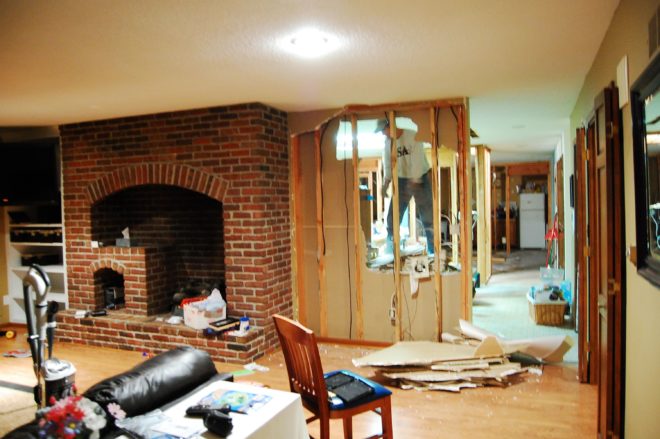
It was even darker before we painted over the dark olive beige with a pale gray.  Painted the trim white, and took down the wall between the family room and the kitchen.
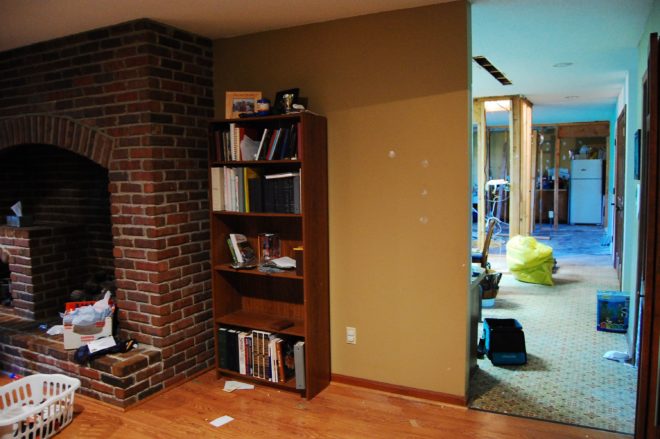
dsc_0605

dsc_0613

My gut has been telling me the dark brick has to go if I ever want a light and bright space. It’s so massive that it absorbs a ton of light, and the inside is stained black from soot.  I’ve tried several methods to clean it up, but it’s deep into the porous surface of the brick.  I’ve lightened it some but the stain is still there.
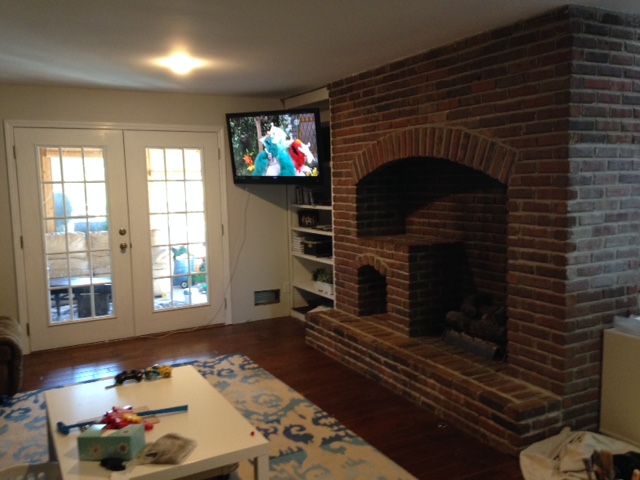
white-french-doors

In a last ditch effort to save the brick, I decided to paint the french doors white to bring in as much light as I can.  It helped a bunch and every time I walked by my heart gave a little leap of joy.  As much as the little things we did improved the space, it only made the dark brick stand out more…and not in a good way.
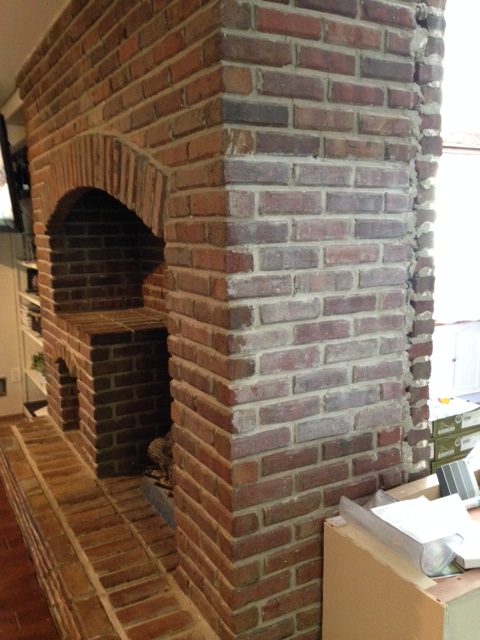
fireplace-end

When we took down the wall between the rooms, there was an unfortunate seam in the brick never meant to see the light of day.  I was imagining seeing the cute exposed brick wall from the front doors….but that seam is NOT cute.   We plan to cover it with a floor to ceiling chalkboard with a wide white frame all the way around. SOOOO since I was going to cover it up completely, I took a risk and tested a white wash technique first.

I loved it and hated it at the same time.  My mom told me it looked dirty, but my online friends from the Cozy Minimalist class told me it was beautiful.  I finally got up the nerve to start on the part that would be seen.

brick-part-way

I spent a few hours painting, and then wore out.  You can see the top left corner and the inside has been done.  At this point, I was pretty sure my mom was right and I had ruined it.  Then I remembered The Nester telling us, “You can’t ruin something you already hate.”  It took several weeks for me to find the nerve to finish the project.  I decided if I hated the whitewash look I would paint it solid white.
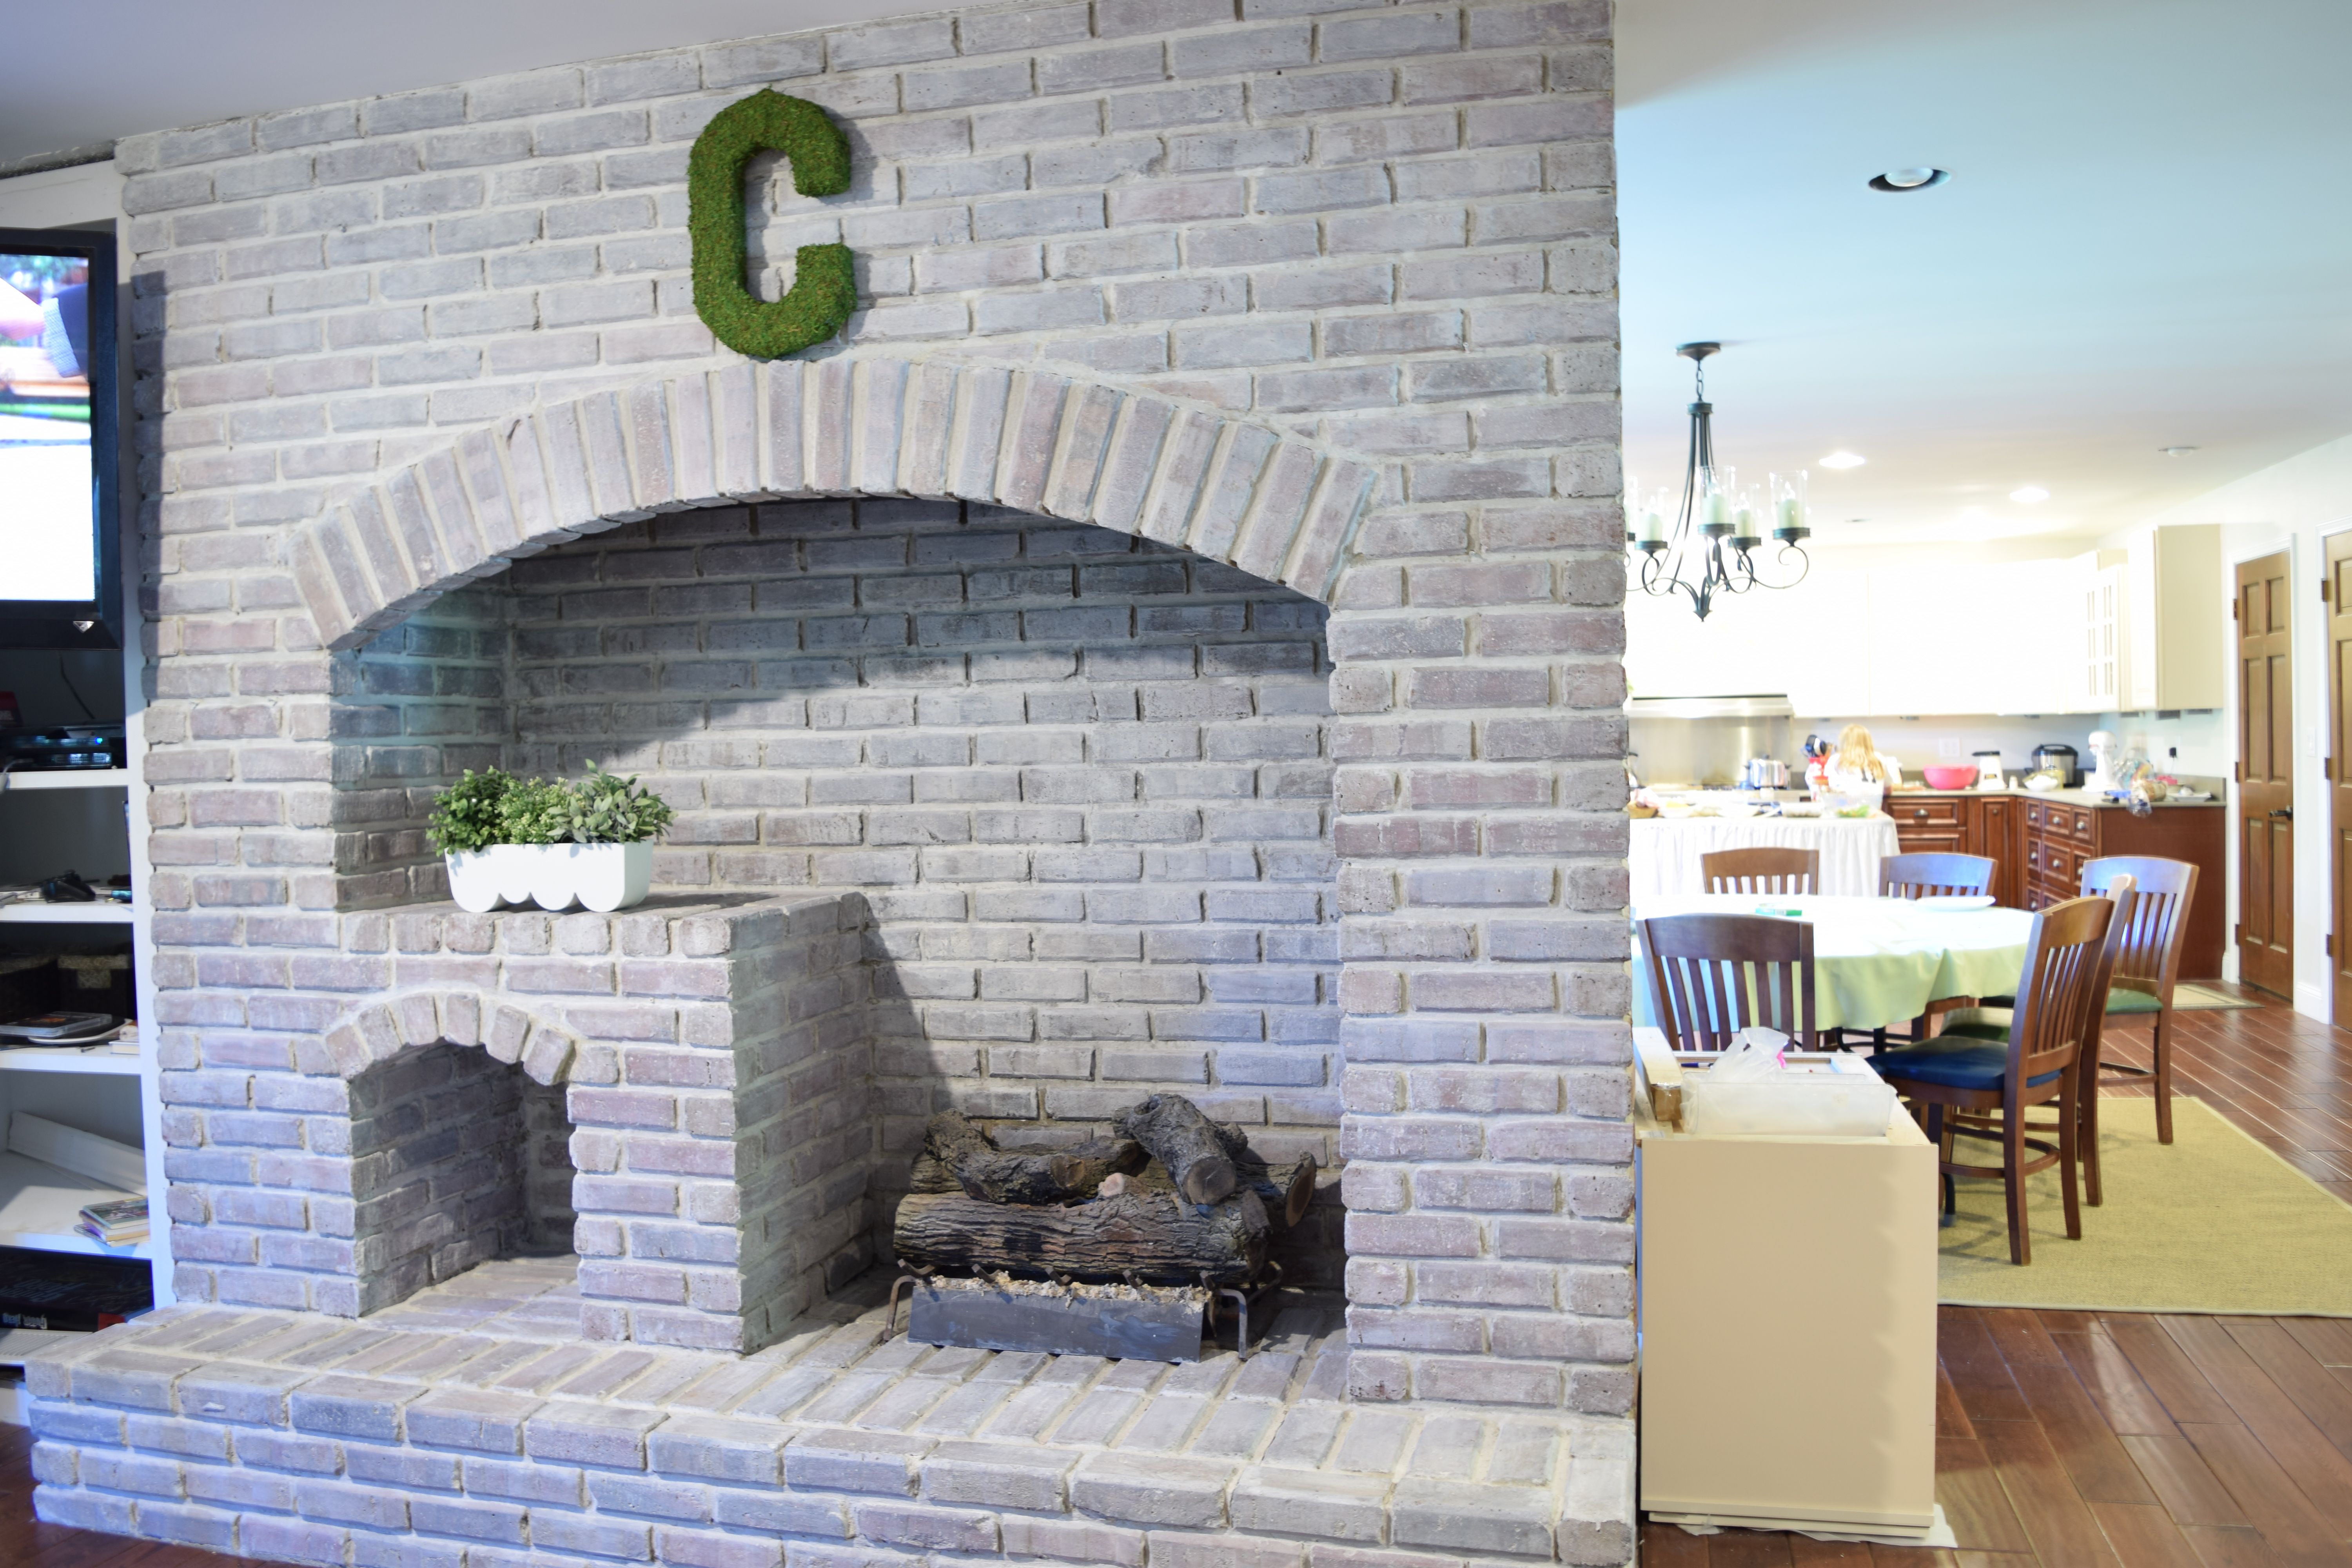
fireplace-and-moss-letter

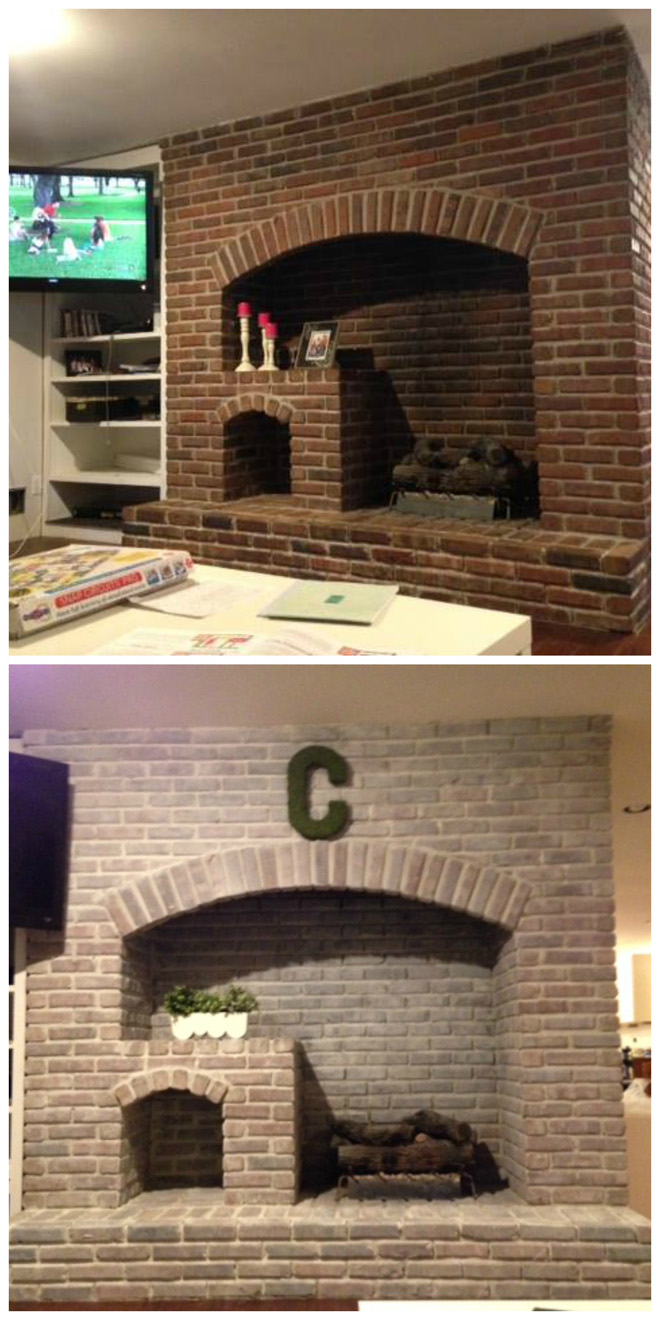
The paint I chose tends to settle during the painting process, so the fireplace got lighter and lighter as I went on.  I had to go back over the places I started with to make it blend with the rest of the brick.  It ended up lighter overall than I had planned, but I love it anyway.

This is just an iphone picture, and doesn’t do the space justice.  The brick finally feels like it goes with the rest of the room.  I quick made a moss covered monogram to hang on the new whiter brick, and have plans to style up the space more with inspiration from here and here.

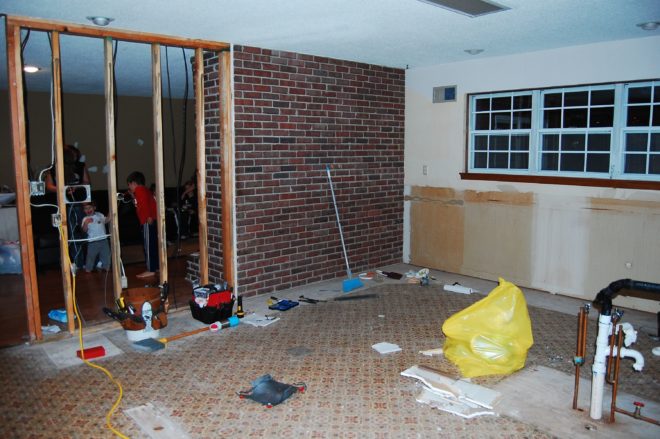
I’m KEEPING the original brick on the backside where it is exposed in the dining room.  Here’s a picture of the back side of the fireplace back during our construction phase.  I can’t believe I’ve never taken a picture from this direction “finished.”  Ok, we aren’t finished yet, my buffet table on the brick wall is still those stacked flooring boxes with a tablecloth on it. But we’ve made progress since this.
dsc_0672

Choosing the type of paint for the brick was a challenge.  Brick is hard to strip paint from, no matter what.  Latex paint CAN be removed from brick with this stripper or this one, but latex paint is not heat friendly.  My fireplace has a gas insert, and while it is too expensive for us to use right now, we have hopes one day to make it more efficient.  We didn’t want to permanently eliminated our option of ever using the fireplace again.  I thought about using latex only on the outside and using heat proof grill paint on the inside, but it only came in black.  Painting the massive inside of the fireplace black would fight against my goal of light and bright.

While searching for paint that is heat friendly, I came across milk paint.  Milk paint is permanent on brick. It soaks into the pores and becomes one with the material.  It doesn’t bubble, crack or peel when exposed to high temperatures.  And unlike traditional lyme white washing, milk paint won’t rub off on hands or clothes once it’s cured.  Going with this option meant never being able to go back to raw brick again.  That’s scary for me, because I’m kind of fickle when it comes to decorating.  I took the risk because letting fear trap me into keeping a look I hated was worse than never being able to go back.

There are lots of different brands of milk paint.  I chose this one because it keeps longer than the rest while still being REAL milk paint. Some milk paints are only good for 24 hours after mixing up, but this one lasts 6 weeks.  (I loved having a time limit though, or I might not have finished even now.)  The paints that are “like” milk paint but not really made with milk, I didn’t trust.  I wasn’t sure they would have the heat proof quality I was looking for.

The paint instructions say to mix it equal proportions with the powder and water.  I did that first to make sure the powdered mixed up well, then added 2x more water for a whitewash look.  My finished formula was 1/2 cup paint powder to 1 1/2 cups water. I brushed it on with a natural bristle brush, stippling it into the texture when necessary, then used an old flour sack tea towel to wipe it off.  The wiping off part was key to an even texture and removing brush strokes.

Just for fun, here’s a before and after:
fireplace-before-and-after

P.S.  Thank you for making it safe for me show you my imperfect house and imperfect pictures.  I’m holding back the urge to point out all the flaws. I know no apology is necessary–because we’re friends like that.