Heather’s Bedroom Birthday Surprise Part 2

We said goodbye to Heather at 5:00 pm on Friday.  As soon as the car was out of sight, we started working.  I was hoping that Heather didn’t forget anything and decide to come back for it—not sure what story I would have told, lol.  This is My daughter Heidi with her friend JJ and little sister Bea (names changed to protect the girls.)  What a pretty crew!

DSC_1097

Bea is one of Heather’s closest friends.  She called not long after Heather left to see if Heather could walk down the street to play.  I told her the sad news that Heather would be out of town for the week, and then told her why.  She said, “Why didn’t you tell me!!!! This is a huge surprise.  If someone did this for me, I would die!”  Then she rushed over with big sister support to lend a hand.

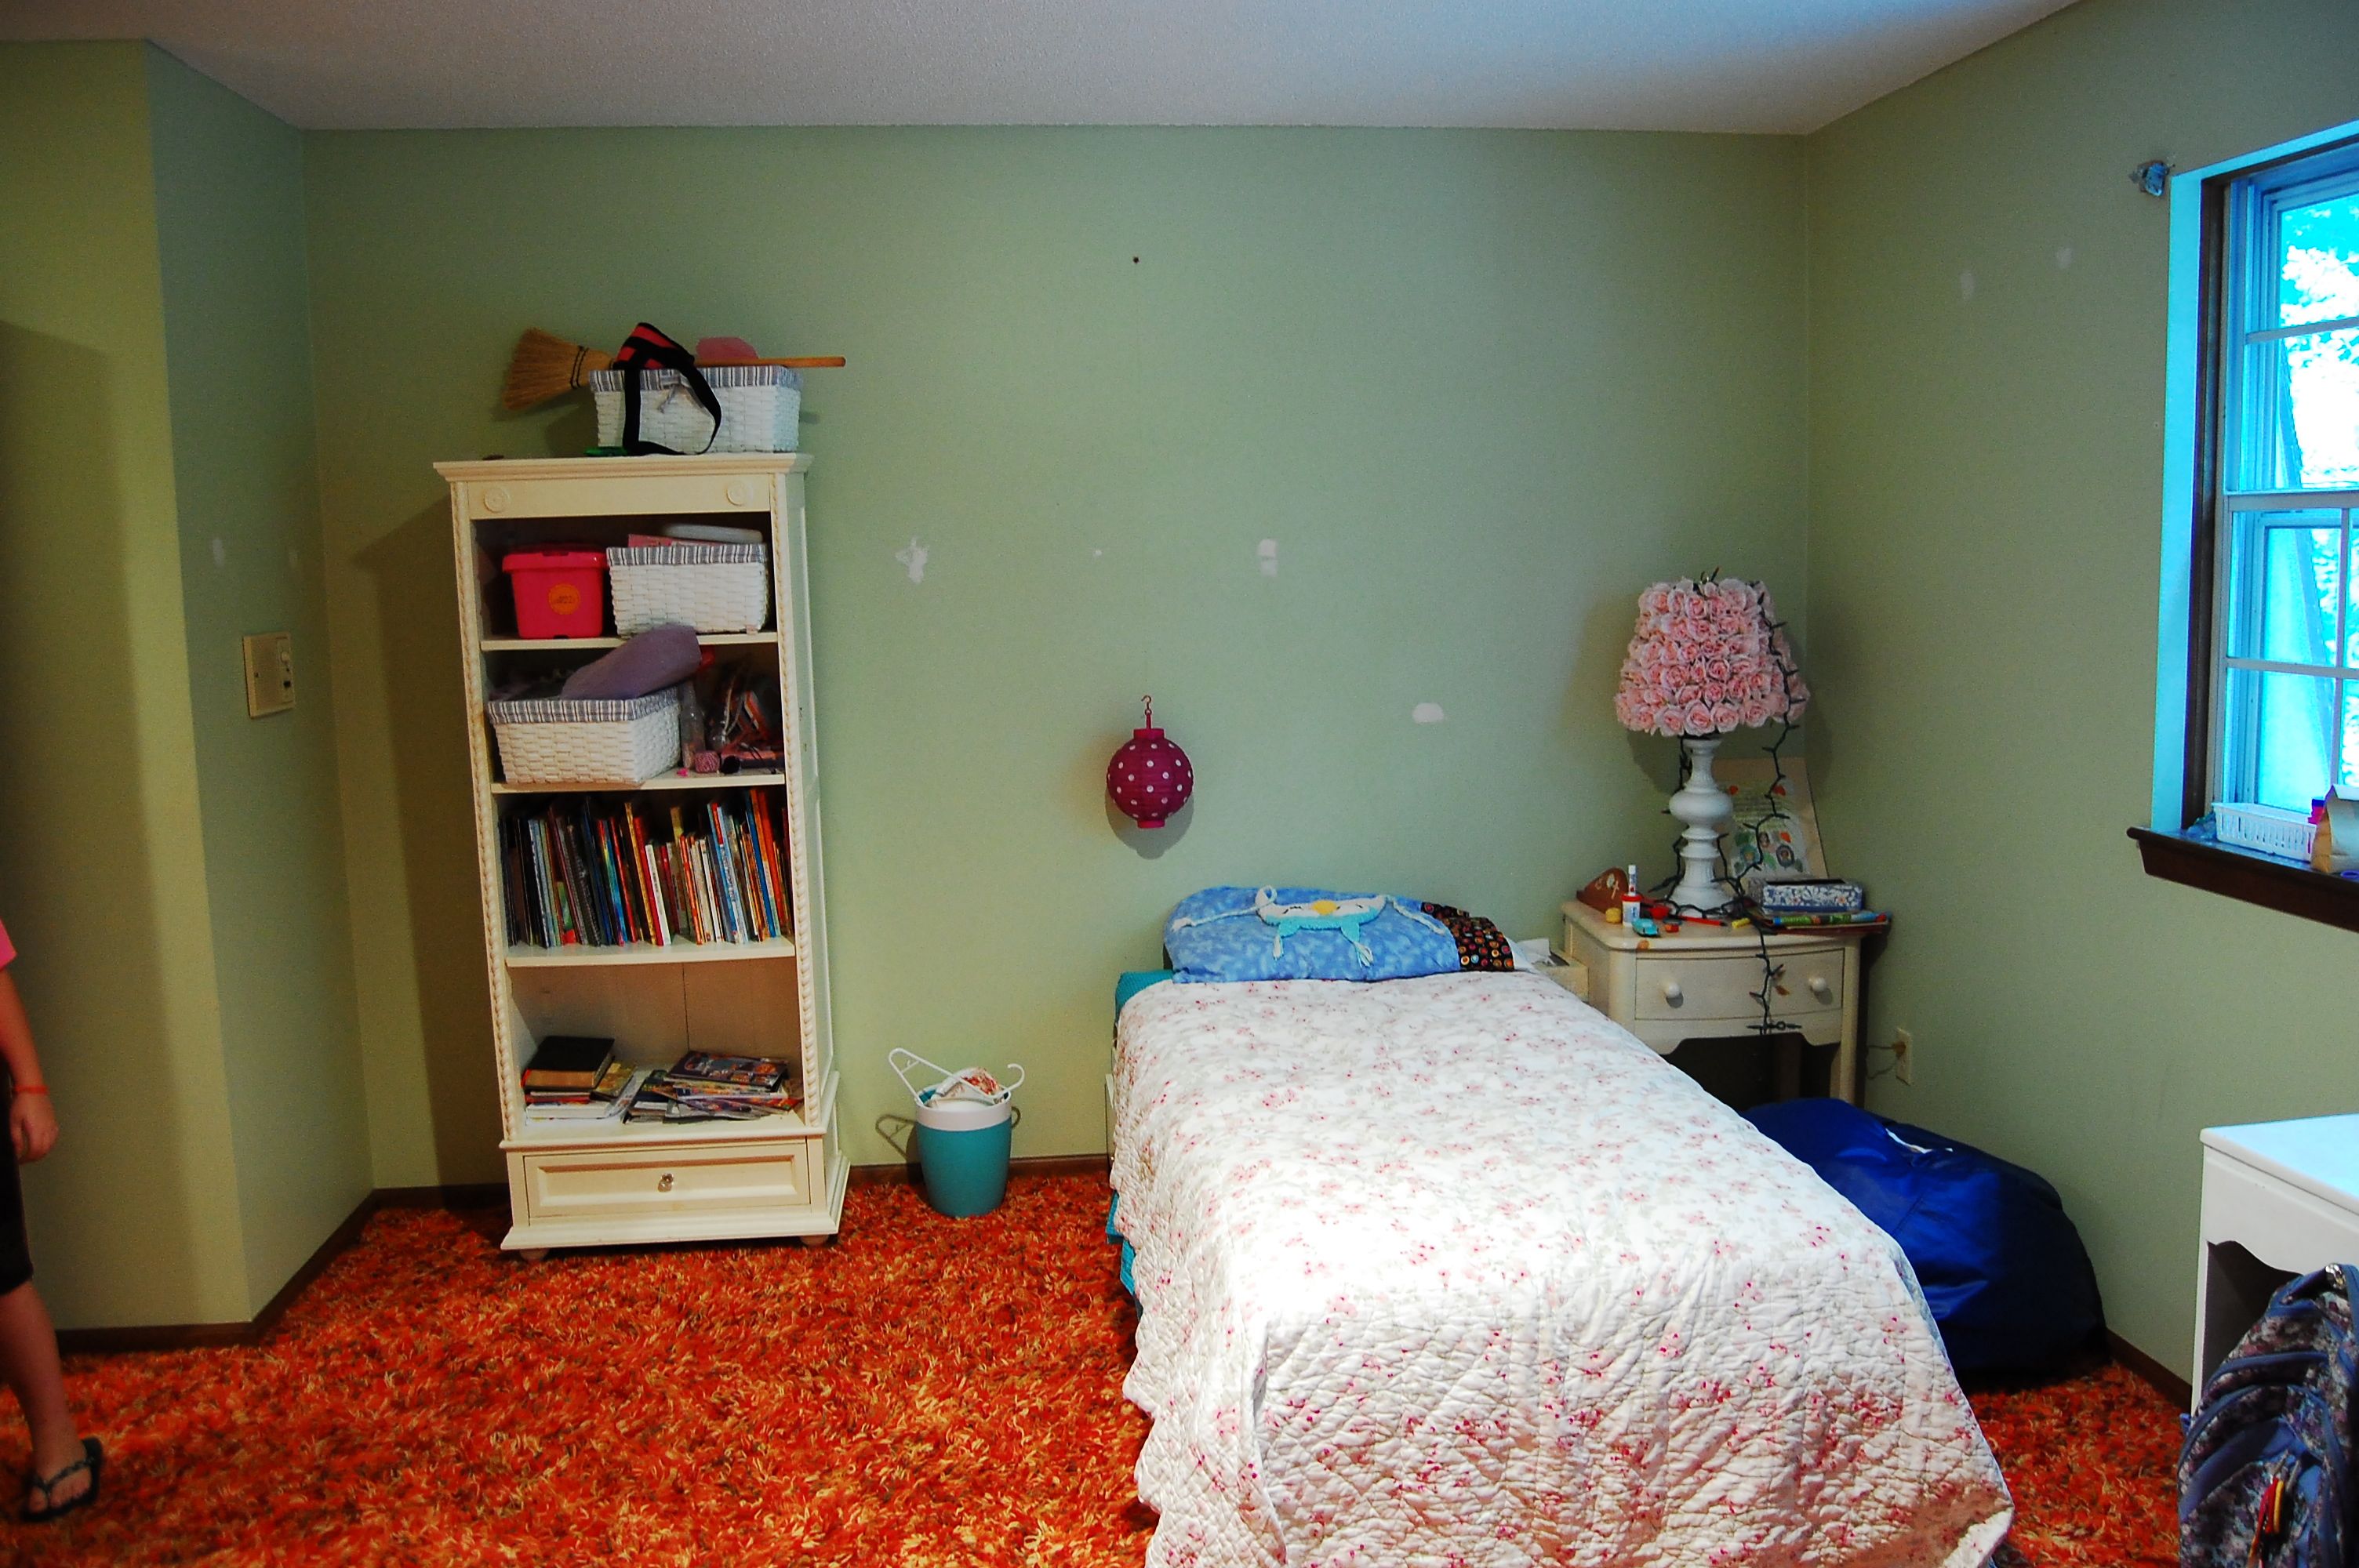
Here’s Heather’s room before:


DSC_1116 DSC_1118
DSC_1101
DSC_1099

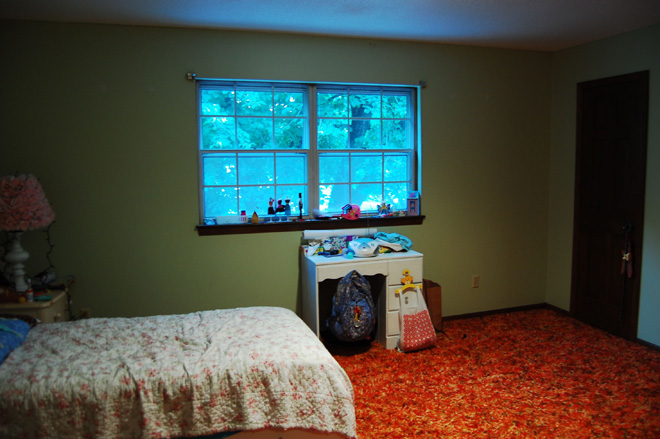
It’s a big room–15 x 11.5 feet.  With a small walk in closet (door above) for storage and a 6 foot traditional hallway closet leading into the room where Heather puts her clothes.

DSC_1108


Here’s a close up of the toy eating orange shag.  In it’s defense, it is super soft and I’m sure it’s super cool.  Only I’m not cool enough to appreciate it….
DSC_1107


Bea assured me it IS super cool.  She said, “You’re getting rid of this carpet?!!!!! I LOVE this carpet.  Can I have it for MY room?”  Sorry, Bea, but it fell apart in the removal process—it is 43 years old you know.

The pretty crew had Heather’s room packed up and empty in 30 minutes.

DSC_1134 DSC_1135 DSC_1136

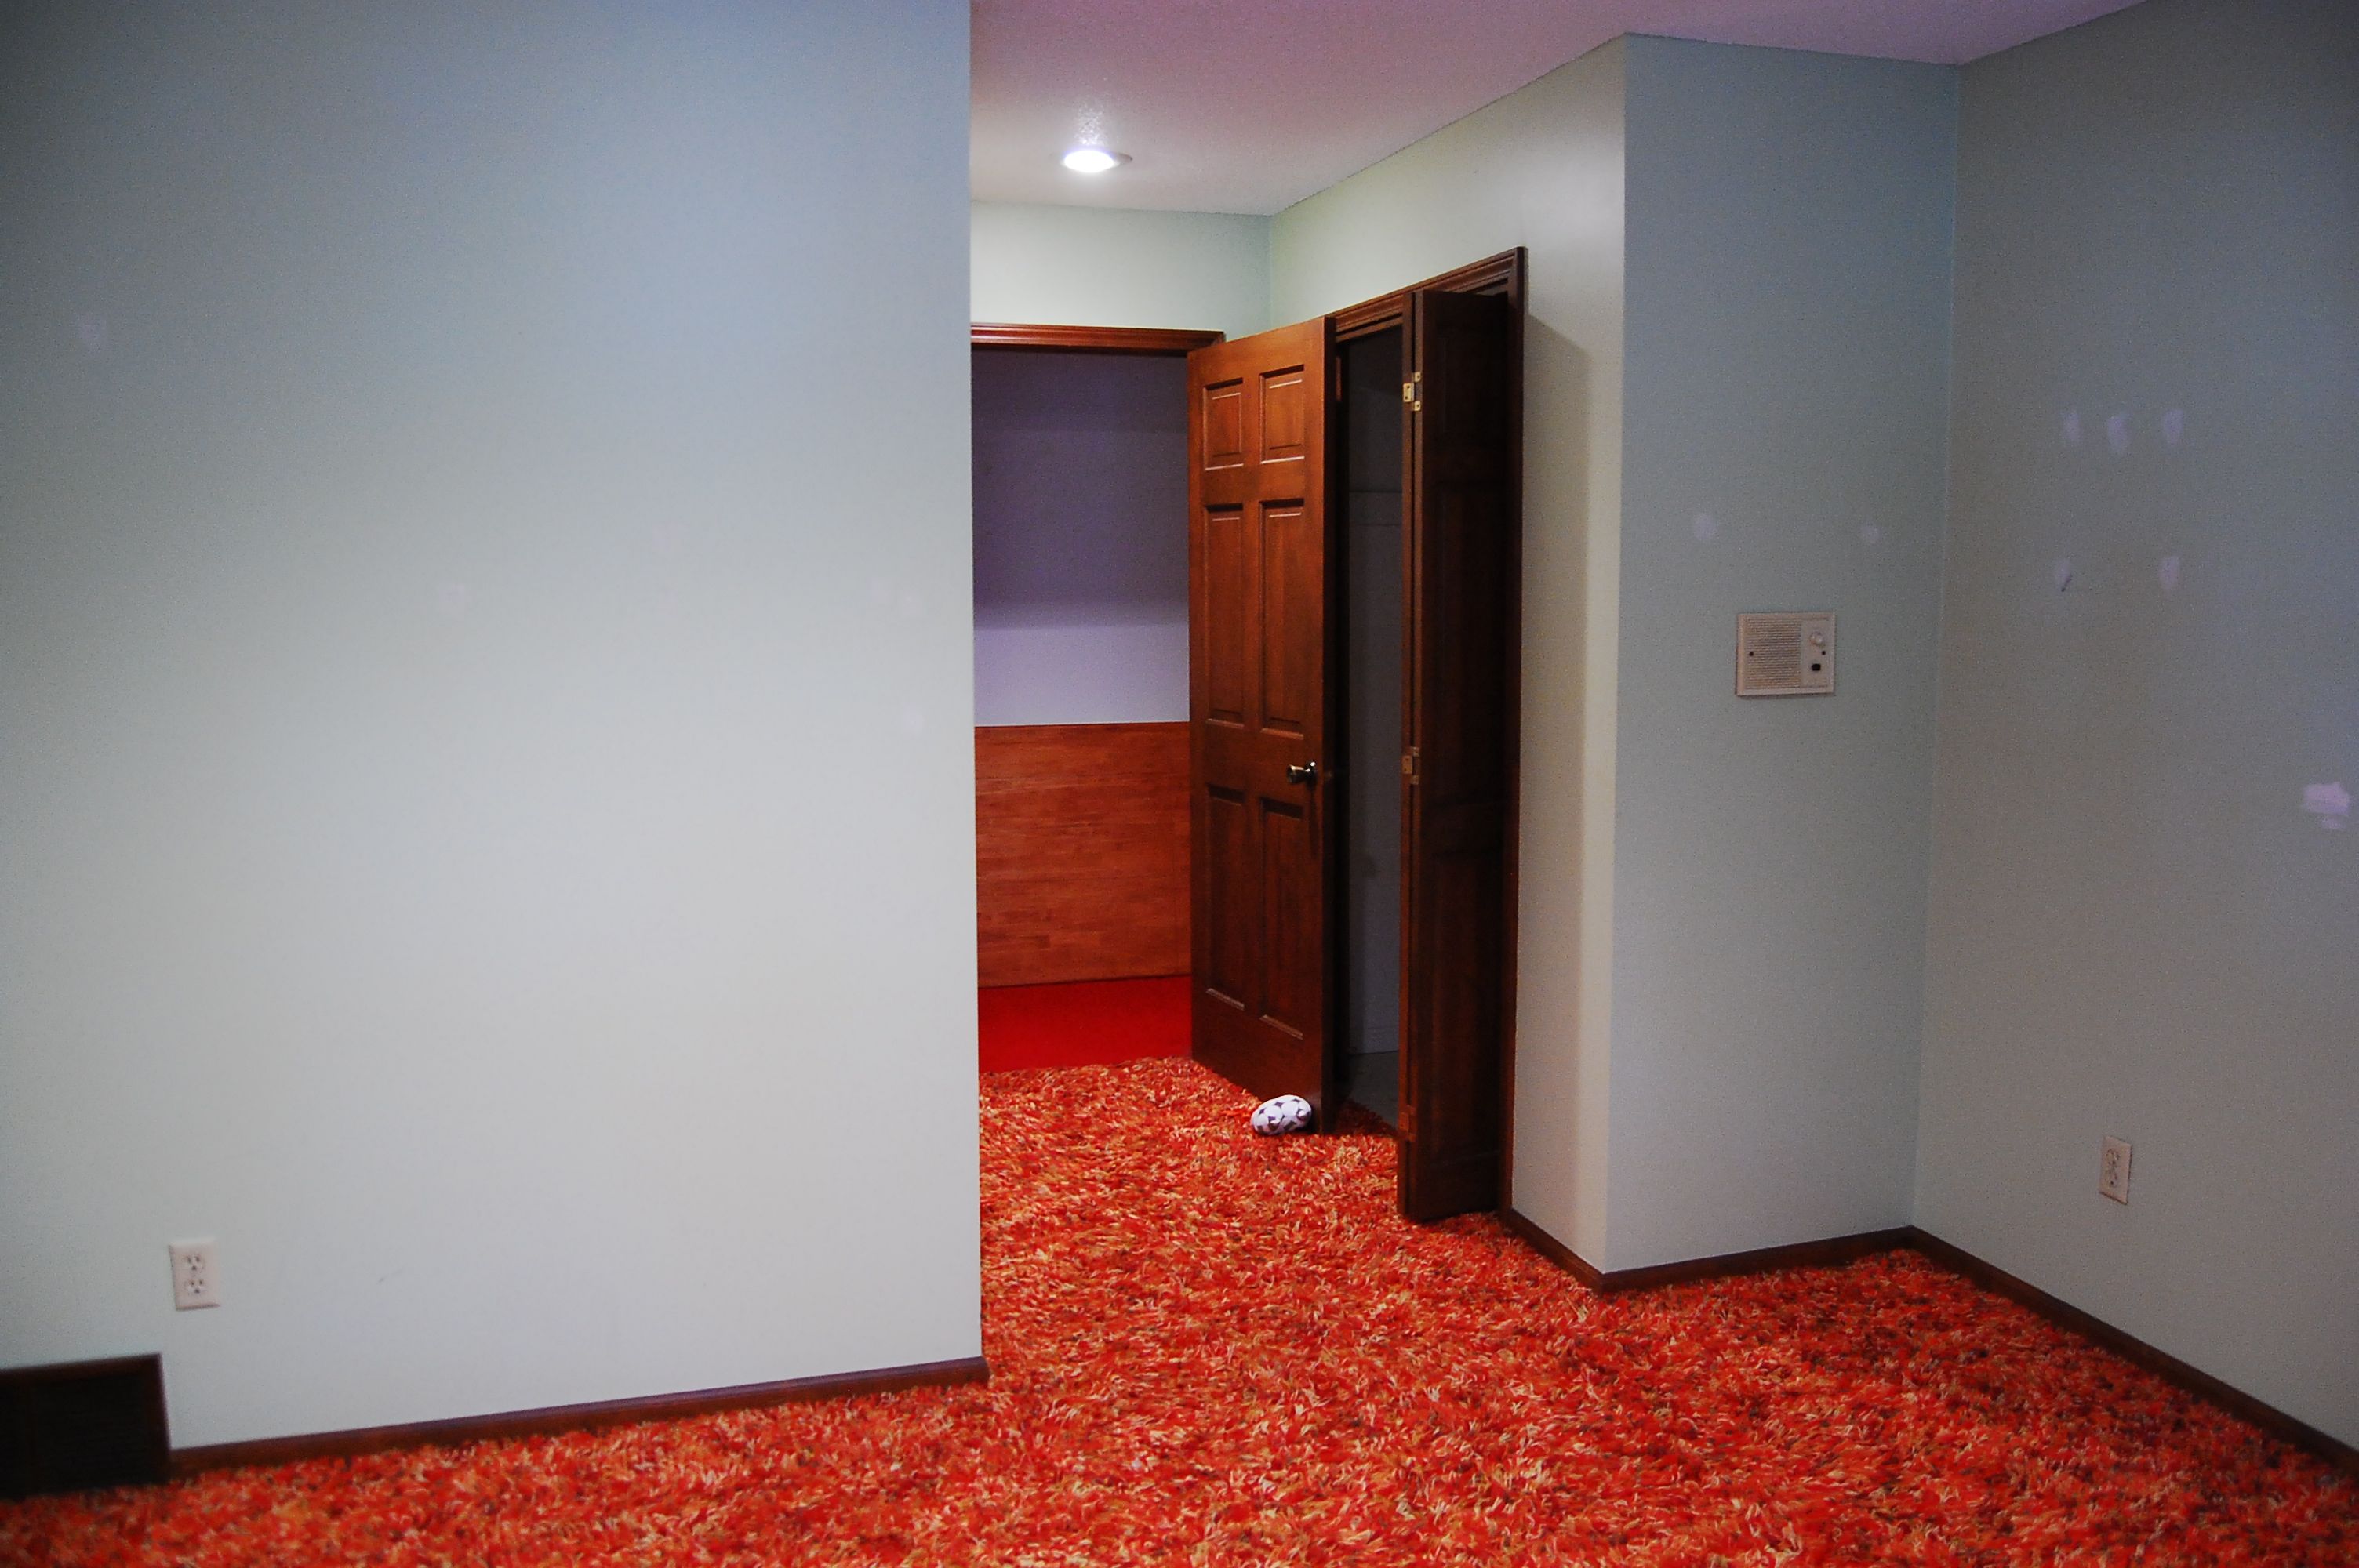
We stacked all the stuff across the hall in a corner of brother Caleb’s room.  He was not thrilled.  It’s only for 6 days, Caleb.  Deep breath.  (Yep his room is original to the house too.  Red shag and check out that wall paper.  He loved it when we first moved in, but is ready for a change too. Only I can’t talk about that right now….too many projects going on.)

DSC_1127

Darren ran out to get McDonalds, because I had hives already just thinking about the next 6 days.  I spent the rest of the evening cutting, hemming, ruffling, pinning and sewing on ruffles for Heather’s duvet cover.  I finally called it quits at midnight.  That’s a lot of ruffles….
DSC_1131


When I’m done, it will look something like this–only in ombre:

Duvet originally from Urban Outfitters, but discontinued.

Duvet originally from Urban Outfitters, but discontinued.

That’s the end of the short day 1.  Tomorrow I’ll show you day 2.

Heather’s Bedroom Birthday Surprise Part 1

We’ve  lived in our gigantic house that needs lots of love for 18 months now.  The first room we did was our oldest daughter’s bedroom.  She is 13 and will graduate High School in 5 years.  It could be 5 years before we get to every room in our home–so we wanted her to be able to enjoy hers as long as possible.

You can imagine how our second daughter felt about all this.  She was a great sport, but it was a little hard to see Heidi’s beautiful new room and to be living in an orange shag paradise for who knows how long. About a year ago, Heidi and I started planning a huge birthday surprise for Heather.  We started a pinterest board for her and encouraged her to pin room inspiration ideas that she loved.

She pinned these:

Whew, that’s a pretty big mix of styles.  And if pressed, Heather doesn’t like to choose just one.  So Heidi and I decided we would try to surprise her, choosing from the elements she loves.  Here’s what we decided:

1.  Curvy daybed with lots of pillows in bright fabrics

2.  Turquoise blue walls (we are going VERY pale to let the other brighter elements in the room take center stage)

3.  Hardwood floors–her previous shag rug ate small toys.  I also want to add a fun area rug–so far it’s sold out and won’t make it here in time for our big reveal :(.

4.  Paint her desk in a fun accent color (we chose coral pink.)

5.  A bed drape with bed crown

6.  A huge furry beanbag

7.  A gallery art wall

8.  A reading corner with hula hoop tent

9.  White trim to make the light blue walls pop

Darren’s mom came and picked Heather up last Friday to spend the week at the farm.  All Heather knows is that it’s her turn with Grandma.  And I don’t think she suspects much even though I’ve had to sew on things while she was home last week.  We have 6 days to complete the transformation–and there’s no HGTV crew here to make the magic happen.

Come back tomorrow to see our day 1 progress.

Bulk Cooking: Slow Cooked Ground Beef

As the weeks drag on without a kitchen, I’m starting to loose it a little.  Our project was delayed in an unforeseen scheduling conflict with one of our professionals and our finish date is two months in the future…..sigh.  But when it’s all said and done it will be worth it.

Part of holding it together, is making sure my family still eats while sticking to our tiny food budget, which DH lovingly raised to $500 a month (for the 8 of us) at least while our kitchen project drags on.  This allows me to buy a few more convenience items to make meal prep in our alternative kitchen space a little easier.

“If only I had a bunch of cooked up ground beef in the freezer!” I thought to myself last week.  That would make life so much better.  So I did a search on all the ways to cook large batches of ground beef–only I don’t have a stove, so it can’t use a wok, lol.

Finally I decided to try it in the slow cooker.  And it worked, beautifully–though until the very end I was sure I had wasted 6 lbs of meat.  Here’s how it played out.

I unwrapped three 2 lb logs of frozen ground beef and stuck them into the slow cooker.  Then I added 6 cups of water, because I wanted beef broth.  To make the broth and hamburger taste good, I added 2 finely chopped onions; 1 Tbs of salt; 1 tsp of garlic salt; and 1/2 tsp black pepper.

The lid wouldn’t close.  No worries.  I covered it as well as I could and cooked in on low overnight.  After about an hour, I could push the lid down.  That made me feel better.

In the morning I had 3 logs of cooked hamburger–oh no!  I was hoping for it to form crumbles automatically while I slept. But the broth looked delicious.

I chopped up the meat into huge chunks and then used a colander and bowl system to drain out the broth.

It had great color and smelled amazing.  I was surprised what little fat hardened on the top after it cooled.  This was grass fed beef direct from the farmer.  I could see the quality when cooked this way.

I was pretty sure at this point that it was all a waste.  But I decided to try the two fork shred method that I use on my pulled pork. I ended up mashing it with the back of a huge fork.  It worked beautifully–and fast. Perfect fine crumbles of ground beef!

I divided up the meat into 5 freezer bags.  Each one weighed about 1.4 lbs. And pressed them flat.  Once they were cool, I put them in the freezer.  

I got about 2 quarts of broth also.  It smells and looks so yummy.  I’m definitely doing this again.  No more thawing meat, no more standing over a hot stove.  Win win win.


Sew a Child’s Painting Smock: Tutorial

In an effort to save money on school supplies, I’m stitching up a painting smock for Brandon, the Kindergartener.

IMAG2168

I started by following this tutorial.  It is excellent!  I made some changes since Brandon is too big for this size and I didn’t have any oil cloth in my stash.

I did a quick search at fabric.com for oil cloth–just to see if I could justify the cost.  They have adorable prints averaging $15 a yard.  You only need 1/2 yard of fabric to make this, so $7.50 for a cute paint smock isn’t too bad. (But you’ll need to order extra stuff so you can get free shipping :).) Hobby Lobby also has some cute laminated fabrics in their decorator aisle and 40% off coupons available.  If you bind the edges with bias tape, you can wash it (The glue holding the fabric to the vinyl will wash out and separate the two layers without stitching them together in advance.)

Since I’m trying to do this without spending, I put my thinking cap on and remembered I had some clear vinyl in my stash.  So I layered it with a cute cotton print for the same waterproof effect and no money out of pocket!

Materials Needed:

1/2 yard of printed cotton

1/2 yard clear vinyl

4 yards of double fold bias tape

2 inches of sew in hook and loop tape, cut into two 1 inch pieces

1.  Cut a rectangle 40-44″ (selvage to selvage) by 17-18 inches wide. (Straighten your half yard of fabric and see what you have left.)

2.  Fold it into fourths and use a t-shirt to trace a neck hole.  I used a pencil and traced following the seamline underneath.  And cut it out.  While it is still folded round the lower corner (on the opposite edge–none of the rounds should be over a fold–I messed this up the first time.)

image


image

3.  Open up the rectangle and place it face down on the vinyl and trim it–giving yourself about 1″ extra vinyl all the way around.  Pin it with hair clips to keep from making extra holes in the vinyl.

image

4.  Now baste the two pieces together on the machine.  It helps to sew with the vinyl side up and if you have a walking foot, definitely use it.  Mine is broken, so instead I reduced the pressure foot tension a little and reduced the upper thread tension from a 5 to a 2.  (This kept the lower fabric from gathering up as I sewed.  It also helps to have room to lay your stuff out flat to the left of the machine.

IMAG2157

5.  Don’t forget to baste around the neck hole too.  Then trim the vinyl to the same size as your fabric. It looks best if you trim very close to the basting stitches cutting both the vinyl and the cotton.  This makes sure your basting won’t show after you bind it.

IMAG2161

6.  Bind everything with bias tape.  I used a triple zigzag stitch to make sure I caught everything well. I only had narrow bias tape in my stash, but would have preferred wider stuff.  Mine was super vintage–$.45 a package!  And I’m not sure, but I bet they don’t come with 4 yards in a package any more.

IMAG2160

Stitch #8 is the triple zigzag

Stitch #8 is the triple zigzag

7.  Measure 9″ down from the shoulder fold and place velcro or a button on each side to hold it together. I zigzagged all the way around the velcro outside edges.

IMAG2163IMAG2166

All tucked in his school supply bin ready for the first day of school.


School Supplies and the Budget Part 2

Now that I’ve paid attention this year and see what school supplies cost, I’ll know to budget $25 per child next year. Plus more for shoes. We can split it up over the year and put $10 a month into an envelope tucked away in the safe. Or we can choose to fund the whole thing in July. I’ll let Darren decide, but usually we do the little bit a month method.

I’ve found Wal-mart to have the best prices overall for school supplies. Target’s stuff is cuter, but a tiny bit more. If you have a few dollars extra in your budget, it’s nice over there.  And occasionally you can find a great deal at an office supply store or a corner drug store, such as fill paper for 25 cents a package, limit 2. Usually though the rest of their supplies are over priced to compensate for that low price to get you in the door. You’ll pay more overall just to get that deal, unless you only grab the low price items and are willing to go to more than one store to get everything you need.

Dollar Tree has school supplies too and some of them are a great deal. Others are cheaper at Walmart–such as rulers; composition notebooks, and stretchy text book covers. Know your prices so you aren’t fooled.

Here’s the best money saving tip I have:

image

At the end of the year, collect all the school supplies they bring home and sort them into “trash” and “reusable” piles. I keep them in a plastic tub tucked away for next year. We “shop” there first when the school supply lists come out. I cleaned up everything with a soft cloth and spray cleanser until it looked like new. We were able to reuse scissors, rulers; pens; pencils; highlighters, backpacks; binders etc and keep our costs down for new items to $20 per child.

wpid-IMAG2146.jpg

School supply items are cheapest this time of year. Crayons will likely double in price after labor day, as will brad folders, fill paper and spiral notebooks. I usually buy a few extra so we have them to use the rest of the year in emergencies. And for gifts–like to pair with a handmade crayon apron and a cute Dollar Tree coloring book.
crayon apron


il_570xN.45494599

il_570xN.45494518

School Supplies and the budget Part 1

I have 5 children going to school this fall.  How can this be?  Grant and I are going to have a wonderful time together just he and I. But we will be excited for the brothers and sisters coming home in the afternoon!

I miss homeschooling sometimes….the total influence I had on their lives. Always being together. I could decide what I wanted them to learn and make it happen.  But sometimes my dreams and reality didn’t always mesh. Poop happened.  Dirty dishes distracted me.  The baby cried so loud we couldn’t hear each other and he refused to sleep. Every child sometimes said, “Mama, mama” at the same time and my head would pound.  And when I was busy with one, another might sneak off in a quiet corner and read….and I might not miss him for awhile…because he was so quiet.

Homeschooling took all of me–my every minute.  And I would sit and wonder what I could do with my business if I had a little more time.  (Which is funny because now while I work on my business I sit and think about what it would be like to be with my children instead.)  I was a public school teacher before children and could easily handle 25 kids in a classroom.  When I taught school, there were no babies to poop and cry, no laundry to wash, someone else cooked our food, and cleaned up.  All I had to do was focus on those kids.  But still, if the time was right, I’d homeschool again.

image

Dollar Tree baskets hold each child’s school supplies off the floor in my office until the first day of school. Somehow it looks messier in this photo than it feels in real life. The shelves will be getting some TLC while the kids are at school.

While somehow they got a great education at home, they are getting a great education at our little private school too.  They enjoy seeing friends and doing messy projects (that I never managed to fit in.) I love that they are memorizing scriptures and having prayer service together. And I love teaching High School choir there….LOVE. IT.  I love the friendlier relationship I have with my kiddoes now that I’m not the one assigning the work. So this time of year comes a little bittersweet for me.  It’s a chapter in my life I never saw us living…but the living is good.

Anyhoo, We purchased most of our school supplies this week.  And for 5 children that added up to over $100!!!!!  That was without the backpack or art smock for our kindergartener or the 12 pairs of shoes we need.  Yep you read that right, 12 pairs—gulp! Or the complete set of scriptures for my 2nd grader….not sure how we are going to do that, but God always provides.

We somehow missed budgeting for school supplies…..??? Um, they come every year.  So I think I may dust off my sewing machine and use up some stash to fill our needs.

Check out this adorable back pack:


Source: From pinterest--cites Made-By-Rae but link is broken.

Source: From pinterest–cites Made-By-Rae but link is broken.

This next backpack has a complete tutorial.  I’ll leave off the front pocket since Brandon just needs to carry a folder and his lunch and then add the spikes form the photo above.  I love her method for the straps:

Source:  http://uniquety.blogspot.ca/search?q=back+pack

Source: http://uniquety.blogspot.ca/search?q=back+pack


And this art smock

Tutorial: http://creatingbycami.blogspot.com/search/label/Art%20Smock%20Tutorial

Tutorial: http://creatingbycami.blogspot.com/search/label/Art%20Smock%20Tutorial

And thinking ahead to cooler weather, I love these mittens:

Tutorial here:  http://mmezsazsa.blogspot.com/2010/02/celebrate-dino-mittens_27.html

Tutorial here: http://mmezsazsa.blogspot.com/2010/02/celebrate-dino-mittens_27.html

They look so easy to make. I might add a ribbing cuff to keep them on better. Wouldn’t they look darling with a dino backpack?

What if….

…I ran my home like a summer camp?

There’d be:

Rise and Shine–at the same time every day.

Morning worship.

wpid-IMAG2056.jpg

Breakfast and KP and bathroom cleaning (and songs during clean up.) (And of course staff to cook and young men to serve it ….bwa ha ha.)

Cabin Inspections in the morning with public recognition and prizes awarded during dinner.

Rest time

Swimming…..hmmmm (Not sure how to do that every day at home….but thinking.)

wpid-IMAG2098.jpg

A sit down dinner together

wpid-IMAG2136.jpg

Best Friends–that’s me (on the right) and my matron of honor (on the left)-it had been nearly 20 years since we served at a camp together. So. much. fun.
image

Teamwork: (Their job was to keep the giant sea-saw balanced while they move into order by height.  This was my cabin of lovely ladies. Only my daughter’s face is turned to the camera in this shot so I can share it with you. They were really good at this activity.)

Campfire

image

Bedtime Snacks

Evening Devotions

and off to bed.

Sounds wonderful.
wpid-IMAG2127.jpg

We just got home from Camp Tiona.  The schedule was packed tight and I enjoyed every  minute of my only job being to be with the girls.  I’m glad my daughter, Heather, was in my cabin this year, but next year we plan to let her be with someone else.

Camp ran like a well oiled machine and a lot had to do with the schedule and being with friends made clean up that much more fun.  But more than that, the girls were rewarded with a bead for their name tag necklace for doing things well.  It was amazing what they would do for a bead or a little recognition.  I’m not much different as an adult.  I love recognition and attention–I’ll admit it :).

So while we unpack from camp and gather our supplies for the new school year, my mind is searching for ways to have more family time–less crazy time, less unproductive time; more relationship time. And to somehow do it without giving up every extra social or learning experience.  I’ve tried schedules before and they wear me out…but maybe if I tried one that wasn’t so packed, that had time for rest and reflection.  One with built in recognition and motivation for doing jobs well…maybe it would work.

How about you?  Do you you have a schedule or chore system that works for you? Have you tried one that you loved for a few weeks and then didn’t anymore?  I’d love to hear about it in the comments.

Disclaimer (all recognizable pictures were of staff or my own children for the privacy of the families.)


Happy Belated 4th of July!

We had 4 celebrations.  One with our previous congregation in the farming community of Maysville; one at the lake where my Sister-in-Law’s Father lives (no relation to me–so it was super generous of them to invite all 8 of us–every year!); One quiet one with a couple from church where we fed the pet catfish in their aerated pond and then learned to make Kombucha tea in their basement. And the final one was at Darren’s parent’s farm in Stewartsville.  It was super fun to spend so much time outdoors and with amazing people, but I have to admit I hit the wall by Saturday.  Laundry was piled high at home and I was full of rich food–and trying to loose weight in FYMs Summer transformation challenge.  But looking back I have everything to be grateful for.

See what I mean?
image

image


image

image

DSC_0856
DSC_0869 DSC_0885 DSC_0789 DSC_0796 DSC_0801 DSC_0810 DSC_0816 DSC_0845 DSC_0860

Hope you had a wonderful Happy Birthday USA celebration too!


Protein Rich Fudge Cookies

Protein Fudge Cookies


Things are super busy around here.  I’m trying to finish my menus today so I can join the family in 4th of July celebrations tomorrow.  But I thought I’d take a break and tell you I have a yummy recipe over at my fitness blog.   There are two version of these cookies, each with slightly different nutrient profiles depending on what your goals are.  But they are both sugar free and loaded with protein for a great snack that will support your fitness goals.

Homemade Canvas Wall Art

This is not a new idea.  It’s been floating around Pinterest for awhile.  But I tried it and thought I’d tell you what I thought.

I purchased pdf printable files from etsy here. They were $3.50 for each design and I purchased 5 different designs.

DSC_0301

This one is for my girls:  I chose the gray one for Heidi and the brown for Heather.

il_fullxfull.427557840_6l69

I also got this one for free.  There are lots of different color options over at her site.

16x20LOVEABOUTHOMEweb-1

After I got all the prints I wanted I uploaded them to the Costco online photo printer.  I chose the 16×20 poster print option (not the poster board option) for $5.99 each. I made a big mistake.  It’s automatically set to color correct which does NOT correct colors.  It makes them all wonky.  You have to un-click that before completing the order or it won’t print right.  They were kind and reprinted my order for free, but it was a hassle since I didn’t look at the prints until I got home and had to go back and stress about it.

Once I got the prints correct I headed out to Hobby Lobby.   I bought their bargain priced 16×20 stretched canvas that come 2 to a package.  I can’t remember the exact price but I think it is $6 before coupon. (But if you were planning ahead you could just grab a pack each time you went in and use a 40% off coupon on each.  Since these are already so low priced, they aren’t included when the other stretched canvases go on sale.)  I also grabbed a small bottle of craft paint to match each poster; and a bottle of matte modge podge.  Matt makes it look more like canvas.

So here’s a quick list of what you’ll need:

Drop cloth

Paint brush

Modge Podge

Stretched Canvas

Art Print

1.  First paint the edges of the canvas to match your print and let it dry.
DSC_0297

DSC_0298

DSC_0303

2.  Then spread a thin layer of modge podge evenly over the front of the canvas.

Center your print on top and smooth it down so there are no bubbles.  Start in the center and work out. Let it dry. The print will look shiny and not at all like canvas.  You will wonder if you should have just spent the extra money to get your poster printed on canvas in the first place.  Hold on–it gets better.

3.  Use a bristle brush to brush modge podge over the whole top of the print.  At this point you will think you messed up. The white of the modge podge will look splotchy and the brush marks will show.  But the print won’t smear.

DSC_0317

4.  Let it dry and cover with a second coat.  Let this one dry too.  The brush marks will give texture to the top of the print and stay after drying.  This makes it look more authentic like canvas, though the texture is not the same.

Then they are ready to hang:

DSC_0346
DSC_0341

DSC_0348 DSC_0327

The colors came out wonky in the above picture but I wanted to show you that I picked prints to coordinate with the Boy’s bath rug.  Each boy has his own color and a towel to match.  It’s a tiny room, but big enough for the boys :).

Heather’s print isn’t up yet.  She doesn’t read my blog, so I can tell you that we are planning a HUGE surprise for her 10th birthday.  Her room is still original 1972 green and orange shag carpet with walls to match.  No art, no window treatments….You  get the idea.  In August and we are sending her to the farm for the week while we surprise her by redoing every inch of her room.  I’m planning the project while we work on the kitchen, so it feels a little crazy and I’m hoping that we get the kitchen done on time so it will all work out.  Heidi is helping me pull everything together.  We have been buying things all year and saving them in a corner of my office ready to put it all together.  It will be one of the fastest room redos. I’ve done and I’m afraid we will feel like we are trying to pull off a HGTV style remodel without any staff.