Makeover Monday: Grace’s Kitchen

Grace was a camper in my cabin many years ago when I was a counselor at Jr. High camp.  She has always been tender hearted and giving, a true beauty inside and out.  They recently expanded their family of 6 to a family of 8 with the addition of two foster children, and their 3 bedroom, 1 bath house felt a lot smaller.
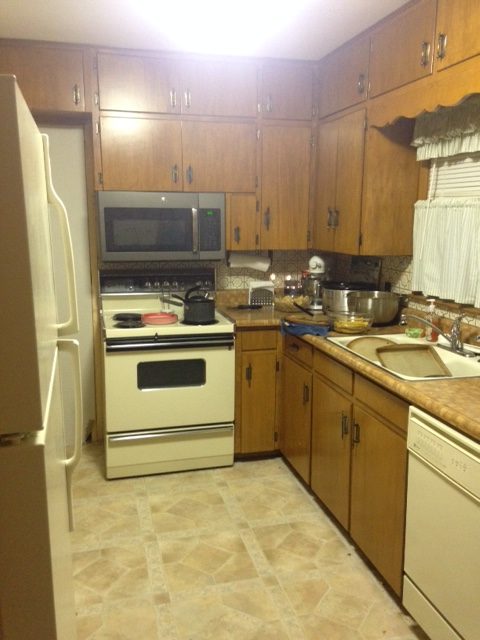
The doorway to the left of the stove is where the old dining room door was.  Now that it’s walled off, her fridge can go there.

This winter they sold their home and moved to a fixer upper just a few streets over from me.  The whole family pitched in together to wall in the dining room to make another bedroom. They also added another bedroom to the one already finished in the basement.
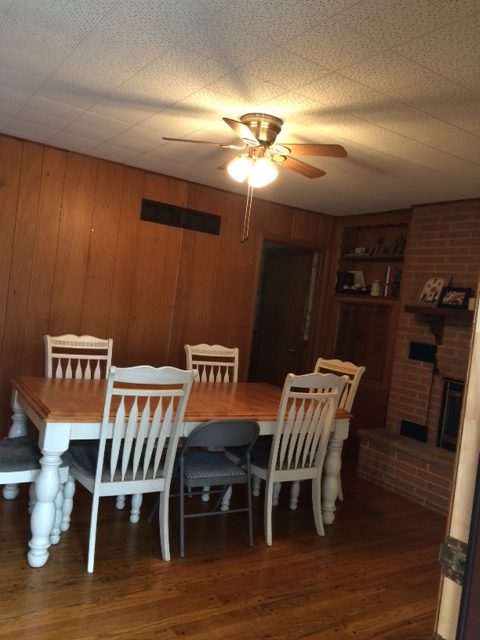
The wall straight ahead needs to come down.  It’s a load bearing wall, with ductwork and electrical in it, so it’s not a simple job.

Grace hosted a youth activity at her home a few weeks ago and invited my kids to join in the fun.  When I dropped them off, I was super excited to peek at the new digs.  She had two living rooms side by side. They turned one into the new dining room since the existing dining room was now a bedroom.  She mentioned her dream of taking down the wall between that room and the kitchen and adding an island for a more open feel and more workspace, and I offered to show her what it might look like in photoshop.
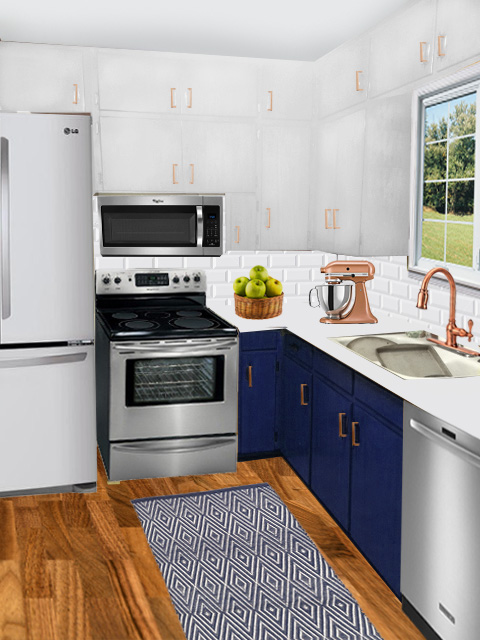
For her kitchen I removed the scalloped window trim and painted her upper cabinets white and the lowers navy blue.  And gave her copper drawer pulls, faucet, and mixer to warm up the space. The navy runner is from Dash and Albert.  The new fridge is tucked next to the stove, giving her room to blow the wall out to the left.
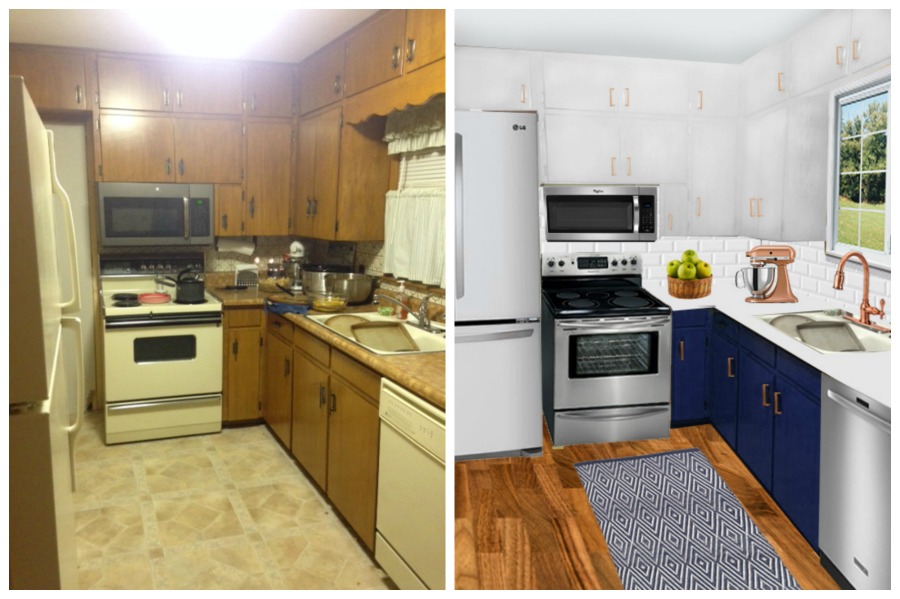
Here’s a side by side view.
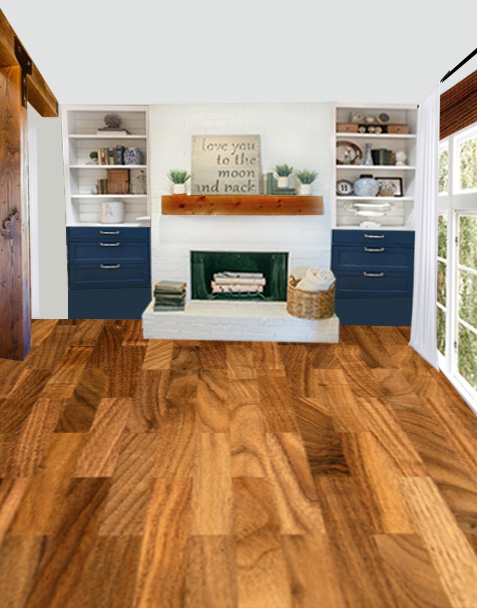
In the dining room, I rebuilt her built in cabinets to be symmetrical, then gave them the same navy/white combo as her cabinets to make it feel like one big room.  I used a chunky beam to support the house with the wall gone and moved her duct work to the east wall. The electrical outlet can go right on her island between the two rooms.  Her fireplace got an update with white paint and a chunkier mantle.  Her original dining room table is already the perfect style and size to pop right back into the room, and with the table in place, she can put in a signature light fixture over the table.
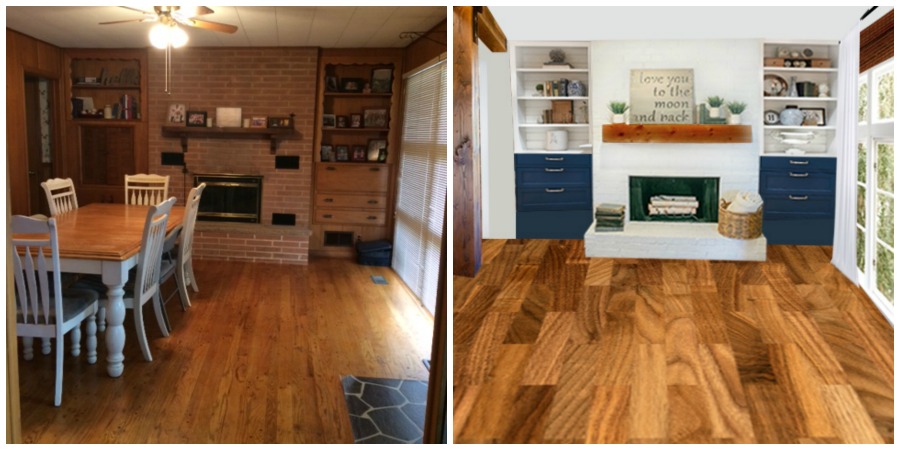
Her original ceiling is tile, but since the wall is coming down anyway, I suggested they put drywall up instead.  I replaced her mini blinds with bamboo shades and simple white Ikea curtains.  I love her original floors, but with the wall down and the kitchen floor not matching, I showed them what it would look like to use vinyl click floor instead.  It looks like wood but it’s 100% waterproof and less prone to scratches than wood floors.  That’s a good combination with a lot of young kids around.

Would you like your room photoshopped and featured on Makeover Monday?  Send a few photos from your space to angela@groceryshrink.com and tell me your hopes and dreams for the room.  

Get a full service virtual makeover complete with 3D room layout plan, 2 photoshop views, step by step work list, and source list–all in your budget. Find out more.

room-makeover-short-banner

Learn how to use Photoshop your own designs with the Room Makeover class.

Makeover Monday: Peggy’s House

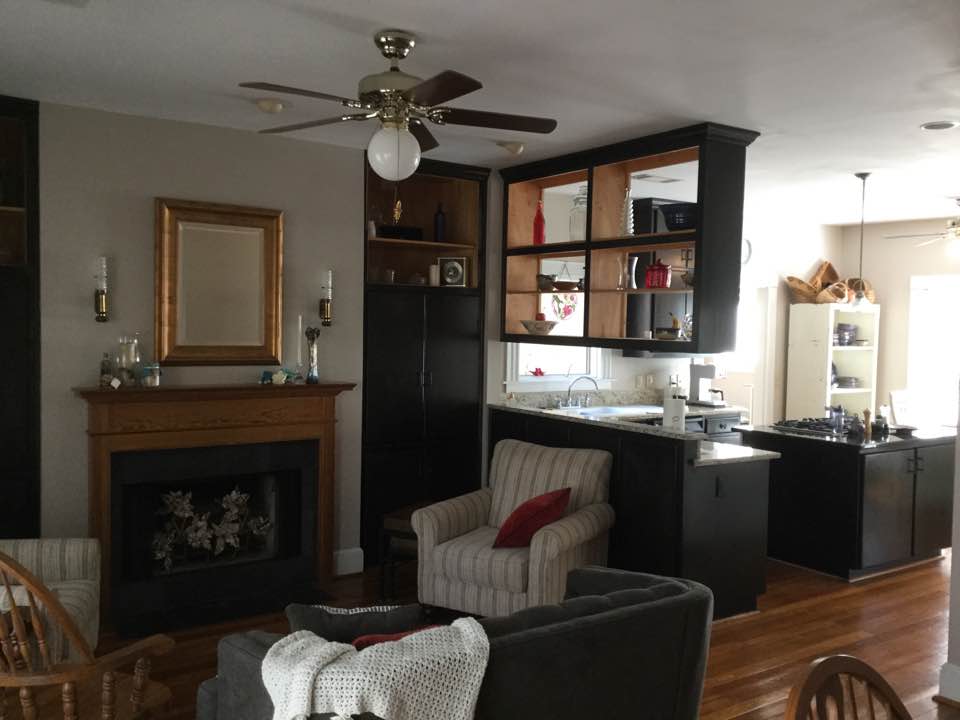
Peggy has a nice open floor plan with a kitchen, hearth room, and dining room all connected.  It has beautiful built ins and lots of windows, but it still felt dark to her.

She asked for advice in the Cozy Minimalist community for the hearth room only, wishing she could paint the built in cabinets and fireplace white, but afraid it wouldn’t look right with the black cabinets.

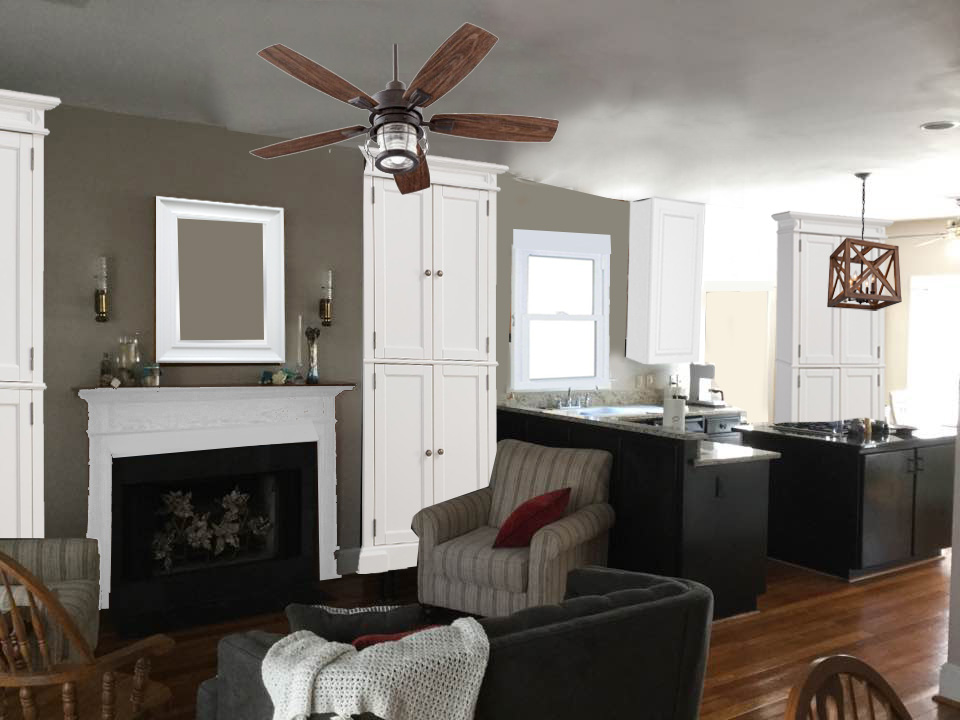
We were all distracted by her upper kitchen cabinet blocking the line of sight.  She had made it a lot better by removing both sides of the doors to allow some light through. She stores bowls in it that she uses frequently and was not excited to give up the storage.  I made a little photo for her so she could envision what it might look like all opened up with the white she was craving.

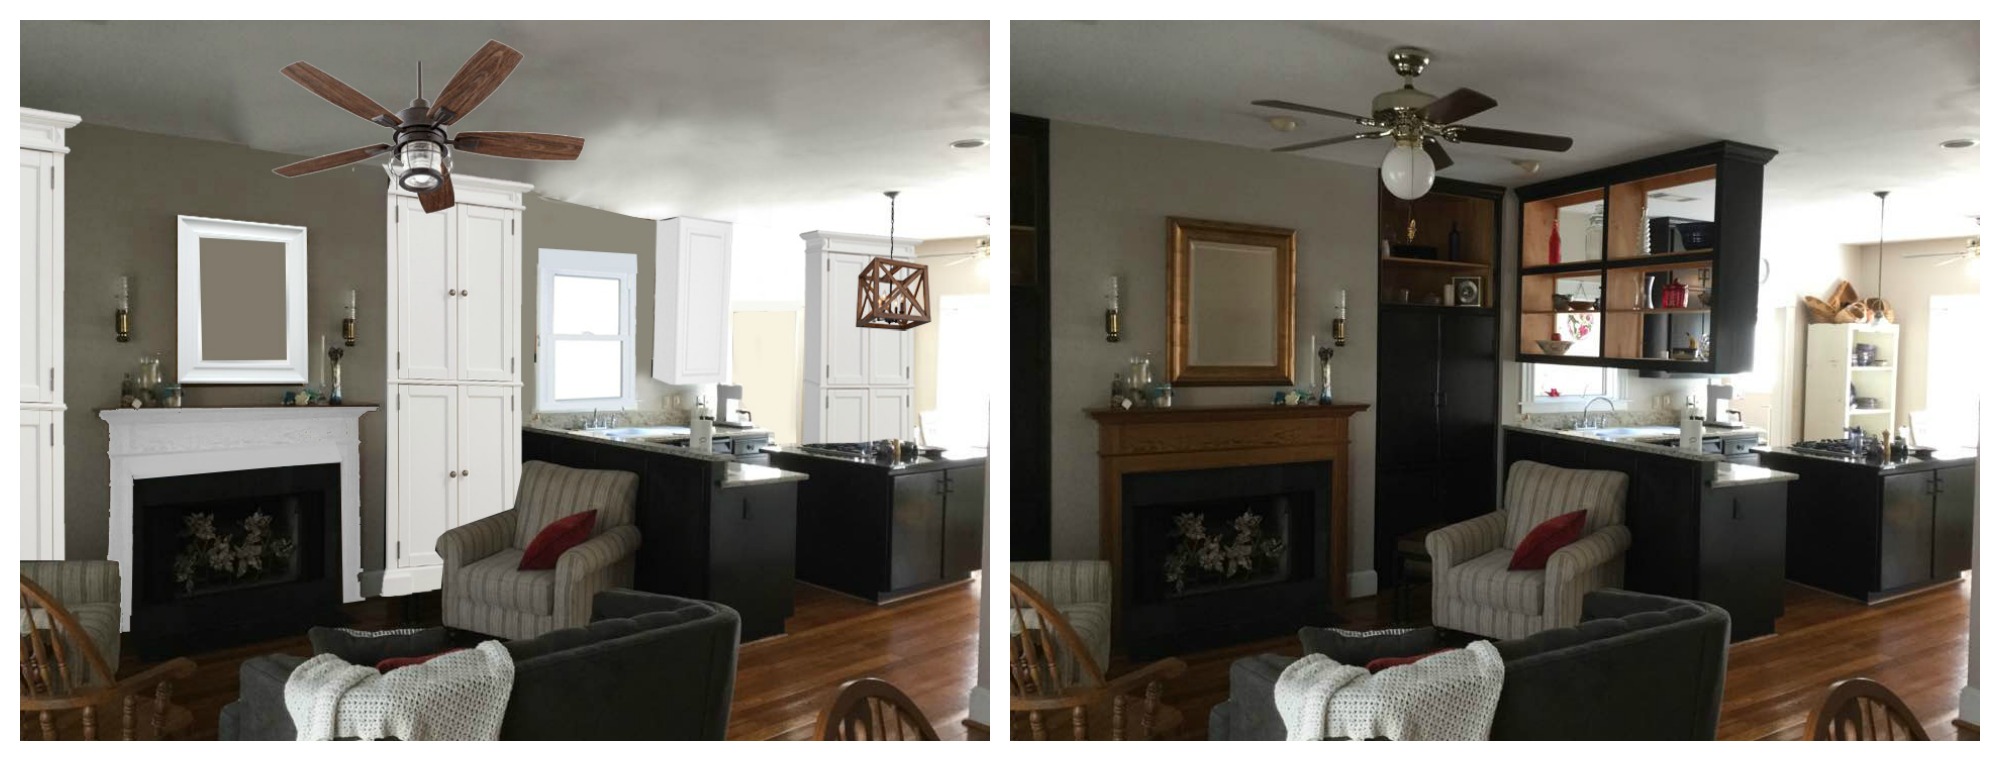
I removed the hanging cabinet and painted her remaining upper cabinet white. Matching crown molding around it would tie it all together even better.  Then added a floor to ceiling built in cabinet, a simple box made from plywood with doors and crown moulding, where her shorter bookcase was before.  Build it with free plans here. This would give her back the storage she lost without taking up any more space.  Just for giggles I added matching doors on her existing bookcases with the white mantle and mirror.  I also switched out her light fixtures for a modern farmhouse look.   I used her existing mirror over the fireplace, but I think a big round mirror would look even better.   Here’s the before and after side by side.

Peggy was concerned about the expense of refinishing the ceiling under the cabinet, but her ceilings are perfectly smooth.  In this situation, the ceiling is usually finished underneath and all she would need to do is fill in the screw holes with some quick dry spackle and touch up the paint.  I didn’t change her paint color in the new picture, but all the white accents make it look darker than when it was by the black.

Would you like your room photoshopped and featured on Makeover Monday?  Send a few photos from your space to angela@groceryshrink.com and tell me your hopes and dreams for the room.  

Get a full service virtual makeover complete with 3D room layout plan, 2 photoshop views, step by step work list, and within your budget source list. Find out more.

room-makeover-short-banner

Learn how to use Photoshop for your own designs with the Room Makeover class.

Little Chocolate Pots

This recipe has changed my week.  It’s one of the rare “health” foods that my kids are crazy about. I tested it for next week’s FitMama meal plan and thought I had double what I needed.  But my oldest daughter is singing a solo at district contest for the first time today and Monday she walked in the door a complete emotional wreck.  When I handed her a little chocolate pot, words were no longer necessary.  I loved knowing it was a tiny bowl of superfood to nourish her adrenals and her brain.  It wasn’t a false stab at comfort food that would fill her body with garbage and drag her down further.

The tiny little bowls were from Big Lots.  At $2 each they were an affordable splurge.  I love the texture in the stoneware on the outside and the crackle glaze inside.

The only unusual ingredient in this recipe is Xylosweet.It’s a sugar free sweetener derived from probiotics+corn that I feel ok about using.  It tastes like sugar without messing with your blood sugar. You can use any sweetener you prefer or have on hand.  Another good choice is Monk Fruit In The Raw.  You can also use Truvia, but if you find it bitter, pick one of the other two.

Superfoods:

Coconut Oil: thermogenic to boost metabolism; nourishes the brain and helps memory; reduces inflammation and boosts the immune system; nourishes skin, teeth and hair; anti-fungal and anti-microbial

Unsweetened Cocoa Powder:  Rich in fiber, protein, and anti-oxidants; boosts metabolism

Collagen:  Builds strong hair, skin, and nails; soothes the lining of the intestines and helps with digestions

Eggs:  Full of protein, vitamin A, Vitamin B and zinc.  Good for your eyes, brain and heart and reduce the risk of metabolic syndrome.

Cinnamon: Boost metabolism, helps regulate blood sugar, good for the heart and aids in circulation

Little Chocolate Pots

½ cup refined coconut oil, melted*

¼ cup ground xylitol**

Pinch salt

¼ cup unsweetened cocoa powder

¼ cup collagen

2 large eggs, room temperature***

½ cup hot water with ¼ tsp cinnamon****

1.Add all but the eggs and hot coffee to a blender and blend well.

2.Add eggs and blend well, one at a time. (If your eggs are too cold, the coconut oil will solidify too soon.)

3.Slowly drizzle in hot coffee while blending. Blend well. The hot coffee will “cook” the eggs.

4.Pour into 6 small ramekins. Cover with plastic wrap and chill at least 2 hours or until firm.

6 servings: 242 calories; 21g fat; 9 net carbs ; 7g protein

*Refined coconut oil does not have coconut flavor. If you LOVE the taste of coconut, you can use unrefined pressed coconut oil. MCT oil won’t work, because you need it to harden when cooled.

**You can use any no calorie sweetener you prefer. I grind my xylitol in a little coffee grinder. It helps it dissolve better. If you are subbing all the sweeteners with honey, this is not the meal plan for you. The fat burning process with these specific ingredients rely on no sugars

***The temp of the eggs is super important here. I didn’t remember to take mine out ahead of time, so I ran some really hot water in a mug for each egg and dropped them in. They stayed in there for 3-5 minutes and were warm enough for this recipe.

****You can change the flavor by subbing hot coffee or mint tea

If you are looking for a weight loss plan that works with your busy schedule.  Check out FitMama. The food is prepped ahead so it’s ready to heat up and eat whenever you need it.  Healthy food could soon be as easy for you as grabbing a bag of chips.

Here’s the meals for the first day for the March 12th Fit Mama Plan.  We have a private facebook group too, so if you need help with ingredient substitutes for preferences we’re on it :).

Breakfast: Guacamole Eggs

Snack: Little Chocolate Pots

Lunch: Salmon Chef’s Salad

Snack:  Giant Frozen Eggnog

Dinner: Grilled Steak with Asparagus and Whipped Cauliflower

Snack: Hot Creamy Peppermint Sipper

This post contains affiliate links.  Thanks for supporting us :).

Weekend Links

Happy Weekend!  Here are some things that inspired me this week.

I joined the Octpus for a Preemie US Chapter, founded by my good friend, Jessica Holmes. Here’s why people or crocheting little octopuses for tiny babies.  I’m still trying to finish my first one.  It’s a tricky project but I think the rest will go faster.

Krokotak is a fun website full of free printables and craft ideas for all ages.   Here’s their tutorial on homemade phone holders from toilet paper rolls.

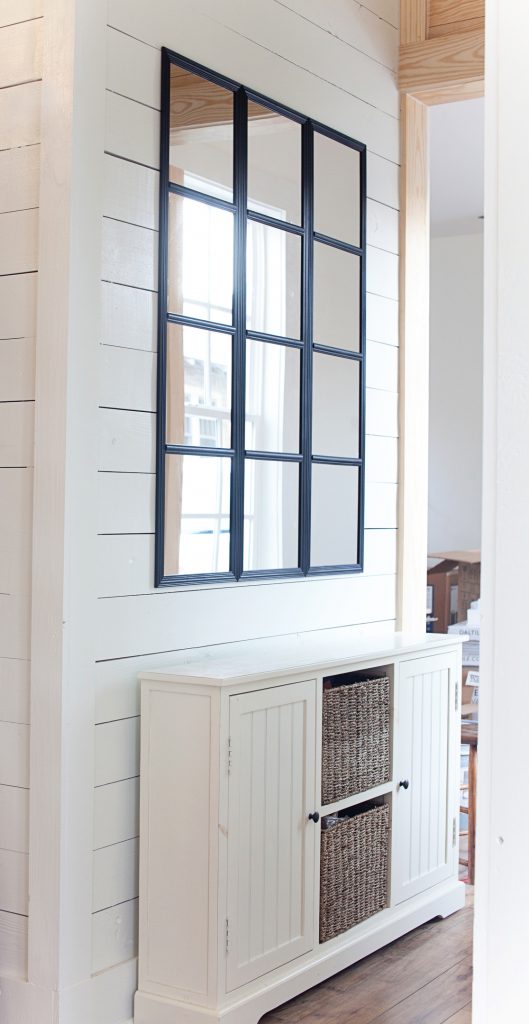
Layla from the Lettered Cottage did a DIY paned mirror of mammoth proportions.  So far about $20 spent, but she promises to show us a curved topper soon that will make this strikingly similar to a $549 catalog version.

This floral garland hoop wreath from Julie Ryan at Life of Bliss.


The Secret Stash

Halfway through my first year teaching, we got married. As if being a new teacher wasn’t hard enough, my 2nd year about the same time we had our first baby.  I had made a commitment early on to be an at home mom, so even though it was much sooner than we expected, I suspended my teaching career at the end of my 2nd year.

My mom was a professional homemaker, so the idea of thrift and economy wasn’t new to me. I penny-pinched and DIY’d myself to homemaker bliss and also brought in small amounts of income on the side:  a little babysitting here, some music lessons there, a garage sale a few times a year, some custom sewing and craft sales….you get the idea.  It was never a great deal of money at once.  I put it in an envelope in my lingerie drawer and let it accumulate.**

If I got birthday money or had leftover in a budget category some month, it all went in there.  I didn’t tell anyone about it.  To be honest, I rarely thought about it myself.  It’s what the farm wives of old used to call their “egg money” or “cookie jar money.”

One day my husband came home as low spirited as a man could get.  His job had been suddenly terminated.  He made a mistake and was terminated for cause so we were not eligable for unemployment.  We had a small emergency fund, so we weren’t eligible for food stamps or medicaid either.  I called every agency I could think of, and we fell through the  cracks for all of them.*  By the time we qualified for help, we would be homeless.

My husband sat on the sofa with his face in his hands thinking about his dismal job options when there was a termination for cause on his employment record.  He had 8 mouths to feed and our small savings would last us 5 months IF we just paid for power, gasoline, mortgage and $200 a month for food and all other household needs.  We immediately canceled everything extra including music lessons.  Cobra insurance would have wiped us out completely in just a couple of months, so we had to let our health insurance go too. It wasn’t safe or recommended, but we were desperate.

Then I remembered my secret stash.  I had been hoping to use it for a family vacation or a home update project.  Instead, I grabbed the fat, worn envelope out of it’s lacy nest and brought it to my despondent husband.  His eyes opened wide at this unexpected gift. We counted it together and it was enough to buy us an extra month of job hunting time.

It was a blessing at the time, but we have mixed opinions about the wisdom of a secret stash.  My husband believes all income should be reported to the family and properly budgeted for, even if it is to go in the emergency fund.  While I can see his side of things, I loved being able to surprise him with more than he hoped for, and having a little “mad money” that I could decide for alone.  He agrees mad money is a great thing, but wants to budget for it.

What do you think?  Do you have a secret stash?

*I have since learned about 20+ Harvester food drop locations in driving distance from my home. Most of them do not require enrollment or proof of need, which would have been a blessing to me at the time.

**There’s also the law that even small amounts of cash income are supposed to be reported to the government, excluding gifts and garage sales where items are sold at a loss. I didn’t know it at the time, but thankfully the largest bulk of my stash was from garage sales and birthday gifts.

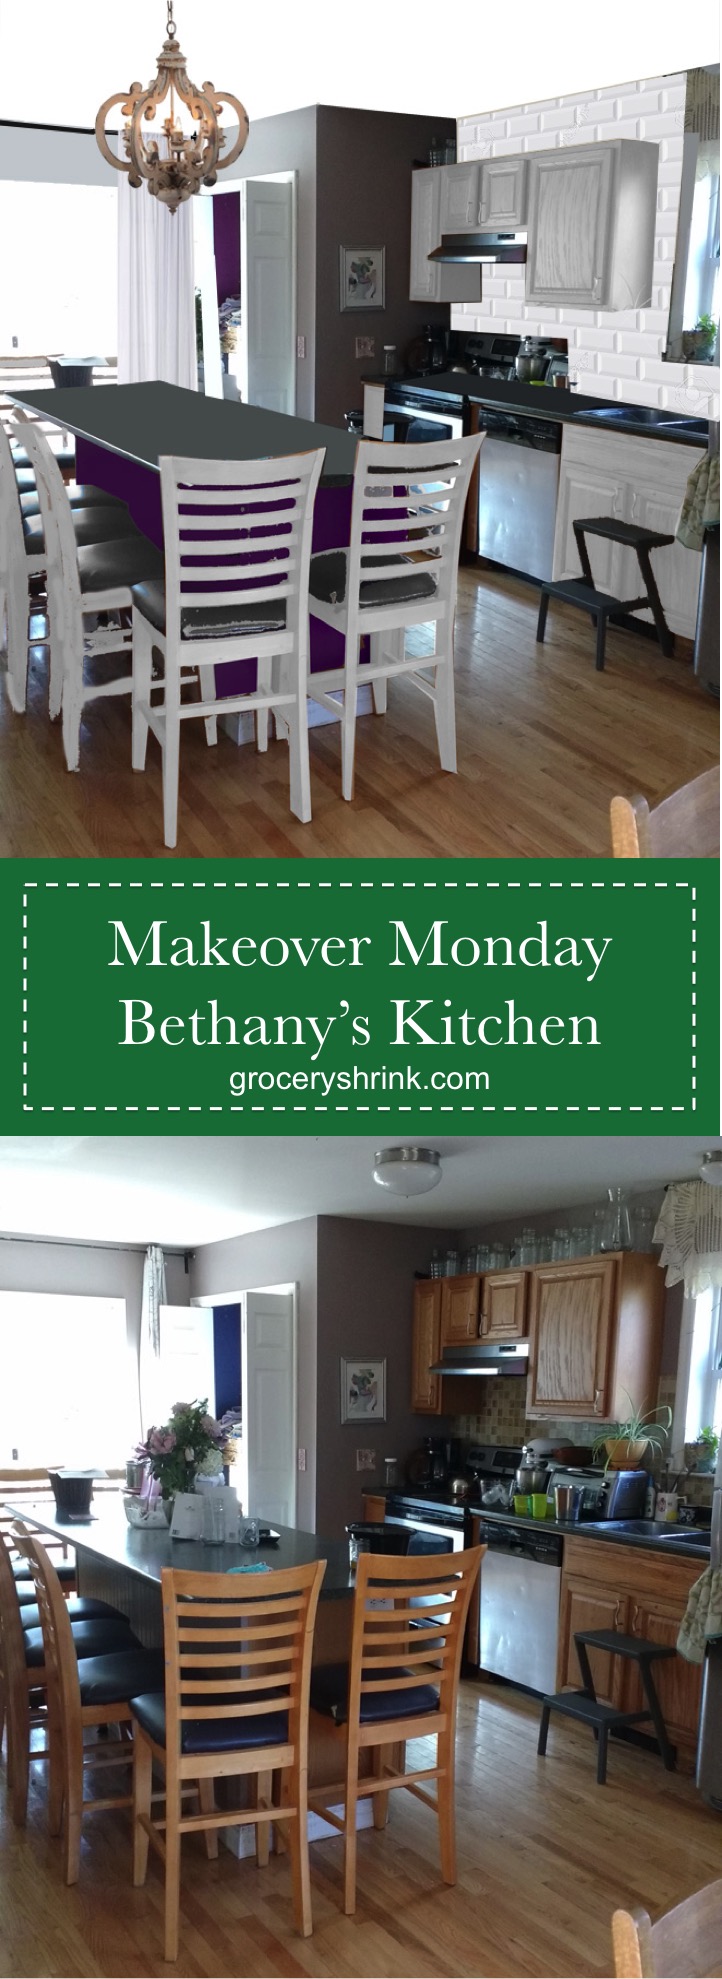
Makeover Monday: Bethany’s Kitchen

Bethany is a homeschool mom to 8!  Her dining room doubles as their homeschool room so needs amble storage. They also hosting family dinners for 20-30 people.  It’s great that they have an open floor plan so the crowds can spread into the kitchen and the living room and still feel connected.

She writes: ” The stained glass in the window was made by my uncle, and I really love the plum color in it. I also have a stained glass with aqua in it. And I  have a China cabinet that I want to repaint on the opposite wall (maybe white? Or a fun, bright color?)

Right now, I think the wall color is bringing me down. It’s just too blah. This room is in the north side of the house, so the light isn’t as bright. I don’t like white walls, but I need something light. I have thought about painting the chairs white, or all different colors of purple.”

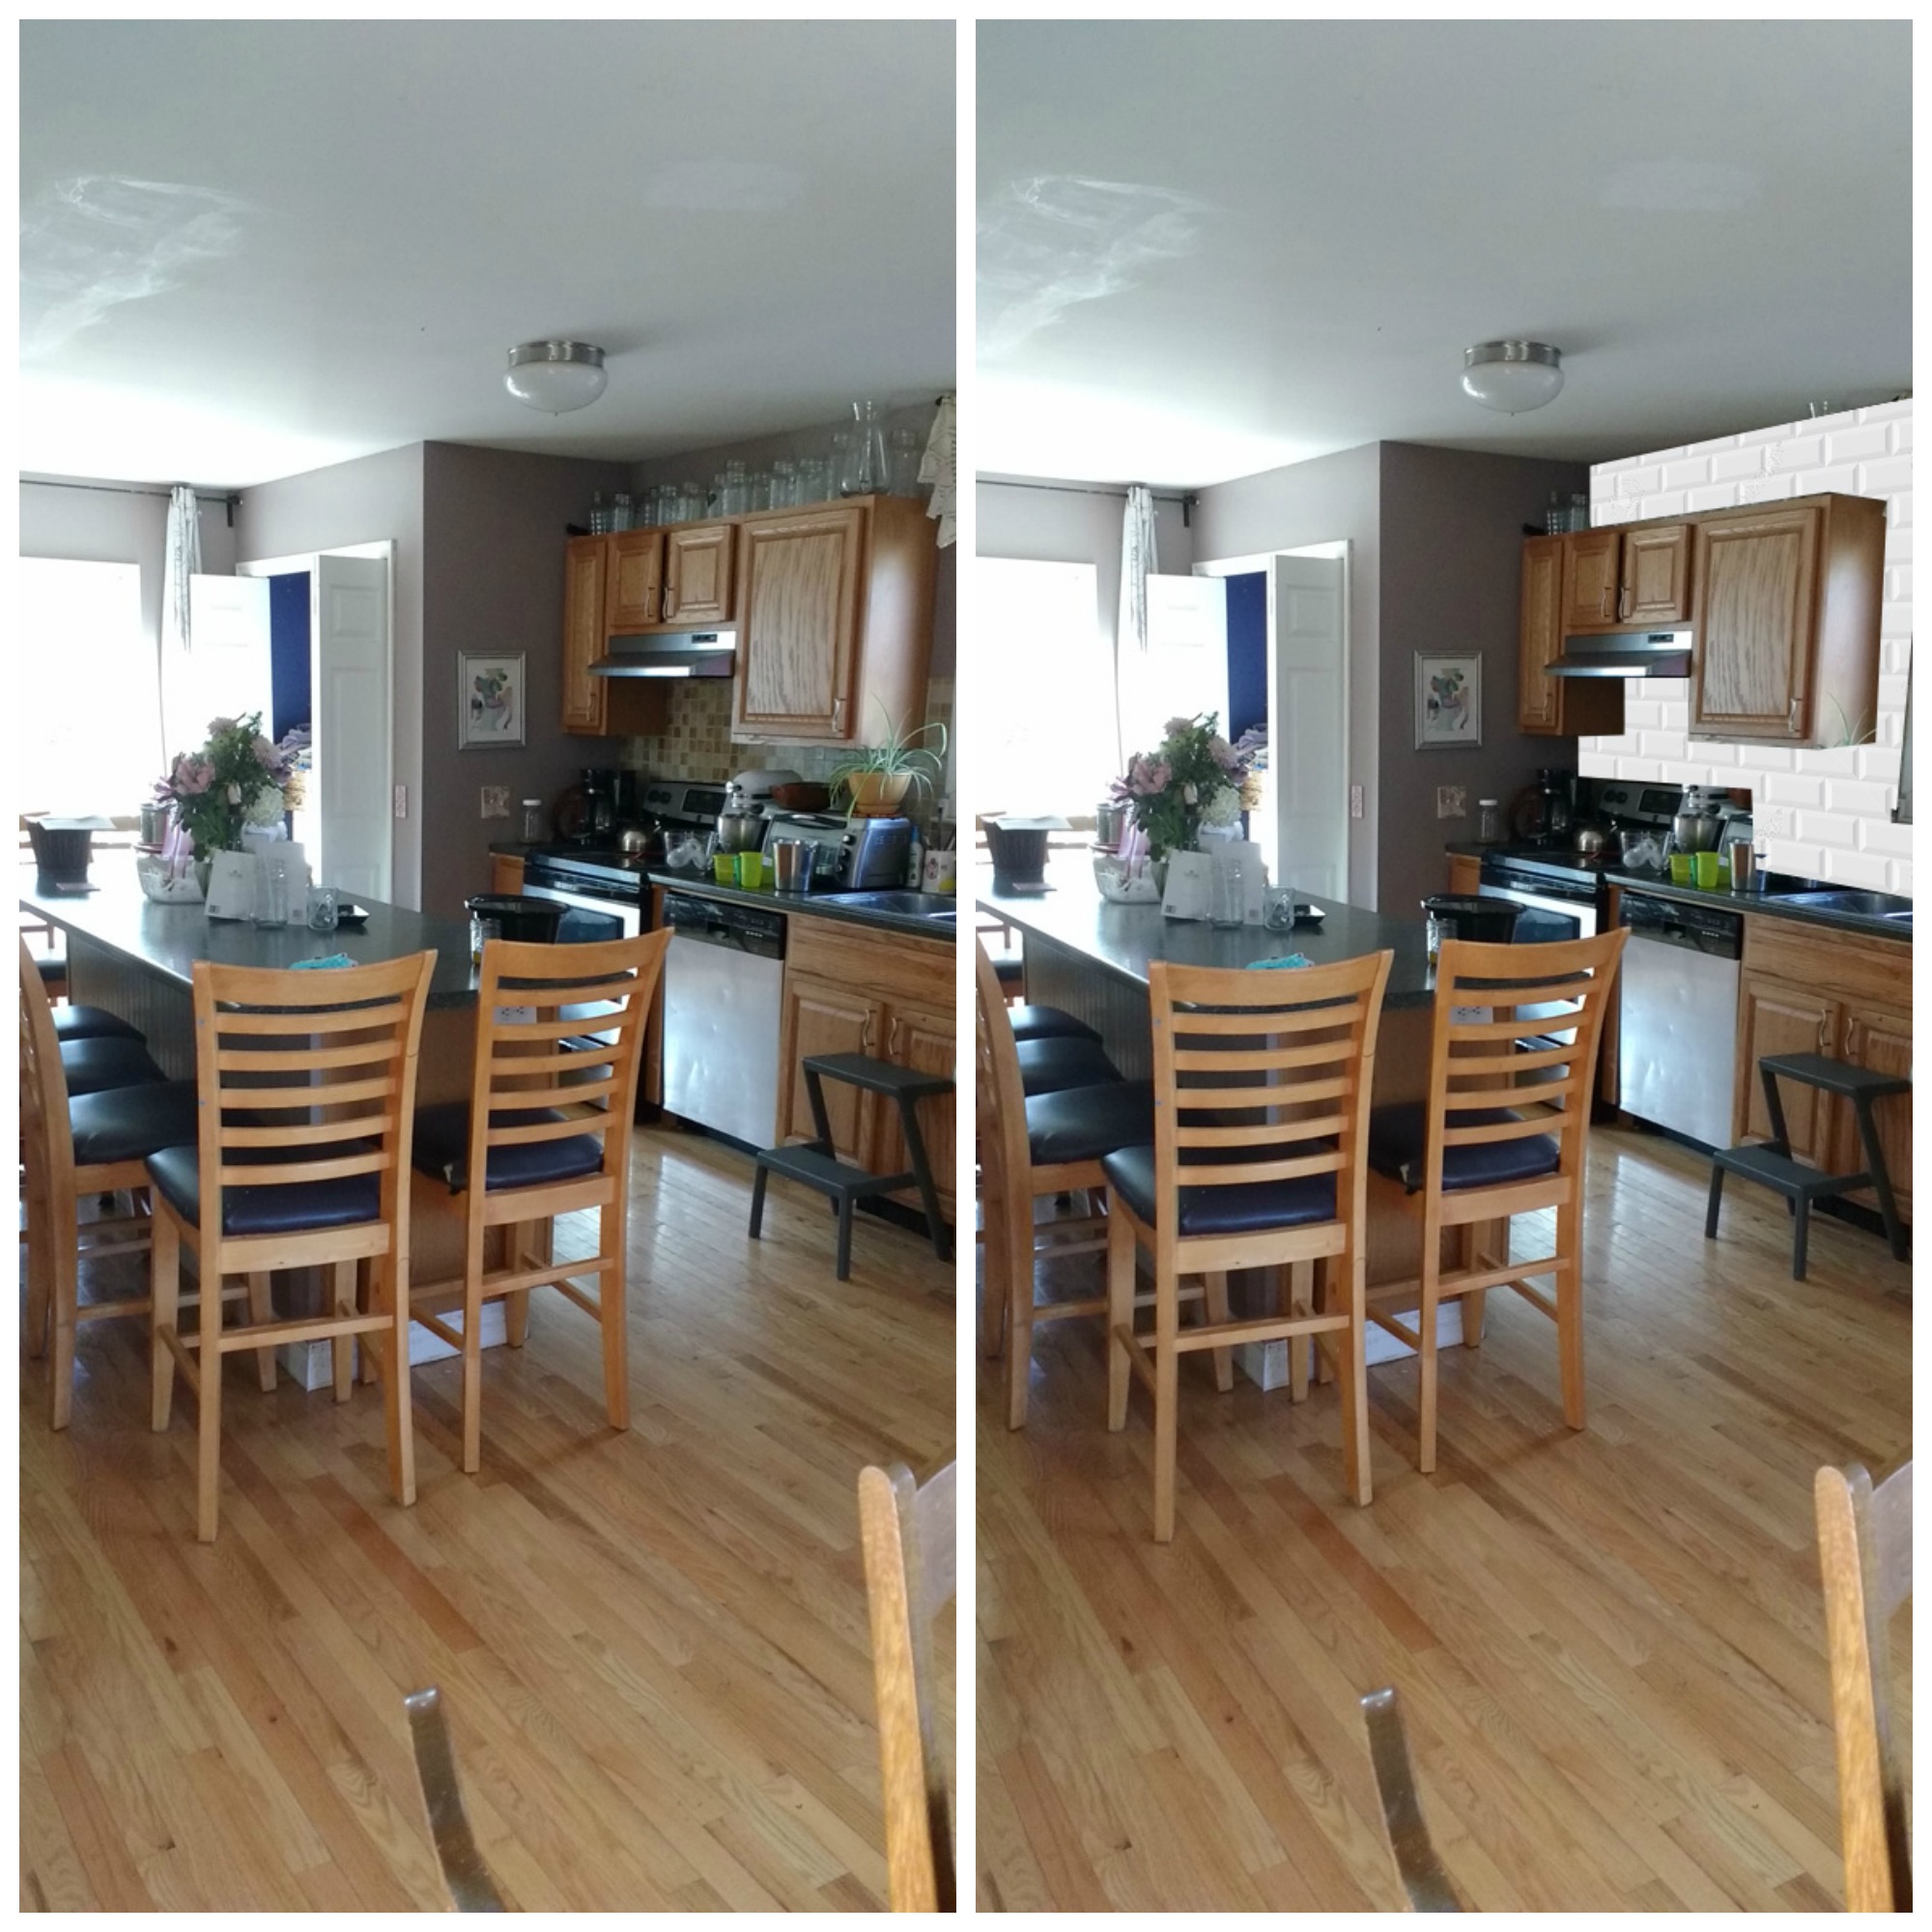
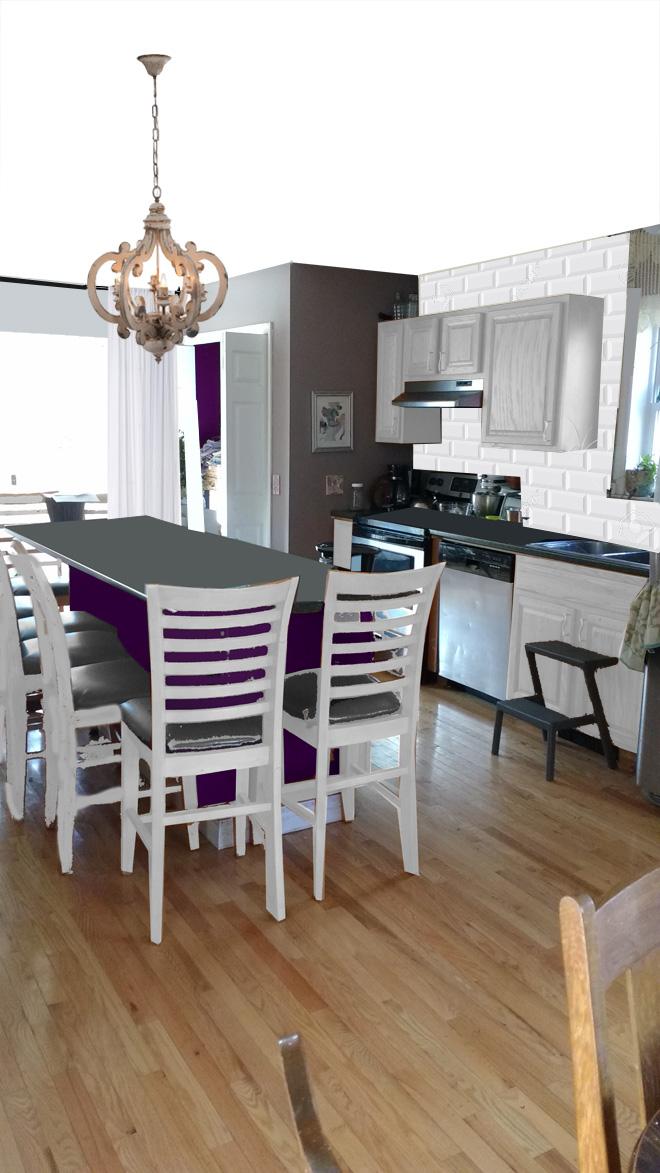
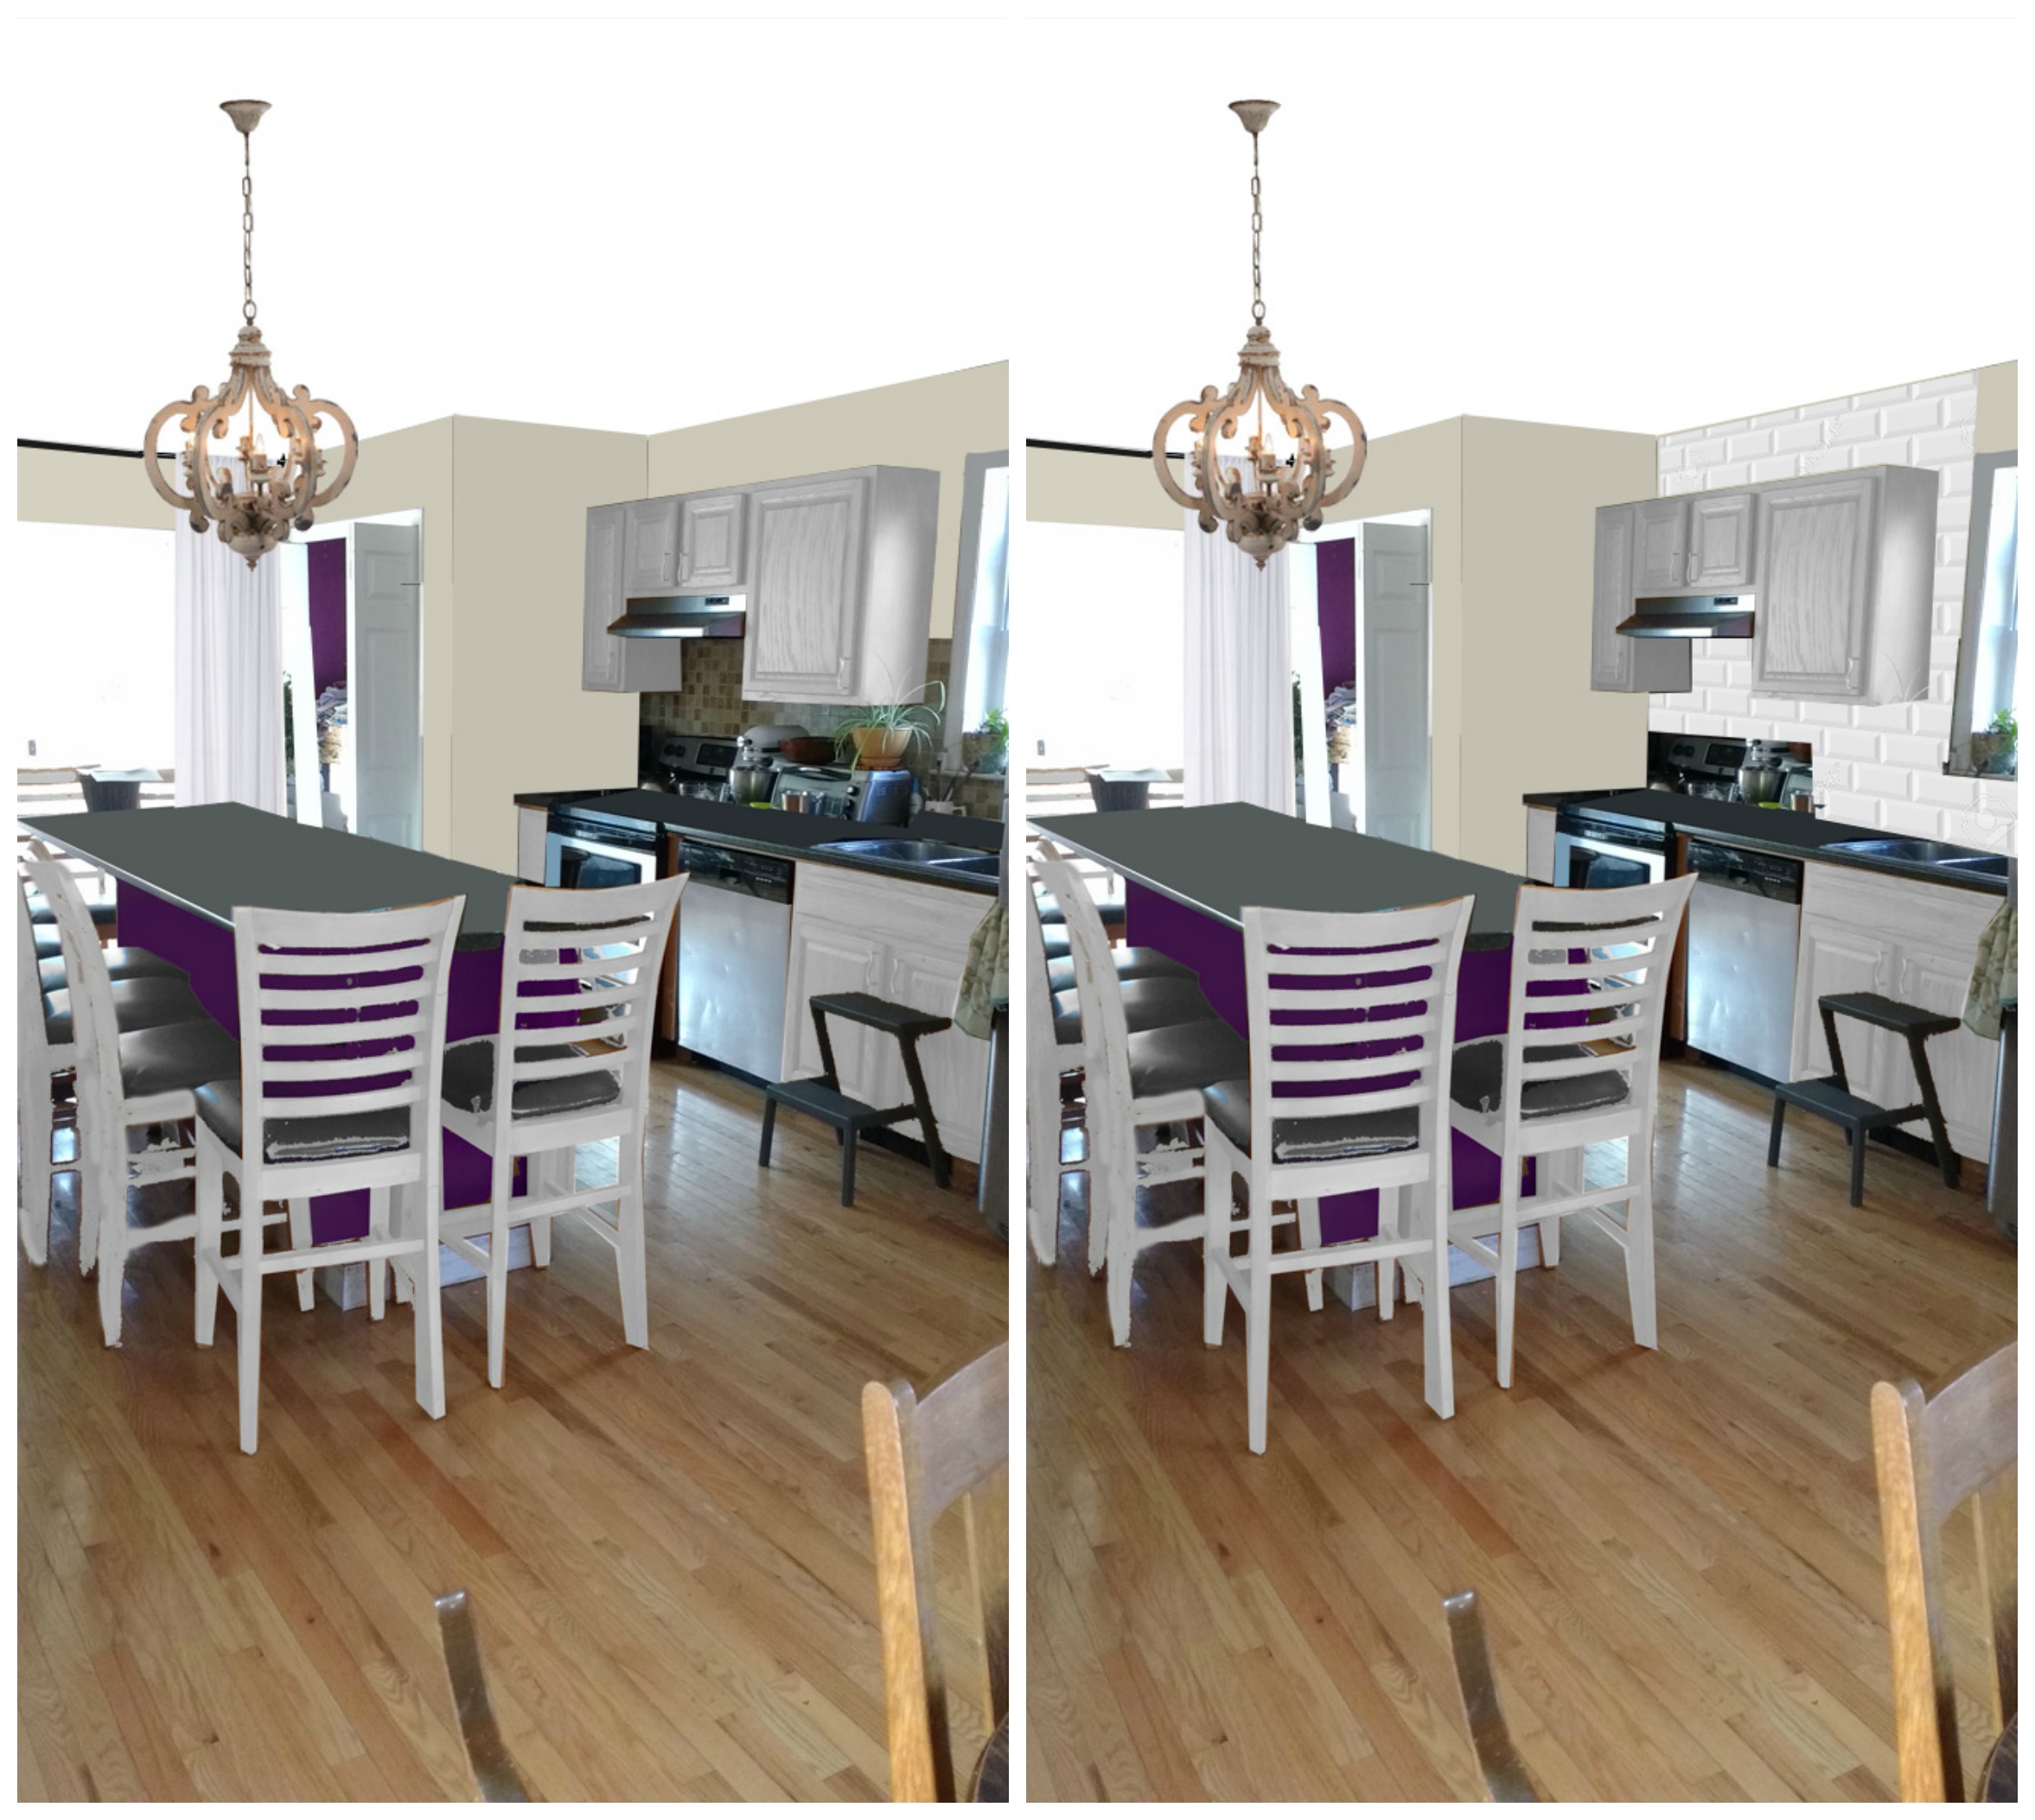
Bethany!  Thanks for being a long time fan and for reaching out.  I think your wall color is charming and a good accent for your special window, but it’s pink undertone is fighting with the yellow undertones of the backsplash.  My first choice would be to replace the backsplash with a classic white subway tile.  This tile was first used in 1904 and it’s vintage charm insures it will never be “out.”

I love your light colored hardwood floors.  Lighter, more natural wood tones are at the front of the trend right now and your floors are perfect.  The cabinets and most of your furniture match them perfectly, which sounds like a great idea, but can make the room feel “flat.”

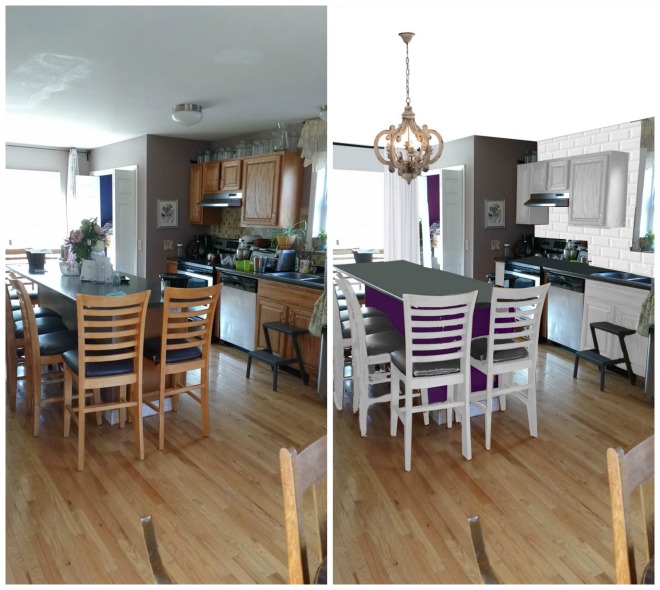
To break it up a little, I recommend painting your cabinets and island chairs white with gray seat cushions.  I also gave your island a little pop of plum color to say “Hiya” to your stained glass window. Inspiration here. I had trouble getting the color right, it’s too bright, but you get the idea. (If you don’t tile across the top of the window, add a bamboo blind.)  With the updates, I think your paint color works.

(The bright purple was bothering me, so here it is a little darker.  You can choose whatever shade coordinates with your stained glass the best.)

With the cabinets painted, the chairs could be left wood toned for more warmth if you prefer.

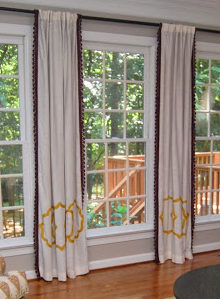
You already had the perfect curtain rod on the kitchen side and your curtains hung high and wide. I just gave you some beefier white curtains to fill up the wall space a little better. I think they would be amazing with plum colored pompom trim on the edges. Like these without the yellow embroidery:

 Here it is with Revere Pewter paint.  This paint is a little more friendly with your backsplash–a warm yellow toned gray.

I gave you a statement lighting piece in aged wood to add character and warmth to the space.

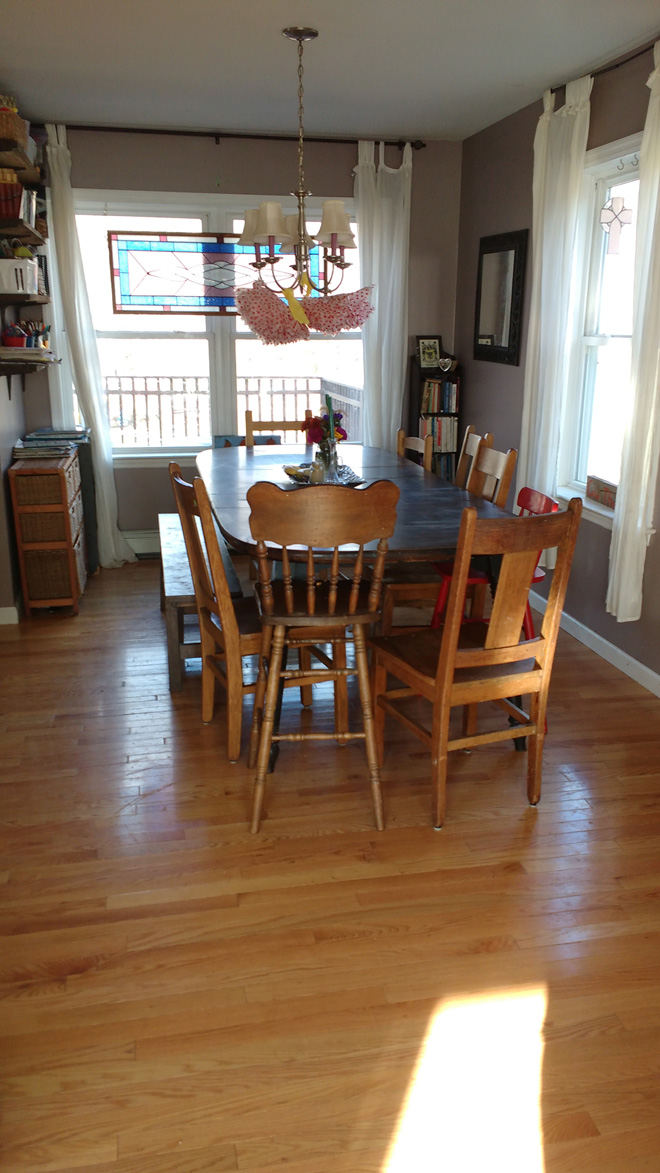
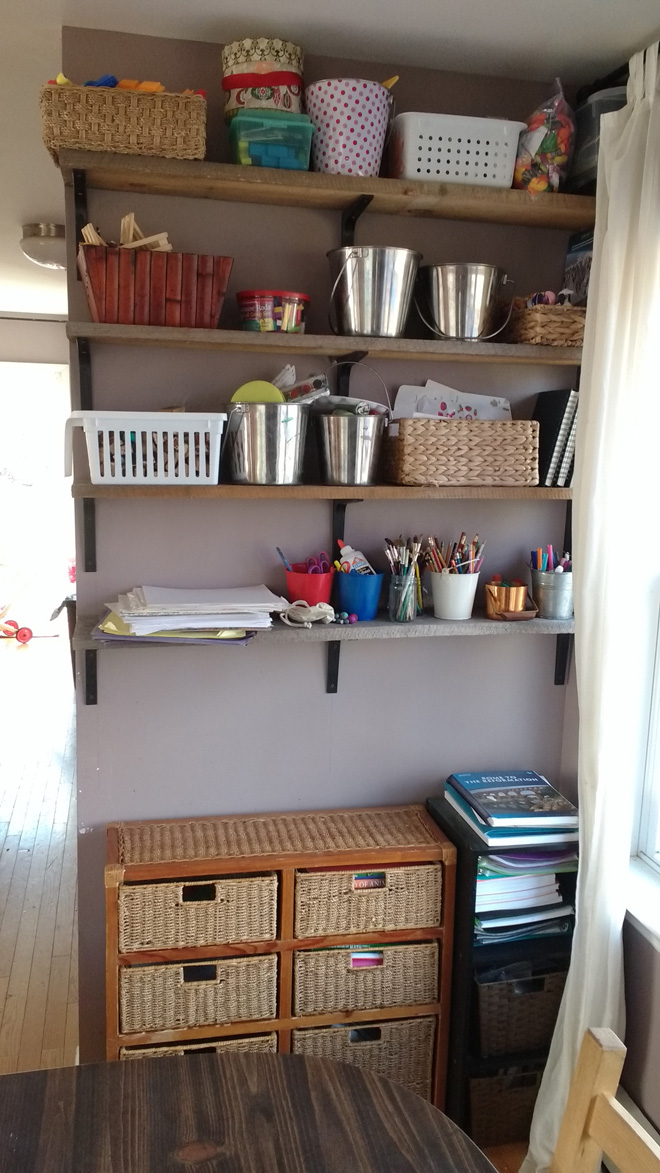
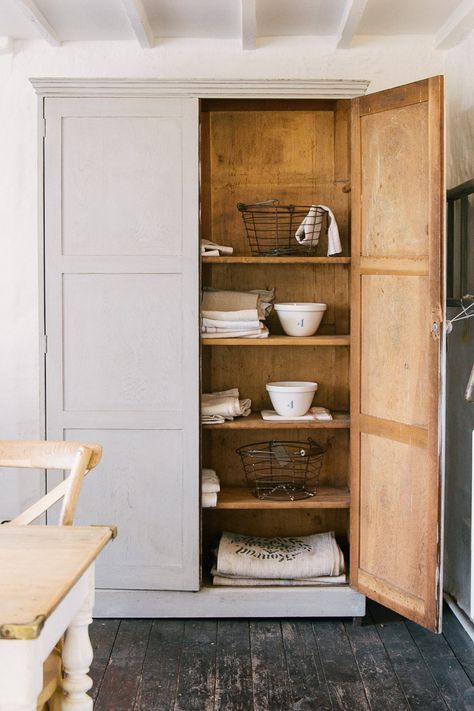
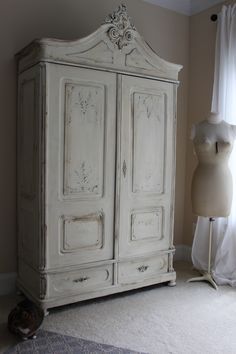
The depth of the wall on this side of the window looks narrower than the other side.  I would swap your homeschool storage with the mirror, so your curtain can hang freely on this side.  And I would swap your open storage with a vintage look armoire, so you can close the doors and quiet the space.  (Make sure it’s narrow enough to not block the window on either side.  If you can’t fine one on craigslist, you could consider building one out of Billy bookcases, covering the upper glass with gathered white cloth and leaving the very top clear glass.)

Like this one:

Or this one:

I love the dark color of your table and would keep it as is, but paint the dining chairs to match what you do with the Island seating.

Beef up the curtains to match what’s in the kitchen, and make sure they are all floor to ceiling. I’d be tempted to buy the thickest white Ikea curtains and crochet pompom trim edging to save money.

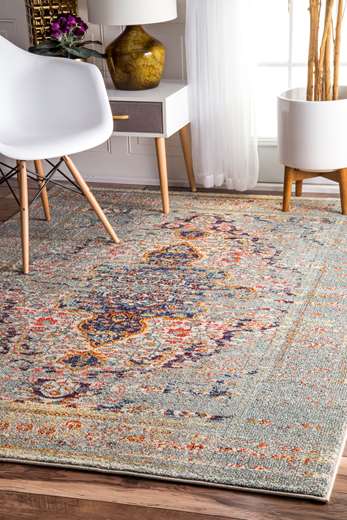
The last thing to cozy up the space is probably not practical at all for a family of 10, but a rug on hardwood grounds the space and brings in a cozy warmth.  If you go for it, get it big enough that all the chair legs will stay on it when people are sitting.  And choose one with plenty of pattern to hide stains.  Here are some ideas:

If you’d like to add some finishing touches, I’d do crown molding all around the room and swap out the dining room Chandelier with one that coordinates with the one over the island.

Would you like your room photoshopped and featured on Makeover Monday?  Send a few photos from your space to angela@groceryshrink.com and tell me your hopes and dreams for the room.

Get a full service virtual makeover complete with 3D room layout plan, 2 photoshop views, step by step work list, and within your budget source list. Find out more.

room-makeover-short-banner

Learn how to use Photoshop for your own designs with the Room Makeover class.

Weekend Inspiration

Here are some things that I thought were particularly clever, money saving, or inspirational:

Angie from eHow made a Macrame Hammock Swing for around $25.  (Source for the cord) I love to make a few of these for our lower deck.

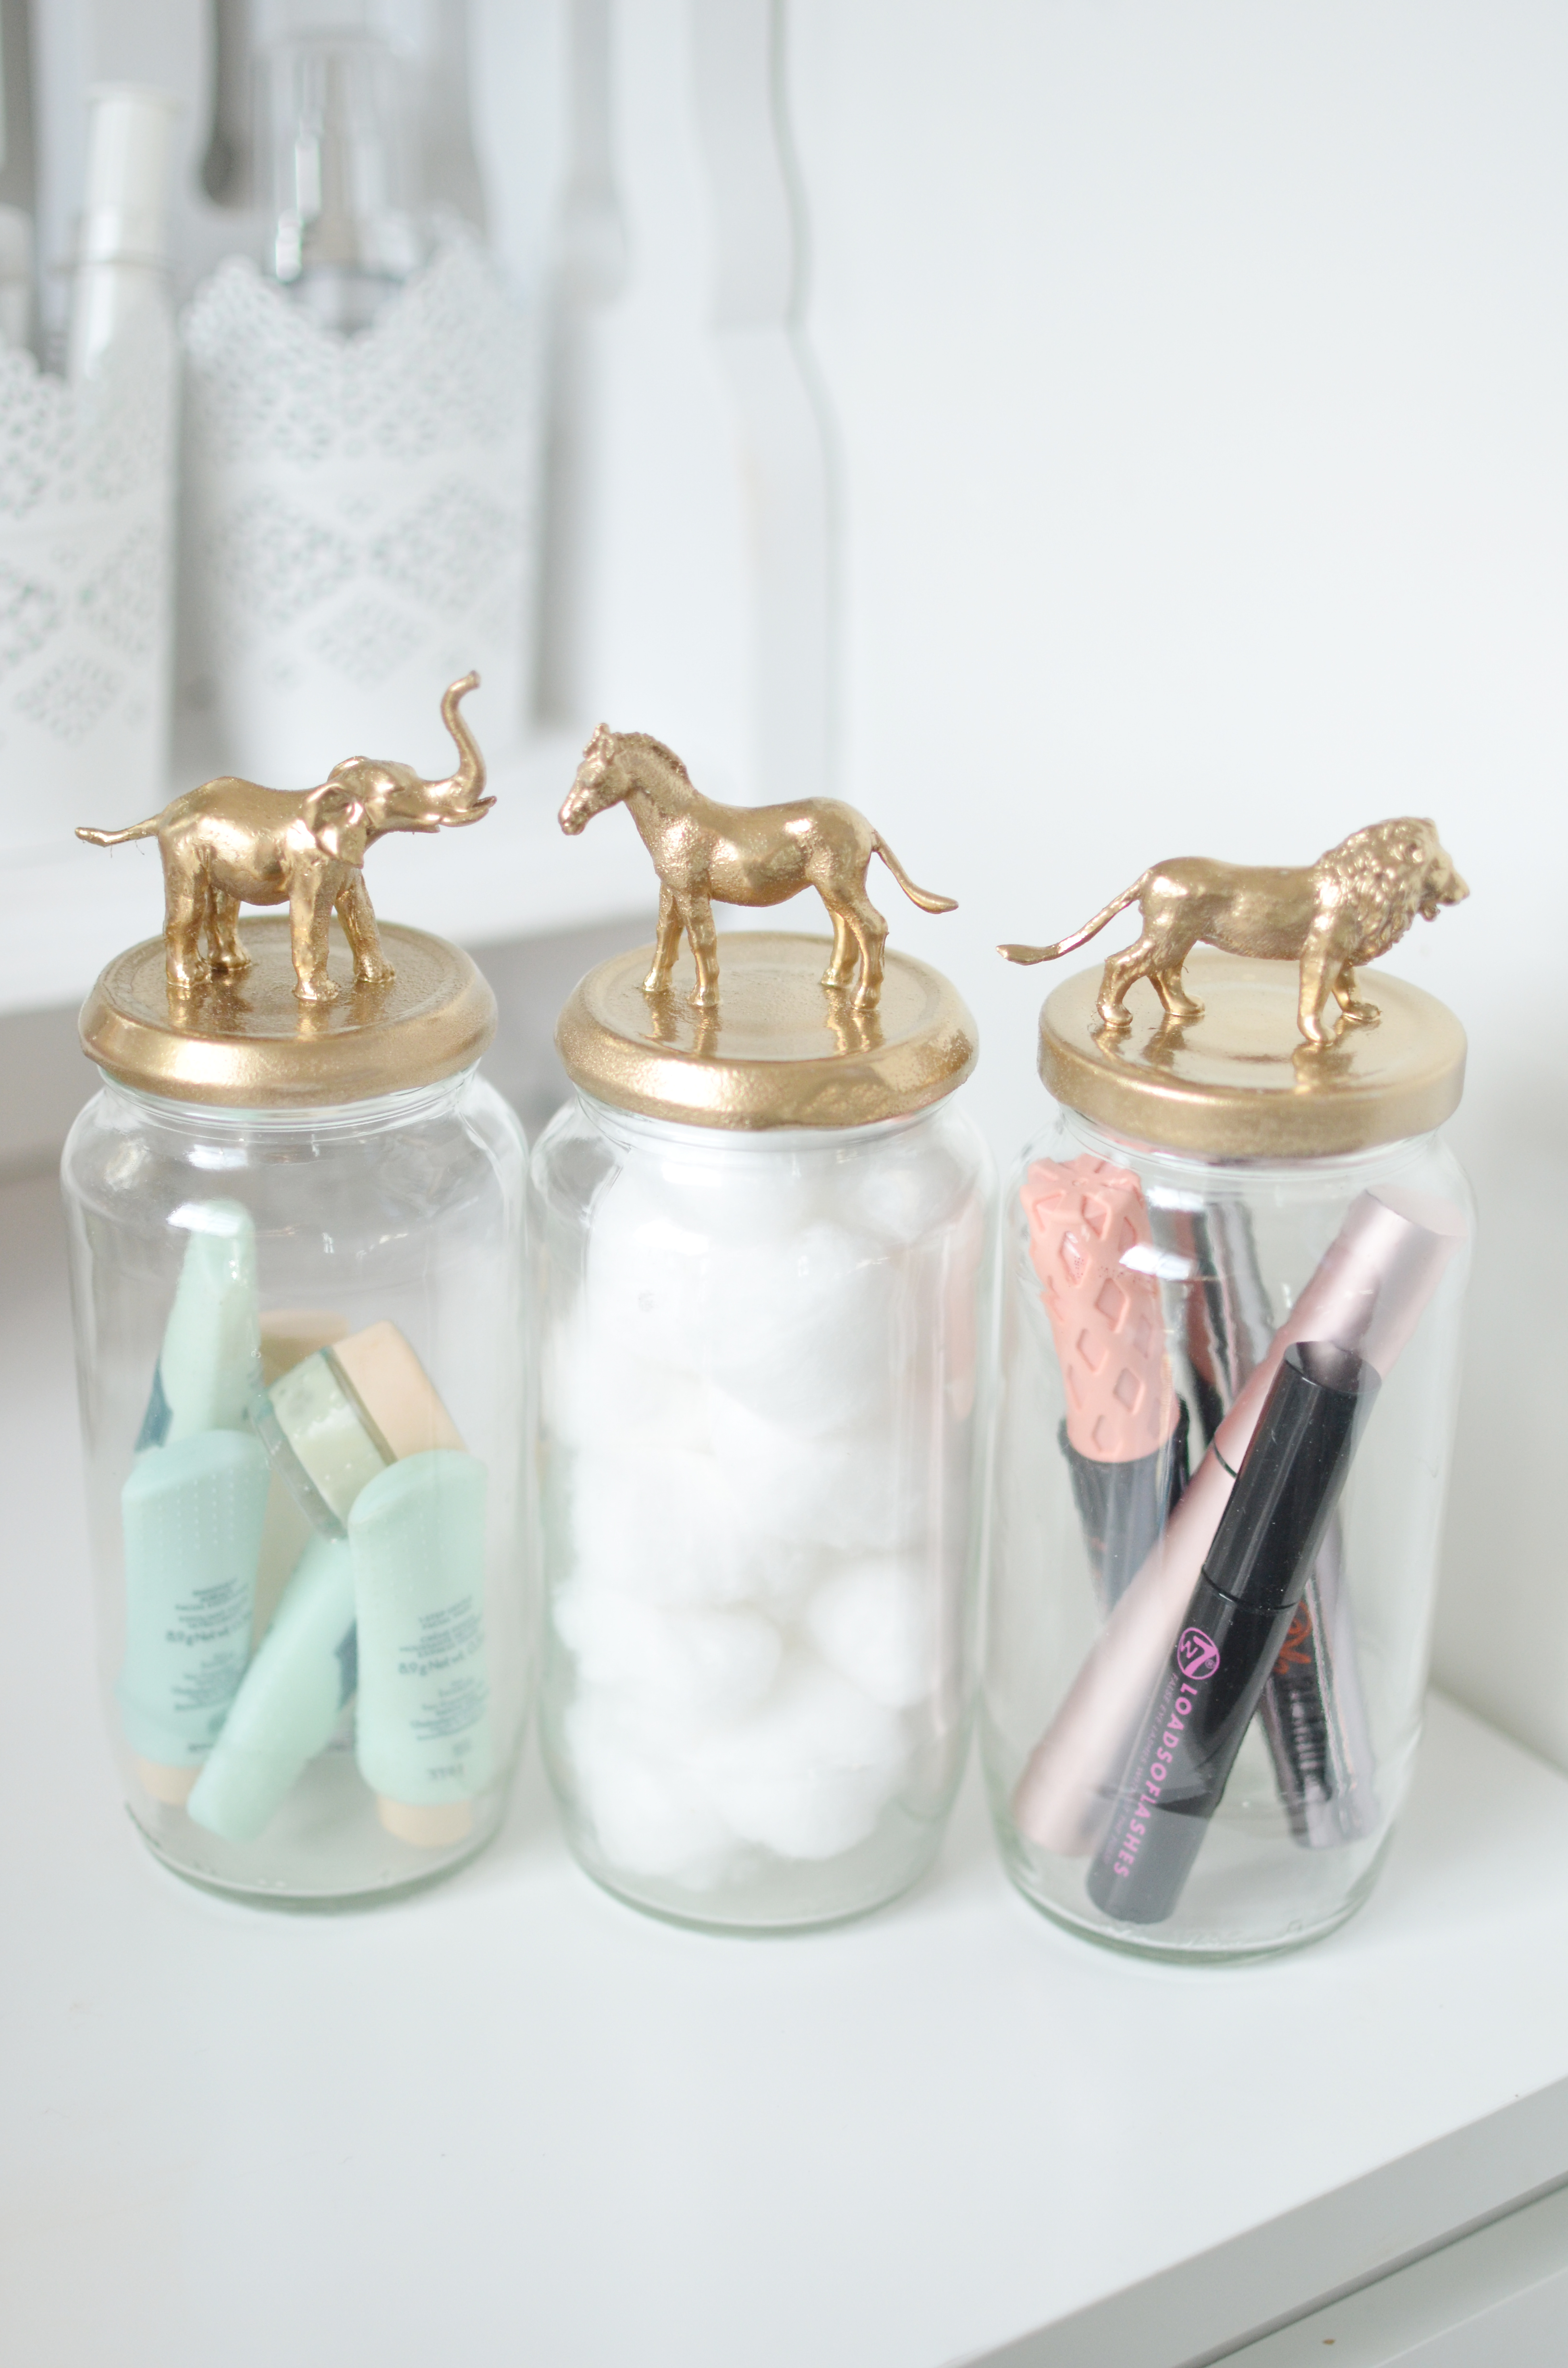
Debs from Bangonstyle recycled jars into Gold topped animal containers to organize her bath.

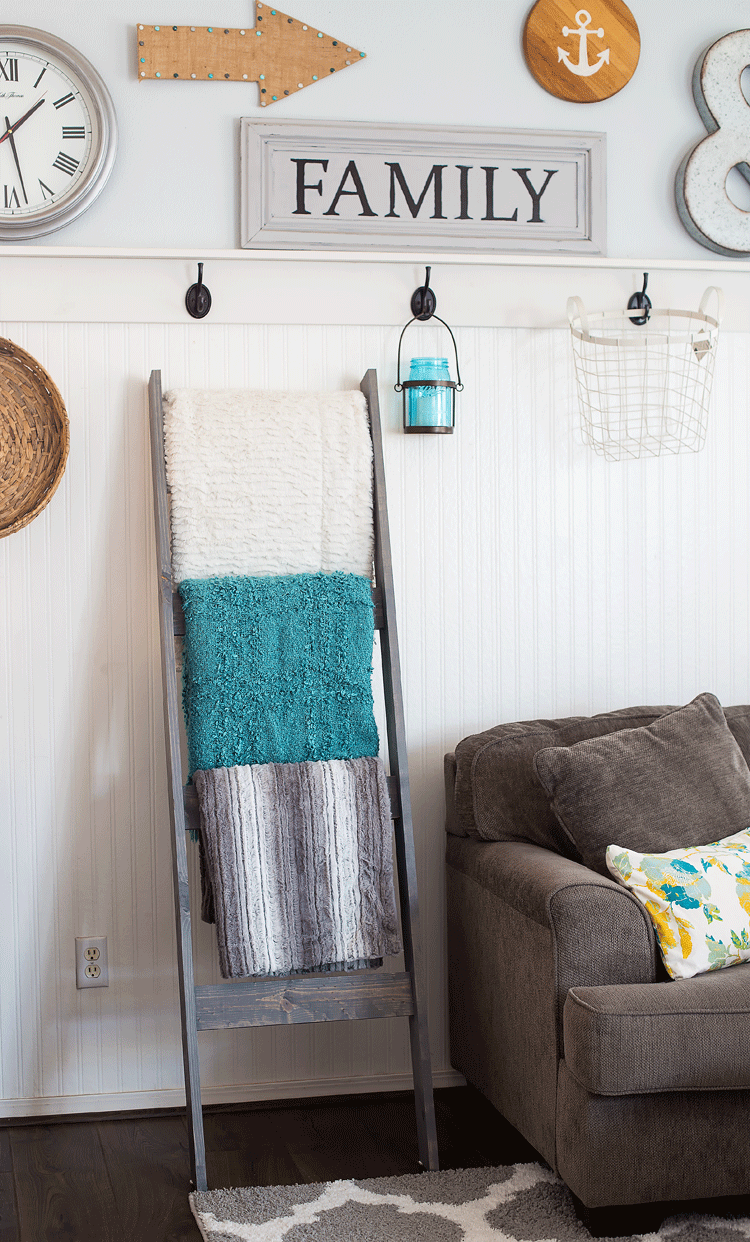
Maryanne from Domestically Speaking made a blanket ladder with just $5 in lumber. I’d like to build one of these for towel storage in our master bathroom.

Pottery Barn Teen has instructions for these cute painted vases.

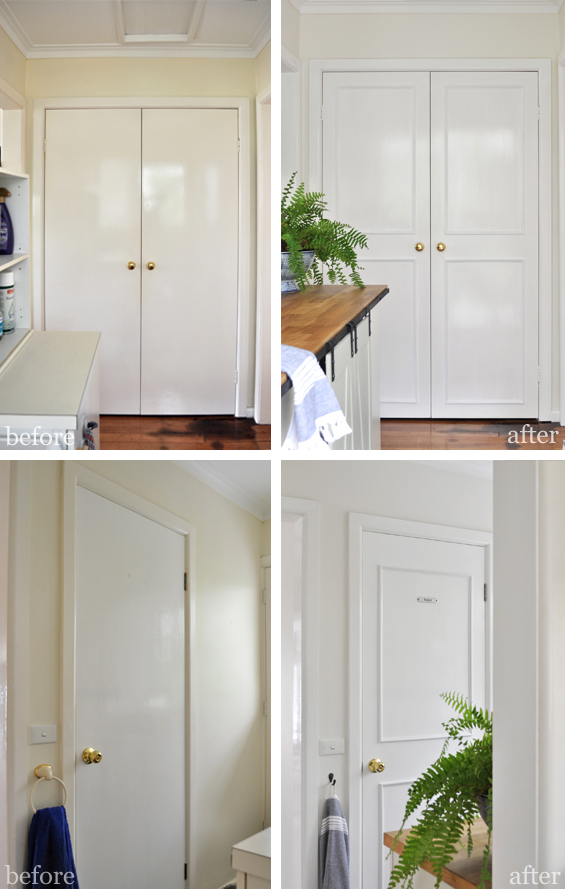
Kristine at the Painted Hive added a bit of molding to her plain hollow core doors and elevated the look for just a few dollars.

The Best Proteins to Buy when You’re Broke

We’ve all been there.  Funds are limited, but you still have to eat.  Most people think of high carb foods like white bread and pasta when funds are low, but it’s important to get plenty of protein, especially in times of stress.
Eggs 

Eggs average $1 a dozen or 17 cents for a 2 egg serving with 140 calories and 14 grams of protein.  They are full of healthy fats and vitamins too.  With eggs you can make:  egg salad; scrambled eggs; fried egg sandwiches; creamed eggs over biscuits; and frittata.

Read more

Chili Dog Enchiladas

This recipe uses a few convenience items to get dinner on the table in a snap.  Since we usually cook from scratch, this change of pace feels really special.  Haha, yep, hot dogs are special.  This will only taste as good as your hot dogs are, so I recommend splurging a little on the all beef or turkey ones.   Read more
House Updates

We’ve been working on this fixer upper of ours for 4 years! This is the year we might get it finished.
I pulled the red sculpted carpeting on the second floor last year even though we didn’t have money to replace flooring.  The carpet was 40 years old and the allergens were really built up in it. As soon as we figured out it was part of why I was sick all the time we pulled it out. I painted the subfloor with porch paint and even though it was rough, it was ok.   As soon as I could save up the money, I bought the same flooring (TrafficMASTER Handscraped Seratoga Hickory) we put down in Heather’s room. (I still need to paint the walls, add trim and wainscoting and art. And move the mattress, ha ha–but baby steps.)

It’s a little darker than the trend is going right now, but it matches our vintage doors perfectly and is only $.99 a square foot.  Their lighter colorway in Lakeshore Pecan is only $.79 a square foot!  It has been in Heather’s room for almost 4 years now and it has worn perfectly.  No scratches or chunks out of it.  It has held up better than the real hardwood we installed on the main floor.

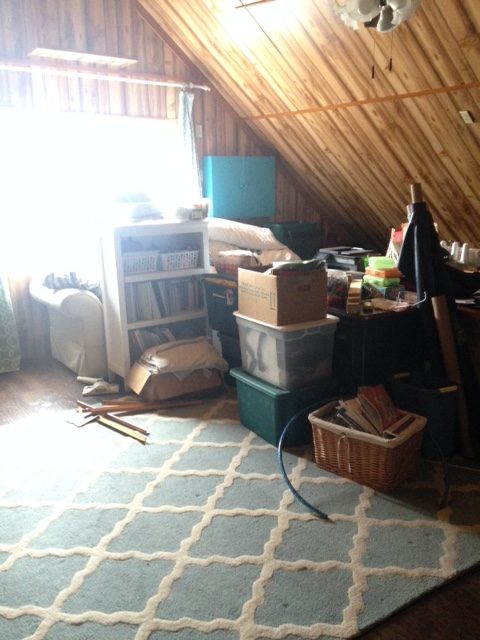
Next step is to replace the paneling in the office.  I was going to paint it white, but it has water damage that caused the panels to warp and fail at the seams, which could mean mold issues above. As much as I’m afraid to look behind the paneling, I can’t risk leaving mold up there.  With fresh white paneling up, the office will become the temporary master bedroom.  I’ll miss my closet, but I won’t miss running past the glass front door wearing nothing but a towel as I head to the working bathroom while hoping the glare of the sun off the glass blinds the neighbors before the sight of me in a towel does.  I’m imagining this kind of cottage feel:

Source

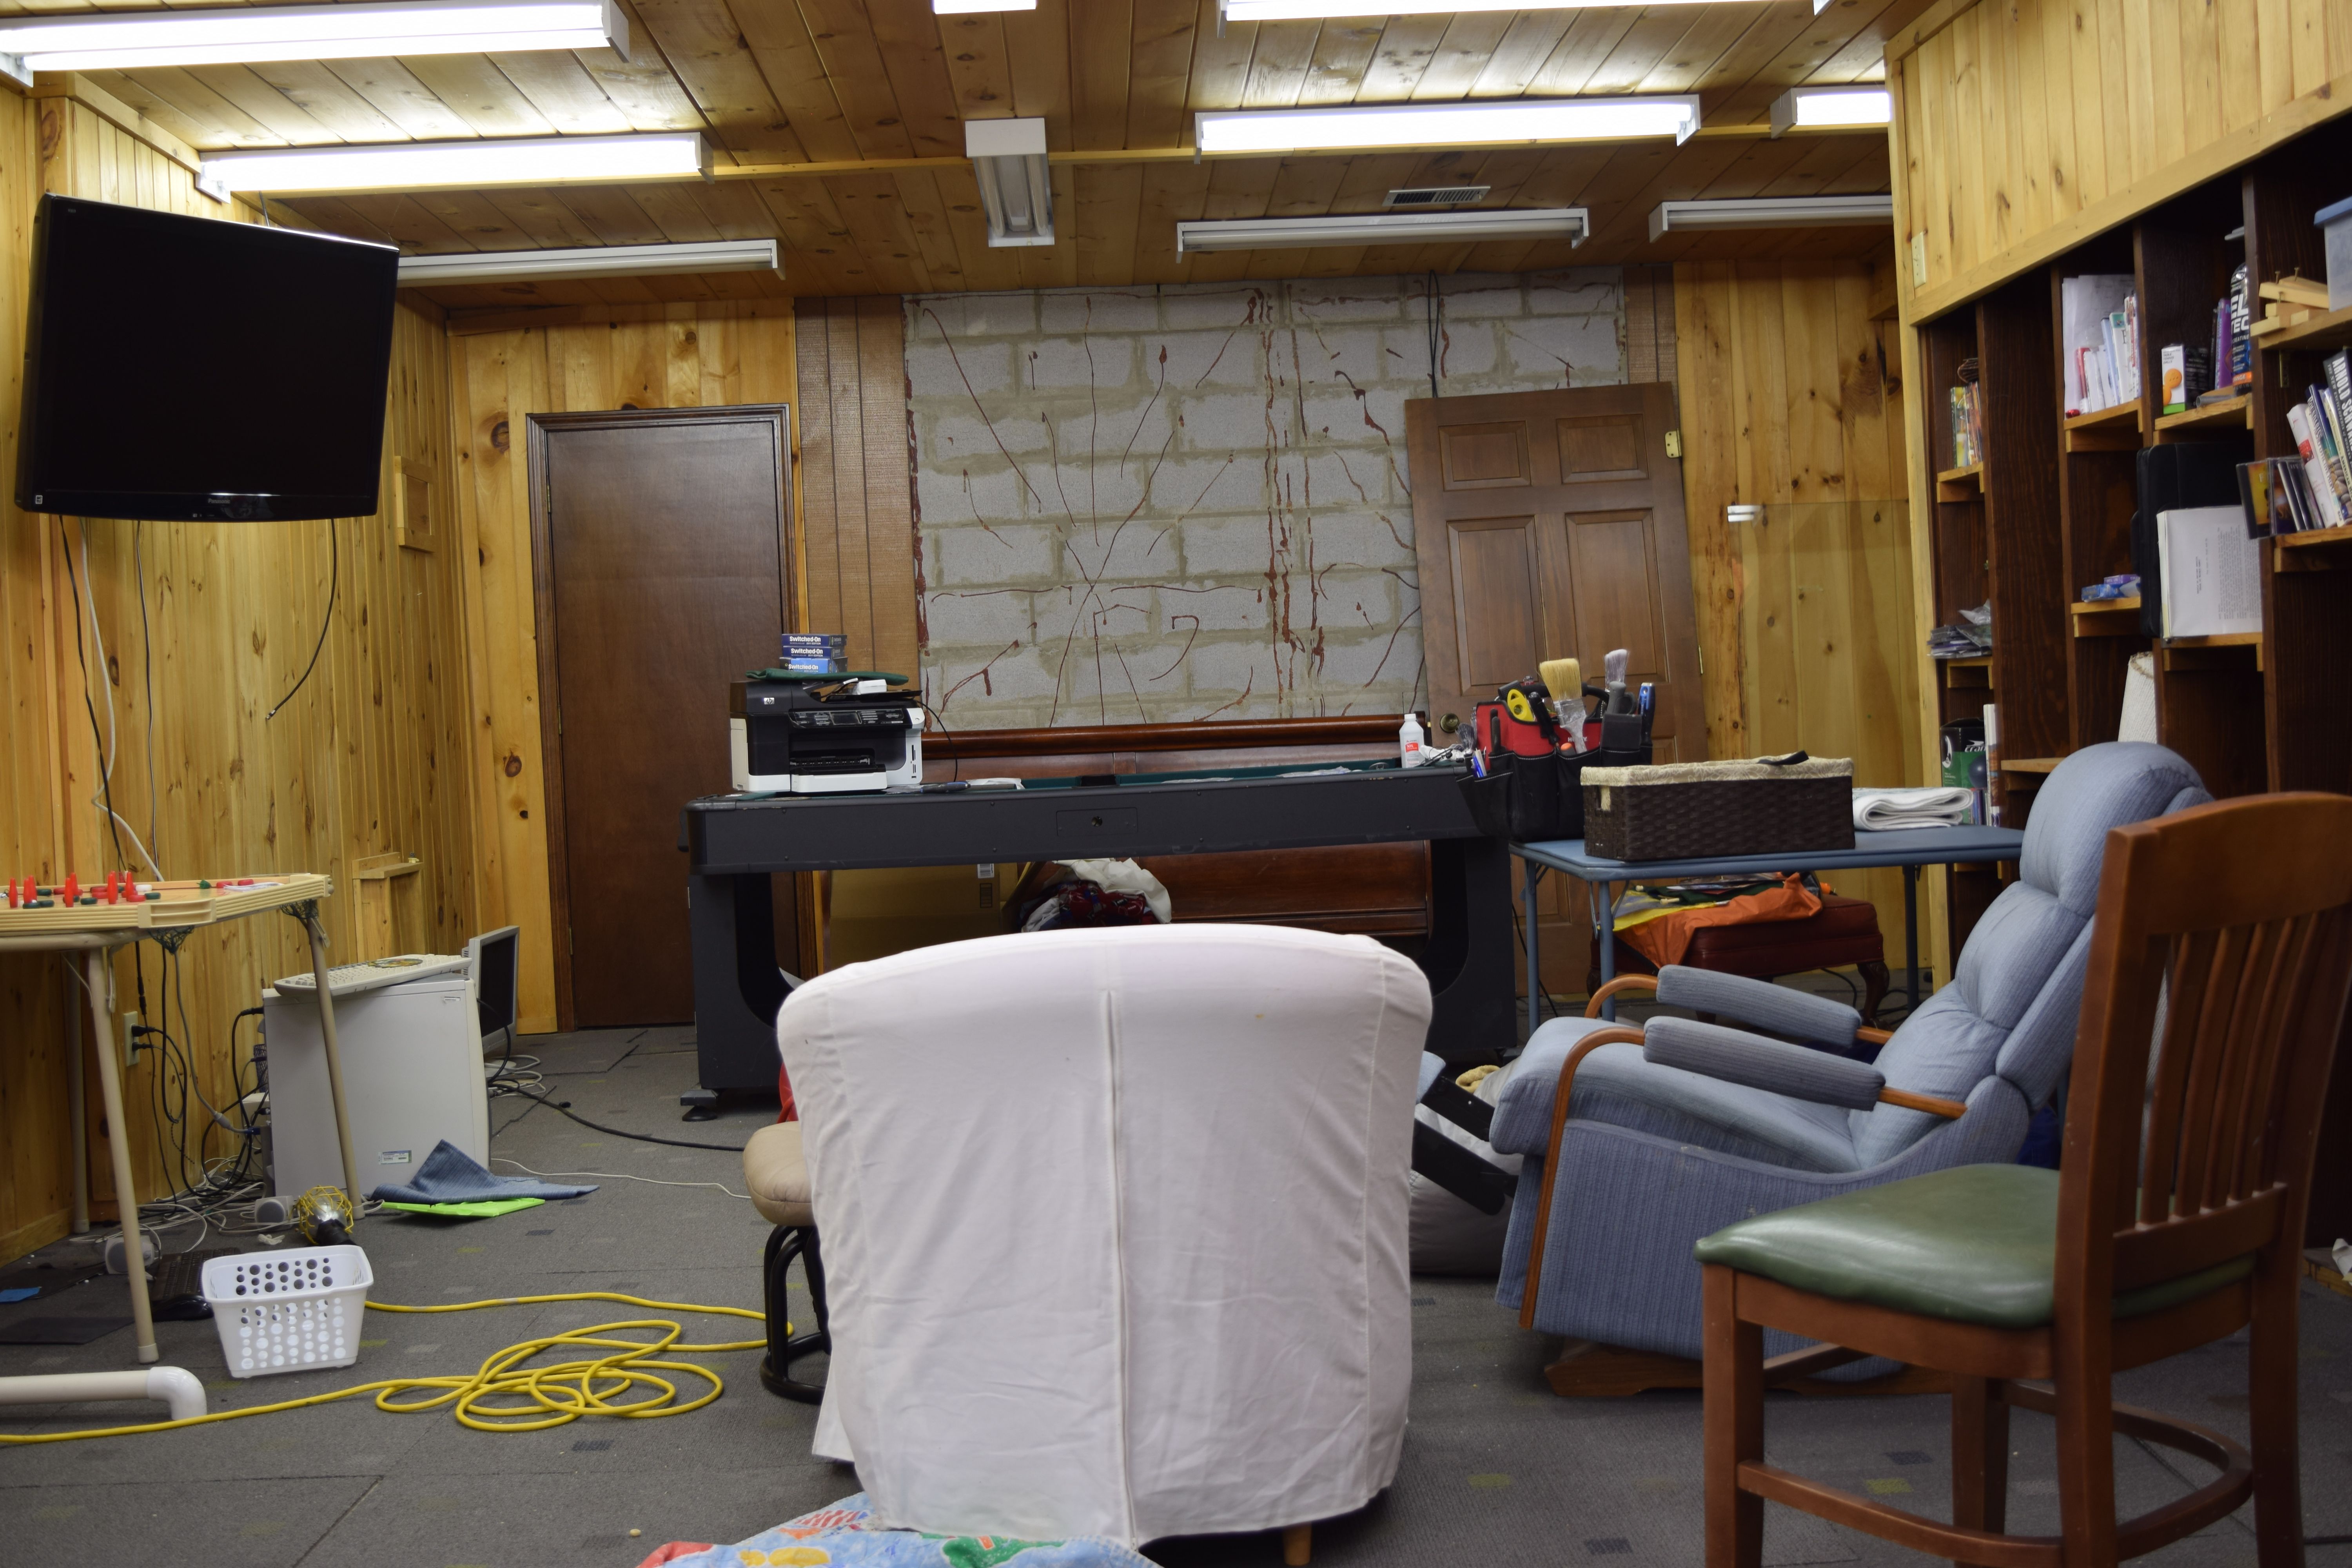
After that, we start removing the pine planked basement ceiling which is covered with 100 florescent lights.  I love the look of a painted pine ceiling, but the lights created 100 large holes that can’t be easily fixed.  The plan is to drywall the ceiling with a modest amount of LED recessed lights, and hope to leave the pine walls for painting.   Heidi and I have plans for the ruined pine planks.  We are hoping there will be long enough scraps to build some furniture.

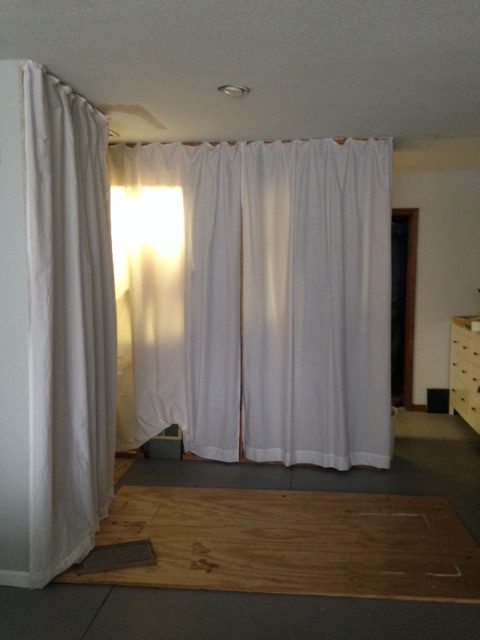
The ceiling is coming down before we’re ready to finish the basement to give access to electrical and plumbing for the new master bedroom.  The master has been raw studs and exposed pipes and wires for 4 years.  I got tired of looking at it and thumbtacked twin flat sheets to the ceiling awhile ago.  It really did make waiting easier.

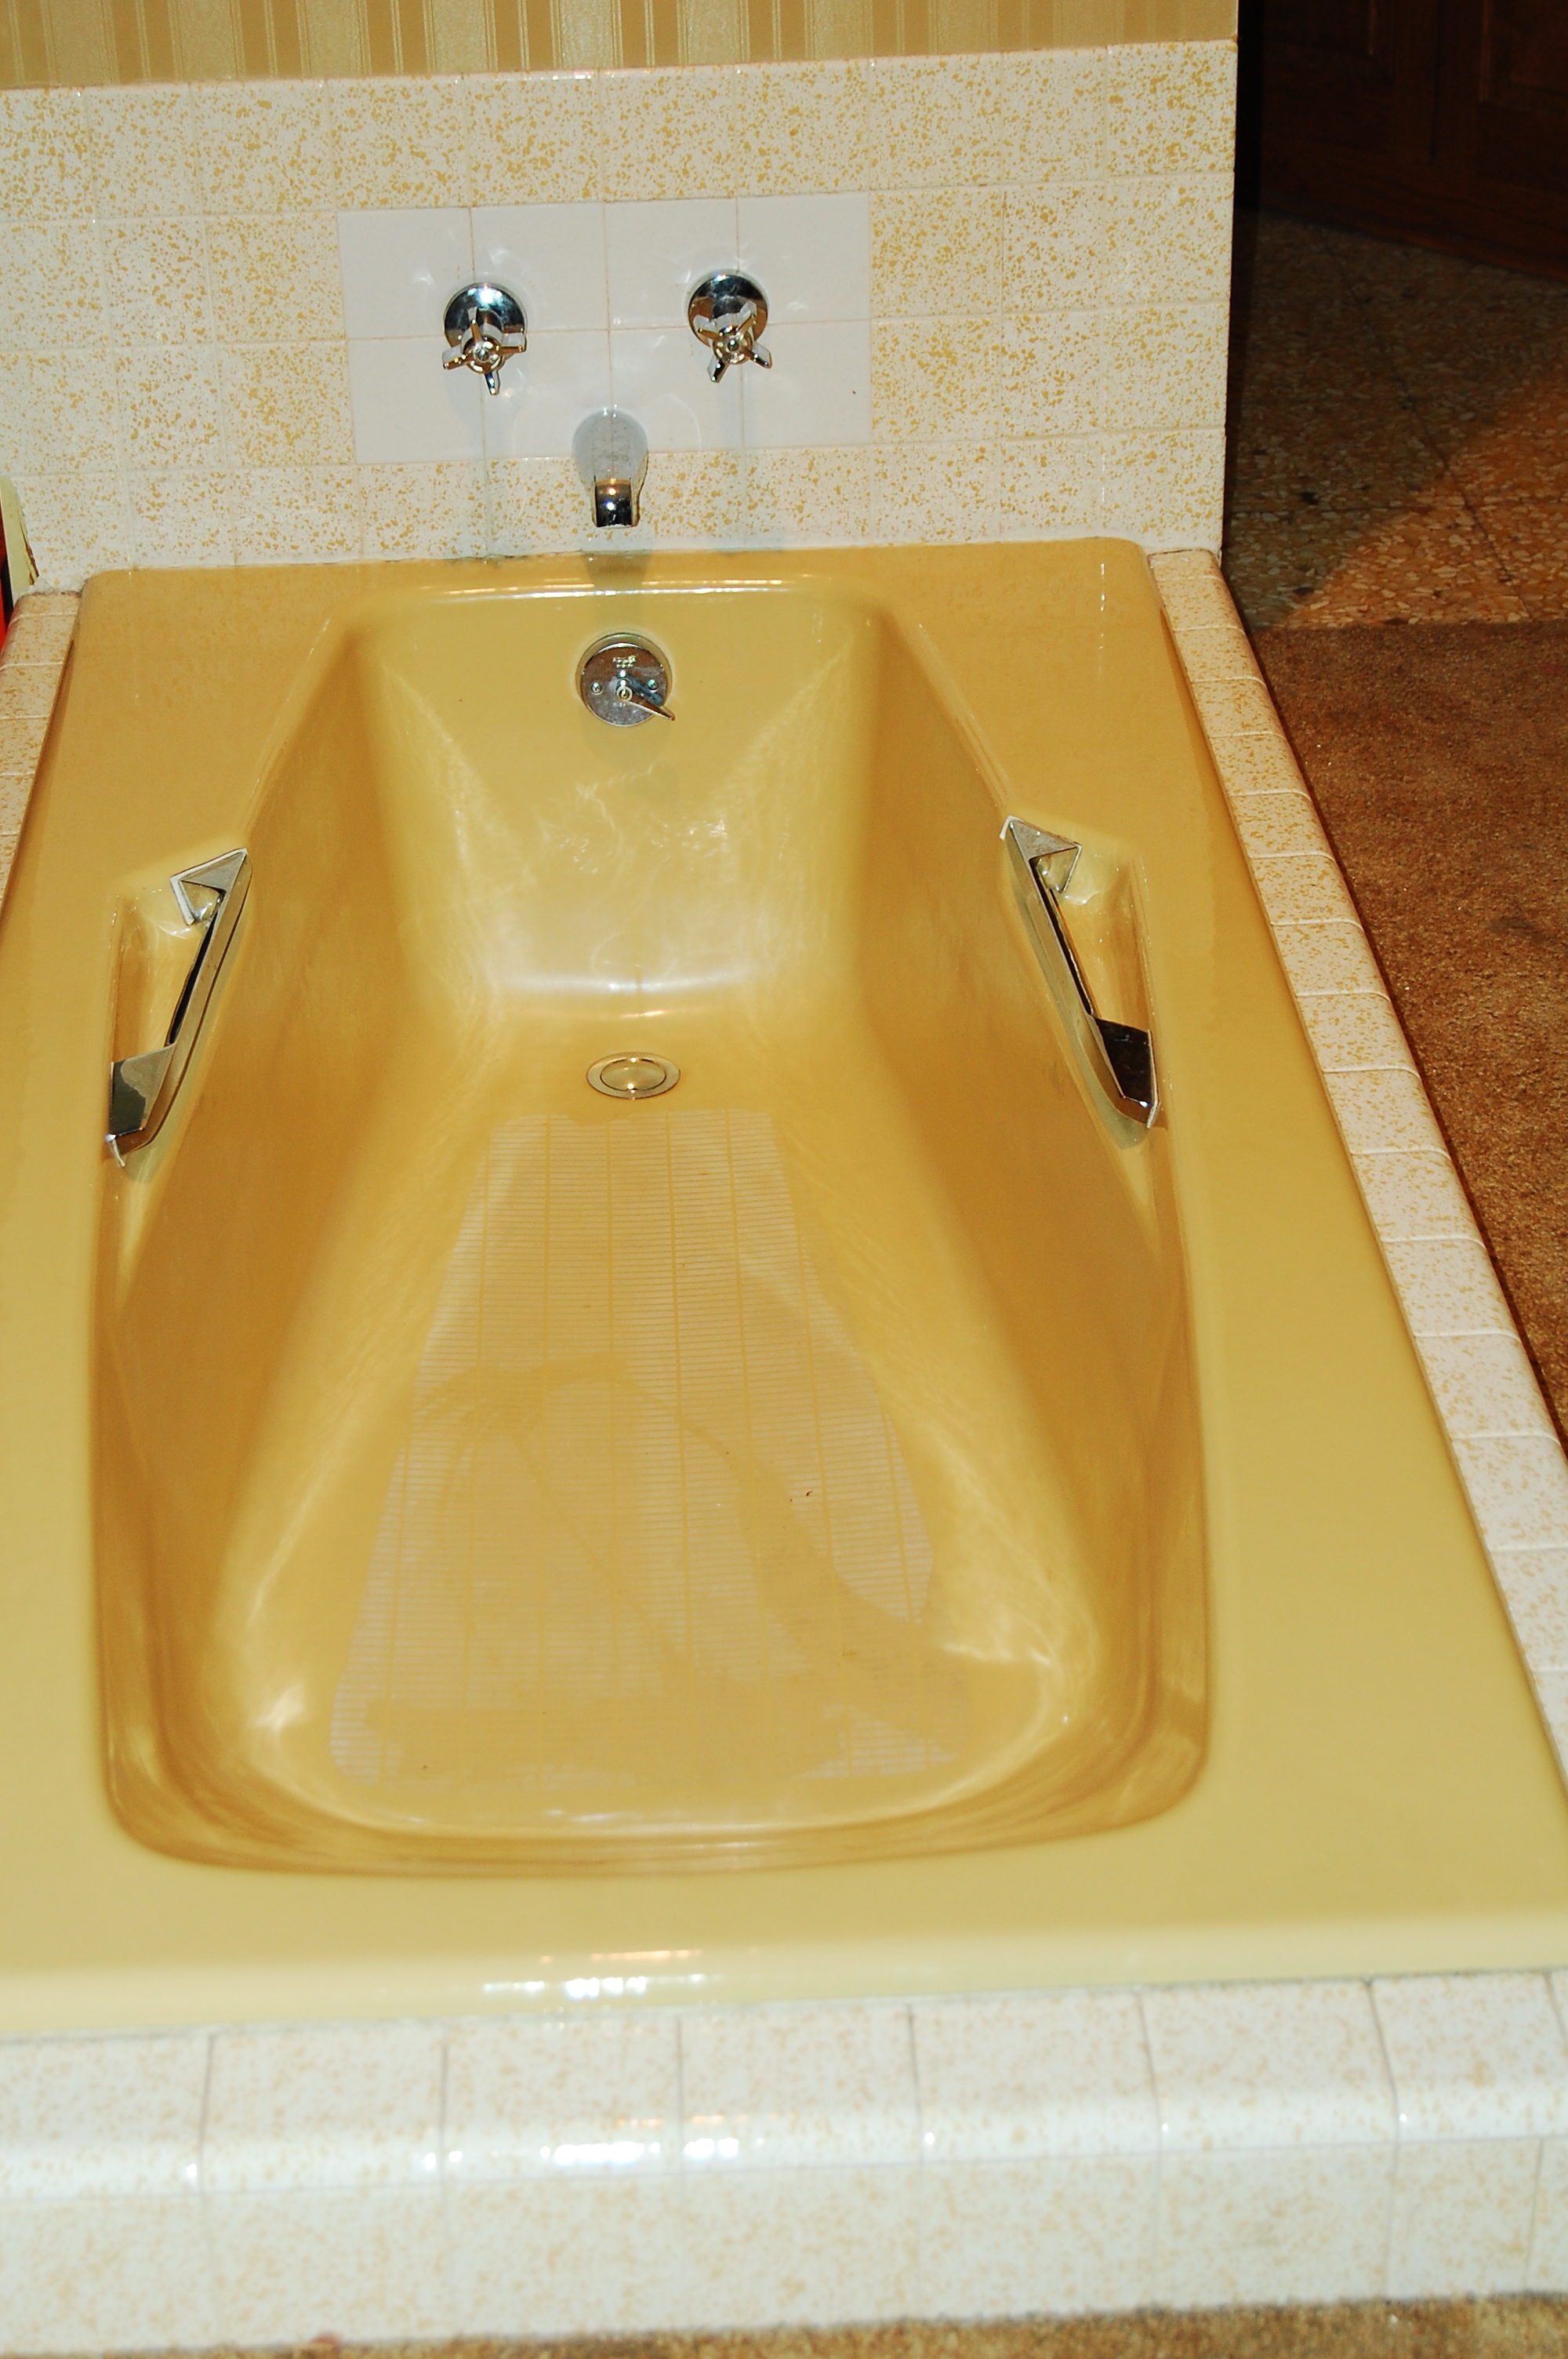
Under the plywood on the floor is a giant hole where the sunken bathtub with no surrounding walls used to live.  It was a big tripping hazard, so we had the tub hauled off by a metal recycler and plunked some plywood down so no one would fall to their death to the basement.  This is RIGHT in front of the entrance to the bedroom.  You could sit in the former bathtub in the master and watch the TV in the family room and hold a conversation with everyone, convenient :).   Plus, the kids liked using it as a slide.  They were pretty upset they day it left.

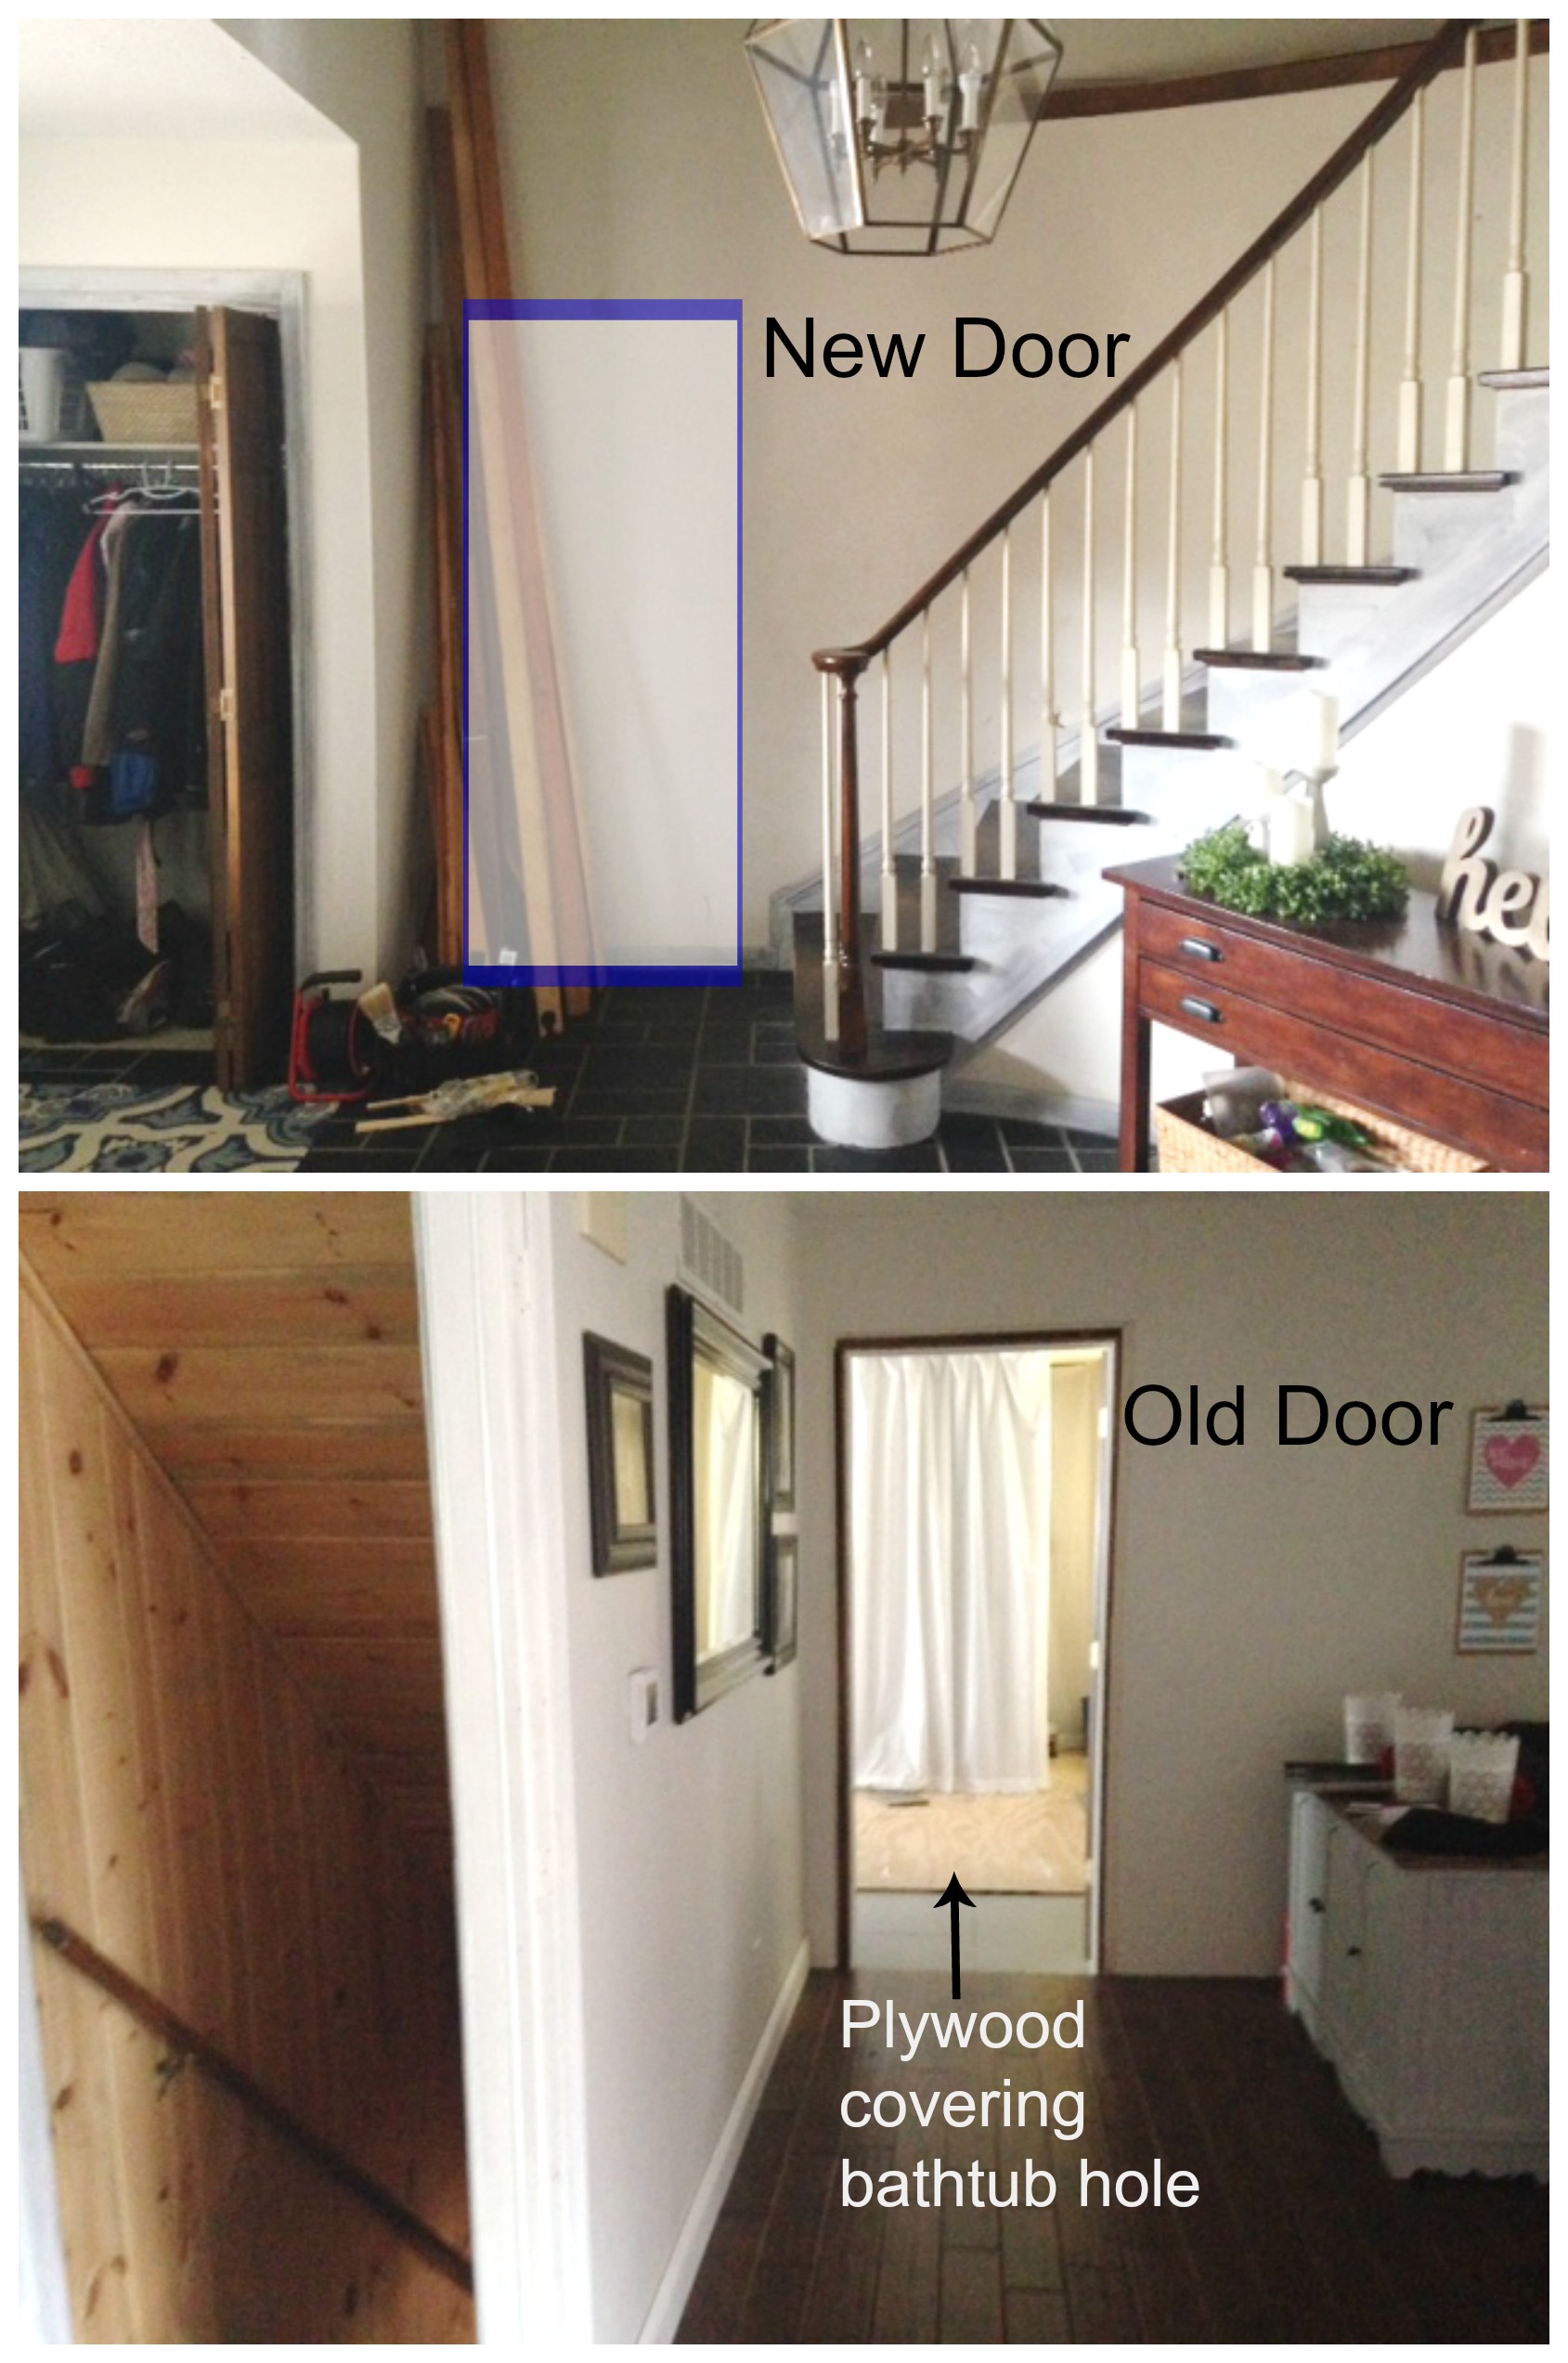
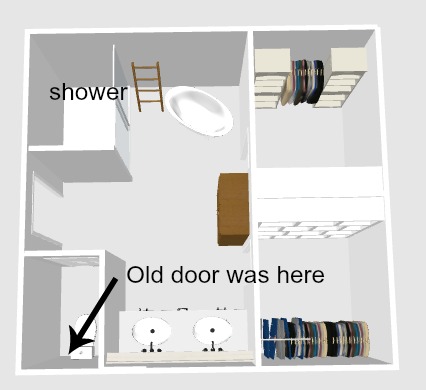
We are moving the door in the master bedroom from the family room to the foyer.  This will give us enough space to build an ensuite bathroom, and allow faster middle of the night access to the 2nd floor where the children sleep.  The doors are right on the other side of the staircase from each other.  The new door is to the left of the old one and makes good sense inside the bedroom also.  There’s just enough space for the new door to make it 36 inches wide with room for proper trim.

Here are the current plans for the ensuite:

Also on the list:  finish the basement, build organizers in the garage, replace the driveway, build a lower patio under the upper deck, cut a back door and add stairs to go to the yard, build a swing set and finish the landscaping.  We’re about $16,000 short on the budget for ALL of this, so some projects will have to wait while we save up money.   I’m also hoping that I over budgeted on some projects and we will find money as we go along.  Bwa ha ha!  Like that EVER happens in remodeling.

We refinanced our home in January.  My parents hold the mortgage to the house.  It’s a rare situation I know, but they are very frugal and built a nice savings that my mom was afraid to invest in the stock market.  It was sitting in the bank making %0.005 interest driving my Dad crazy.  He was interested in loaning it to us where it could safely grow.  We were getting a mortgage anyway and would have to pay the interest somewhere, and it feels really good paying it to them.  We have the mortgage on direct deposit, so every month they automatically get paid.  We’re never late and everyone has peace of mind.  That simple piece of organization keeps the family relationship good.  I know this is something that Dave Ramsey says to never do, but it works for us.  This January, my folks gave us back all the principal+interest that we had paid them over the last 4 years and started our loan over.  If we are super careful, it should be enough to finish the house modestly.