Clothing Budgets for Teenage Girls

Something came up this weekend and made me change the way I parent.  It wasn’t something new, but it was the final straw.  I’d had enough and things were going to be different.

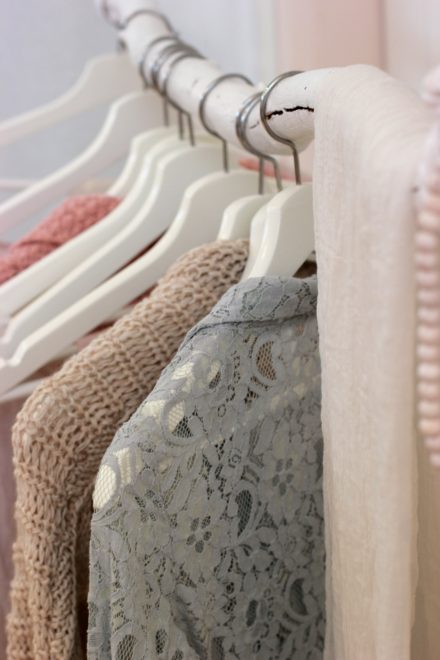
My oldest daughter was having trouble finding something to wear for church, and she was searching in a closet full of beautiful dresses.  Dresses, she picked out, and I purchased for her with a very limited family clothing budget.  She was close to melting down and yes, it was about more than a dress.  It was also about cooking the perfect Mother’s day meal and making the perfect Mother’s day surprise.  Plus knowing that her boyfriend’s parents were coming over to join our Mother’s day celebration and wanting to make a good impression.  It was about singing in the choir loft where the whole congregation could see her, and taking on the stress of trying to be an adult when she isn’t quite there yet.  (I feel like I need to tell you that I was helping her with the meal and everything else, which just seemed to make her more upset, because she WANTED to do it all by herself to make a very special day for me.)  It all added up and equaled “nothing to wear.” I hope other Moms of teenage daughters can verify that this is normal.

It wasn’t an isolated situation and it wasn’t limited to her.  Her sister a few weeks ago, begged for a reasonably priced pair of jeans at Costco.  You can’t try things on there, but their return policy is excellent as long as you leave the tags on.  She cut the tags before trying them on only to discover they didn’t fit.  I was panicked. “Let your sister try them on.” They didn’t fit her either.

“Calm down, Mom.” They said.  “We’ll sell them. It will be fine.”

“What do you think you could get for them?”

“$1-2.”  They looked happy.  “Then we’ll use the money to buy jeans that do fit.”

I said, “I bought brand new jeans for $12 and you are going to turn around and sell them for $2?”  They were cheap jeans from the get-go….but still.  This is bad math.  I had to leave the room before I said anything more.  The air was thick with my frustration.

I’ve noticed a pattern that when I buy their clothes for them, the items end up in the garage sale pile much too soon.  Or relegated to the “nothing to wear” section of the closet.   Or just tossed on the floor and trampled on. I tried to prevent it by asking them lots of questions in the store: “Is it too tight?” “Is it comfortable?”  “Do you like the way it looks from the back?” “Are you SURE you are going to wear this?”  They promise they will, but then don’t.  Sometimes I think all my questions just sowed seeds of doubt that blossomed into full grown confidence busters once the clothing gets home.  Parenting is so hard. Being a teenager is hard too.

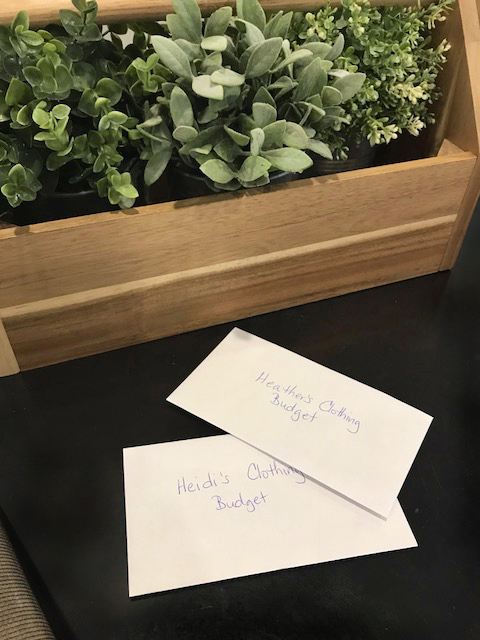
The best solution I could find is to turn it all over to them.  I handed them each an envelope with their portion of the monthly clothing budget in it.  It’s $20.  In June they will get $20 more and so on. That $20 will make the $12 pair of jeans look a lot different in a few months.  Right now, they feel rich.  They said, “Oh Thank you!  That’s so generous of you!”

I didn’t feel very generous.  I reminded them, “That will have to cover your underwear, bras and socks. Swimwear, school clothes, formal wear, shoes.”

“Yes! We understand.”

“You can save it from month to month until you have enough to do something with.”

“Yes, Mama.”

They know the glories of thrift stores and garage sales, and we recently discovered a lovely consignment store near us as well. Perhaps they will discover the joys of selling to the stores as well as shopping there.  Perhaps they will learn about Ebay or Craigslist.  Perhaps they will learn to sew.  I’m not sure.  It’s up to them now, and I’m kind of excited to see what they do with it.

P.S. While this feels like the perfect solution right now, it was really hard for me to do, because I’ve never divided the budget evenly among the family members.  I always used the money in a lump sum for the people who have immediate needs, like athletic shoes or longer pants, and fill in the gaps with hand-me-downs from brother to brother.  Now my lump sum is $40 smaller each month, but I think the educational experience will be worth any kind of adjusting I need to do on my end. 

How to Switch to Homemade Ketchup

This is a post I really hope my kids don’t read.  It could ruin everything.  Kids, if you’re reading…stop now.  See…it’s just spinach.  Move along.

Are they gone?  Shhh.  Lean in a little closer.

I’ve been secretly replacing the ketchup in their favorite bottle with homemade.  Gasp!

Their favorite brand is made with High Fructose Corn Syrup and while the effects on blood sugar are about the same as table sugar, the effects on gut health are way worse than that.  High fructose corn syrup is a pre-biotic that firmicutes thrive on.  Don’t let that name fool you.  Firmicutes don’t make you FIRM or CUTE.  Think F for Fat.  Studies have shown that people with higher levels of firmicutes in their gut biome struggle with weight control versus people with higher levels of bacteroidetes who tend to be naturally thin. Source

In our quest for health, I’ve been slowly getting HFCS out of our diet.  I started with switching from Aldi peanut butter to Costco’s organic peanut butter, where the ingredients are just organic peanuts and salt. It was a little more expensive but not too bad. The kids are eating it, but have been asking for their old peanut butter back (sigh.) Then I switched from Aldi grape jelly, to Welch’s made with real sugar.  They like it even better, because it spreads well. It’s still a lot of sugar, so next stop is buying all fruit jam or making homemade.

I decided to be a little more stealthy when it comes to their ketchup. I noticed the bottle was half empty.  I made a homemade version and filled the bottle back up, shaking well. When it gets half empty again, I’ll repeat the process.  Pretty soon the bottle will be 100% homemade ketchup and the kids might not ever notice.

Here’s our recipe, which I adapted from Whole New Mom.

Homemade Ketchup

6 oz Tomato Paste

1 oz Apple Cider Vinegar (2 Tbs)

2 1/3 Tbs Erythritol (You can use Turbinado sugar or 1 2/3 Tbs honey instead.)

1/4 tsp garlic powder

1/4 tsp onion powder

dash cayenne

dash allspice

1/2 cup water

Whisk everything together and chill.  If you want it super smooth, use a blender. It makes about 12 oz of ketchup, which fills our bottle halfway.

I’m also working on a homemade BBQ sauce.  In the meantime, I’ve been buying  this one.

What do you think?  Are your kids ketchup fans like mine are?

The Secret to Great Energy and Well-Being

Back before we moved into this giant project house, I made homemade bread, had a garden, and sewed our own clothes. I cooked a meal every night and we sat around the table as a family.  Since we moved (6 years ago — aak!) I just haven’t had the energy for it. It might have coincided with adding our 6th child, plus all the extra work from DIYing the house. Plus I took a part time job outside the home and then my health fell apart.

This picture is awful and I was definitely miserable, but it’s not the sickest part of my journey.  Just a year or two before this, I couldn’t walk unassisted because my blood pressure was so low.  If I tried to stand, I would sometimes black out and the room was spinning so fast, I couldn’t keep my balance. It was hard to even lift my arms off the bed.  Some days I was afraid my heart might stop beating in the night.

All that time in bed, I spent reading and researching.  I found a doctor who could help me. Traditional doctors scratched their head and wrote prescriptions for prednisone and other immunosuppresants. Some even suggested it was all in my head, but she guided me through nutritional healing.  The details of that process is a book all in itself, but it has motivated me to help others.  It’s why I’m in school right now to become a personal trainer and going on to become a health coach and fitness nutritional specialist.

Friend, your health is everything. While I was laying in bed, the only thing I had was God. (Which was huge!  I can’t imagine walking this journey without Him.)  I had no family life.  I missed sports games, music concerts, birthday parties, Christmas.  The world kept going with me trapped in bed on the sidelines. The kids did so much growing up in the years that I was sick. Those lost moments are my biggest regret.

I have energy to bake again! No more additives in bread for my family.

Even after I was well enough to get up off the bed, I had a long road of recovery ahead. I’m still on it and sometimes take a step back.  While each regression is frustrating, it also teaches me a lot about my body.

Sheet Pan Suppers make healthy food prep easy

The cause of my illness can be summed up in one word, STRESS.  I used to think about stress as worry, money problems, or a calendar full of too many events, and while that’s definitely part of it, stress is much more than that.  It can be physical stress from exposure to toxic chemicals, like ammonia and bleach or even paint fumes. It can be from toxic load from food additives. Stress can even come from light sensitivity or undiagnosed allergies.  Whether stress comes from internal or external sources, it creates a perfect storm that is the root of ALL disease. Even when we have a genetic disposition to disease, it takes a trigger to turn those genes on.  That trigger is some form of stress.

Research scientists are now discovering that the deadly diseases of aging adults began in their childhood.  This link is specific to heart disease, but I strongly believe that cancers and brain diseases also begin in childhood with root nutritional stress causes.

I’m hosting a free live class through zoom on May 3rd, telling some of the tricks I use, including how to use essential oils to support the thyroid, adrenals and good sleep. How I ensure proper nutrition and reduce oxidative stress. I’ll also show my favorite snack that boosts gut health, encourages fat loss, increases metabolism, boosts detoxification, and is super filling. Plus I’ll be showing my favorite non-toxic cleaners and skin care routine.  Just pop in your email address above to get an invitation. (Plus it’s live, so you can ask questions like “But what about picky eaters? And how can I afford it?”)

Sometimes I still feel discouraged about how far I have left to go in my health journey, then I look back on my progress photos and realize how far I’ve come.

I put these photos side by side yesterday and shared them on instagram. I still have a long way to go in fitness and the scale has actually gone UP instead of DOWN! So frustrating when I’ve been working so hard and if all I had to go on was the scale, I would have given up long before now. Some days I ask myself how I think I can be a personal trainer and health coach when I’m so overweight. “Who do you think you are?” Then I see the progress here and realize the scale can’t tell the whole story, and I keep going.

Even progress pictures can’t show everything.  Remember when I told you a few years ago I couldn’t lift my arms off the bed? This is last weekend, me hiking with my family.  ME!  I’m crying with joy because I was there, participating, living an energy filled abundant life.  If I can do it, anyone can.

I’m excited to share more of my story with you live.  See you May 3rd!


How to Take a Family Cruise on a Budget

We just got back from our Spring Break cruise to Mexico and even though it was full of luxury and pampering it was a fairly low cost vacation.  Here’s how we kept the prices low.

1. Choose a port that you can drive to, eliminating flight costs.  The more people in your family the bigger the savings!  We drove 14 hours to Galveston, TX and it was great fun to watch movies and talk in the car.  We took some healthy snacks so we only ate out one meal on the way down.  We could have packed a lunch but I was maxed out on time getting us ready to go and since we never eat out it was a super big treat for the kids. On the way back the kids were so tired, they giggled slap happy style until they fell asleep in a pile like puppies (but with seat belts.)  There are also ports in California, Florida, New Orleans, Washington State, and along the East Coast, so you can choose the closest one to you.

2. Choose the ship and cruise line you want, then watch prices at Vacations to Go. Buy the deal when the prices drop. This is even easier if you are very flexible on the destination and sailing dates.  We had to be more specific since we didn’t want to take the kids out of school, but still found a deal for $300 a person.  It’s not an exact science to know when prices are the lowest.  Just decide ahead of time what your buy zone is and call immediately when you see it. Deals like that sell out FAST. I sat on the deal for a few hours and when I finally called it was sold out.  They did have a slight upgrade for $50 more (still a great deal!) which gave us a window in each room.  We’d never had a window before and it was great!  It’s not worth the extra money for a window though if you can get an inside cabin.

Remember, no matter which room you’re in, you still get the same great service with folded towel animals, twice daily maid service, and meals included.  We don’t spend much time in our rooms with all the things to do on the ship, so as long as it had a bed we were happy.

3.  Ships want to sail FULL.  So if you are super flexible on the price, watch the 90 day ticker.  You can get a really great deal if you can leave in a few days.  If they aren’t full they start slashing prices just to get bodies on there.  Once you’re there they’re hoping you’ll buy alcohol and other things so they’ll make a killing off of you, (but don’t.)

(The main dining hall requires formal dress at least one night of the trip and business casual the rest of the time. We had fun shopping thrift stores for several months before we left to get everyones wardrobe in shape.)

4. Ask about larger occupancy rooms.  Often the 3rd and 4th persons in a cabin are 1/2 price, though there is no age discount for small children (not even babies.) Our cruise was completely sold out and we got some of the last rooms, so they didn’t have any bigger rooms to offer us by the time I called. Our rooms also had several rooms in between them which made me nervous since 3 of our rooms were just unsupervised kids.  It worked out fine though.

5. Buy a motel room the night before the ship sails.  We drove all night to minimize missed work but still bought the hotel room, Beachcombers Inn in Galvaston. They offered free parking, so it was cheaper to pay for the room we only slept 4 hours in, and a taxi to the dock, than it was to pay for parking at the dock during the trip. We used hotels.com to find the best prices.  My dad booked his room a few months before we did and ours had dropped in price $5 from what he paid.  It’s ok to watch hotel prices to see if they drop.

6. If you are set on buying excursions (sight seeing trips when the ship stops at a land destination) buy them early.  Once you get on ship the price gets higher.  We chose to skip all the excursions for budget reasons and did our own sight seeing by foot and taxi at the ports.

7. Take lots of cash, but break it up into different locations.  In tropical countries they are used to haggling with the prices.  If you pull out too much money at once, they become less flexible on the price. Never take their first price offer as the final offer.  Look contemplative; use few words, and if all else fails start to walk away

8. Don’t forget to budget for tips.  Most ships add $14.50 per person per day to your final bill and if you have a lot of kids this can add up quickly. The cruise staff works super hard for you and is worth every penny of that gratuity.  You can opt out of paying it, but please don’t.  Just plan ahead so it’s not a hardship.

9. Don’t drink alcohol on the ship.  It’s crazy expensive. Some people on our trip paid an extra $1200 per person just for alcohol and sodas.

10. Watch out of other additional charges.    Upgrade restaurants, spa treatments, fitness classes, shopping, gambling, bingo.  We skipped it all so only had tips on our final bill.  There was plenty of free things to do that kept us happily engaged while we were on the ship.  Our absolute favorite was a kick boxing class.  My 2 daughters and I were the only ones that showed up for it, so we got a private training session from the coach.  It was supposed to only last 30 minutes, but we were having so much fun he coached us for an hour and 15 minutes.  It was way out of our usual thing to try and was a fun bonding experience.

Things to keep in mind:

  1.  You won’t have cell or internet service on the ship, though you can pay extra for internet if you need it for work.  This was tricky for us to keep track of 6 kids all in their own rooms, without being able to text. If you have walkie talkies, it’s a great idea.
  2. Your room doors are metal and will take a magnet.  My mom brought cute little magnet animals for each of our doors and wrote our names on them with a magic marker.  It was so helpful to be able to find our room quickly, especially with so many doors between the rooms in our party and everything in the  ship looking alike.
  3. If you pack your luggage in a way that you can carry it all yourself, you can get off the ship 30 minutes faster at the end of your journey and be on your way.  Just skip the luggage tags they leave you at the end and don’t put your luggage out the night before for pick up.
  4. You aren’t allowed to carry on your own luggage at the start of the trip, because they will let you on the ship 3 hours before you have access to your room.  It takes them awhile to deliver everyone’s luggage so I recommend a backpack or carry on bag with essentials that you might want to freshen up for dinner.
  5. If you eat dinner in the dining room (vs the buffet area) and I recommend you do! You’ll need to request either early (5:30) or late dining (8:30) when you book your trip.  There is a strict dress code for the dining room which means no flip flops, shorts, hats, or tank tops. One or two  of the nights, it will be formal only–meaning dinner jackets, ties, and cocktail dresses.
  6. I took a bunch of clothes I never wore.  I did all the free fitness activities offered and pretty much lived in workout clothes or my bathing suit and cover up while on the ship.  Then I wore sundresses or formal dresses for the dining room (the sundresses doubled for classes like napkin folding or the informational spa session) and I didn’t even touch my shorts outfits. Think about what you like to do and might not need as many clothes either.  A cute swimsuit cover up is a must if you plan to visit beaches and the onboard pools or hot tubs.  Then you can just slip it on and go to casual dining whenever you fancy.
  7. Not all cruise lines are kid friendly.  We booked our first cruise with kids on Carnival and their idea of a kid’s program is to clear out a smoke filled bar and plunk down some crayons.  Even the smaller Royal Caribbean ships have dedicated kids and teen areas with quality programs that will have your kids begging to go.  My teens loved the teen center too, but it was on the 10th deck and they could feel the sway of the ship way too much to stay up there.  We’re now super loyal to Royal Caribbean and don’t plan on sailing with anyone else ever again.
  8. Plan ahead for sea sickness.  My kids were helped by the acupressure sea bands, and we had essential oils (ginger) and dramamine for emergencies. I packed my diffuser which floated around the kids rooms as various ones felt seasick. Since colds and flu can travel around the ship quickly, I also packed my fast acting natural remedies just in case.
  9. The ship goes quickly and even in tropical climates the breeze at night can get chilly in the fall or spring.  Take a comfy jacket or sweatshirt just in case, if you like walking around outdoors.
  10. The tropical sun is different than the sun in Missouri.  We used 50 SPF sunscreen and applied often and still got burned.  If you have fair skin, take protective clothing as well.
  11. Think outside the box.  We wanted to go snorkeling as a family, but just renting the gear was going to be over $100.  We paired up and rented gear for half the people.  They snorkeled while the rest played on the beach, then we swapped gear and the 2nd group went snorkeling.  Everyone had a blast and we saved 50%.


Raw Almonds aren’t Really Raw (and might contain added carcinogens)

I care about your health and never want another cancer diagnosis.  We try really hard to eat healthy, exercise, reduce stress, remove toxic cleaning products from our homes, and yet cancer. Today I want to tell you about a whole food I thought was healthy, but had added carcinogens that weren’t disclosed on the label.

Even though I have a super low grocery budget, I pay more for certain things.  For example,  I buy butter instead of margarine or shortening and I buy honey instead of corn syrup.  If it’s for a recipe that stays raw, I even splurge for raw wild honey. The health benefits of these foods, outweigh the costs. By limiting our purchase of junk foods and eating out, they still fit into our small budget.

Almonds are a food that I’ve upgraded in our budget.  It’s illegal to sell a truly raw almond in the United States, unless they are selling direct to the customer at a farmer’s market. (I’ll be looking for that next, but it may be hard to find in my area.)   Almonds must be treated with steam pasteurization or a chemical called propylene oxide (PPO), a known carcinogen.  In fact, my previous favorite “raw almond” source was Costco because of the fabulous price and “high quality” until I found out their almonds are treated with PPO.  Too many of my friends have cancer right now, for me to say “it’s the dose that matters” and continue to feed my family known carcinogens.

Recently I started driving 20 miles to Trader Joes for almonds because their almonds (even the inorganic ones) are PPO free.  While I don’t buy all my foods organic, the one sure way to tell if your almonds are PPO free is if they are certified organic.

The unnerving thing about PPO treatment (also called PPO pasteurizing) is that the tainted almonds are everywhere.  They might be in almond flour, in almond milk, in a cracker, in a granola bar, or in a breakfast cereal, and just because it’s a health food brand, doesn’t meant it’s PPO free. If it’s not labeled organic, we have to contact each manufacturer directly to find out which type of treated almonds they use.  They aren’t required to disclose it on the label.  Did you catch that?!  They can treat their almonds with a known carcinogen and aren’t required to disclose it on the label.  In fact, the label can still say “raw.”

For more reading on the subject:

The EPA page on PPO

Natural Society

Natural Grocers

Whole New Mom

Almonds.com

I’m open to learning more.  If you have information from the other side of the issue, send it to me and I’ll be happy to read it.


Naturally Colored Frosted Sugar Cookies

We are making healthier choices these days and if you want to know why we decided to develop a healthier sugar cookie, keep reading.  Otherwise click here to skip to the recipe.

It’s never too late to chase your dreams

Did I tell you that I went back to school? After years of consideration, I am becoming a Certified Personal Trainer.  I eventually want to become a Health Coach and Fitness Nutrition Specialist, but personal training is the first step.  It is a lot harder than I thought it would be, and yet it’s all the things I love to study.

To give you an idea of the challenge it has been: I need to memorize human anatomy, the names and locations of the bones and muscles etc, including details about organs like the names of the heart valves. In this course, it was all crammed into 1 chapter and an assignment for 1 week.  Thankfully I learned part of it in high school, but back then we took an entire semester to memorize it.  I wasn’t able to re-learn it all in one week, and to keep from falling behind, went on in my lessons while I practiced a little every day.  Without a good grasp on those terms, the rest of it isn’t making sense….aak!   Students who have passed the final exam are encouraging me to keep pressing forward and eventually it will all fall into place.  I’ve never felt so inept at school before!

There are important people in my life that are struggling with health and most of the conditions were preventable with proper diet and exercise. I’m going to school so I can educate and motivate about life styles that prevent disease.  While I study we are making changes in our own home to better nurture our family health.

Even when it comes to treats, we are choosing health giving foods.

My son found a set of adorable Easter themed cookie cutters when we were out shopping Saturday. I bought them and then remembered our healthier choices campaign.  I had an expectant little boy ready to make some baking memories with his mom, so we developed a healthier cookie recipe together and frosted them with vegetable tinted icing. They were pretty good, but not so good that you lose all self control.

These aren’t low sugar cookies and are not diabetic or weight loss appropriate, but for growing kids who burn plenty of energy, they are cookies with fiber and trace minerals that I don’t mind serving as a once in a while treat.

Whole Grain Sugar Cookies

1 cup butter, softened

2 cups Unrefined Sugar (Evaporated Cane Juice*)

2 eggs

1 lemon, zested and juiced

4 cups Fresh Ground Hard White Wheat Flour** (Spooned in and leveled off, not packed)

2 tsp Baking Soda

1 tsp Salt

Cream the butter and sugar together until light and fluffy.  Add eggs one at a time beating well after each addition.  Stir in lemon juice and zest. In a large bowl combine flour with baking soda and salt.  Beat flour mixture into the butter mixture a little at a time (so it doesn’t cloud up into your face.)  Chill for 3 hours for easier handling.

Roll dough out onto a lightly floured surface about 1/4 inch thick and cut with cutters. We like to give the cutter a little wiggle once it’s well seated in the dough, making it easier to move the cookie to the cookie sheet.  Place cut cookies 2 inches apart onto greased cookie sheets.  Then bake at 350 degrees for 8-10 minutes.  Let cool about 5 minutes on the cookie sheet before moving to a wire rack.  Makes about 4 dozen cookies.

*Aldi sells evaporated cane juice under the label Morena.  It’s less than $2 for a 4lb bag and unlike refined sugar still has the trace minerals found in the original sugar cane.

**We buy our wheat berries in 26 lb buckets from walmart.com for around $15 each.  Then grind them just before using with this grinder (affiliate link.) Wheat oxidizes quickly once ground and the oils become rancid becoming bitter and carcinogenic.  Wheat also loses 40% of it’s vitamin content over the first 24 hours after grinding, so we grind our flour fresh each time.   We use fresh ground flour in pancakes, waffles, homemade bread, pizza crust, tortillas, biscuits, cookies, muffins etc.

After learning about the links of artificial food dyes to cancer and neurological damage, we’re skipping it for more natural alternatives.  Not only are these safer, BUT they are health giving in their own way.

Reduced Sugar Frosting

16 oz Neufchatel Cream Cheese

1 Stick butter, softened

2 cups powdered sugar The original recipe called for 2 lbs of powdered sugar!!!!

Beat the cream cheese and butter together until it’s completely smooth.  Any visible lumps at this point will stay visible on the cookie (mine had lumps!)  Once it’s super smooth, beat in the powdered sugar a little at a time.  The vegetable powders will further thicken the frosting as does chilling, so if you prefer you can add as little as 4 Tbs of powdered sugar, or use 4 Tbs powdered Erythritol for a sugar free frosting.

Divide your frosting into separate bowls for each color.  For green we added a little matcha powder, but freeze dried and powdered spinach would provide a more vivid green.  (This was the color that had the most flavor and it wasn’t too kid friendly.  They broke off the green part of the carrot for eating. Adults didn’t mind it so much.)

For yellow we used a small amount of dried ground turmeric. It had no flavor and was the prettiest frosting of all.

For Pink we used freeze dried strawberries that I crushed with a rolling pin.  I didn’t think of it until later, but my small coffee/herb grinder would have made a much finer powder for no visible chunks.  Any freeze dried fruit would work here, like cherries or raspberries.  We bought ours at Aldi.  Beet powder would also make a beautiful color.  Think of all the color varieties of freeze dried foods!

For Orange we mixed turmeric and strawberry powder together.

For the Bunnies, we used strawberry frosting, mini chocolate chips for the eyes and a raw almond for the nose. (It was such a new way of thinking for us to not automatically grab for candies for the facial features and we really had to think about what we had on hand that might work. Everything except the matcha and wheat berries were from Aldi.)

The chicks had turmeric frosting, with a mini chocolate chip eye, and a pepita for a beak.

The carrot had turmeric and strawberry frosting for the root, and matcha frosting for the tops. Grant (6) really wanted to add chocolate chip eyes to all the carrots, and now I wish I had let him.  I’m still learning how to be a good mom and to know when to say yes and when to be the safe boundary for them.  My oldest is 18 and I’m starting to think learning to be a good mom is a forever journey.

Are you interested in learning more about frugal healthy options for the family?  Tell me about some healthy choices you’ve been making lately.


Dump and Go Freezer Meal: Meatball Casserole

It’s time for meal #4 for our Fill your Freezer in 7 days blog series!

This comforting recipe can become fitness friendly with the use of Barilla Protein Plus Pasta.  It’s made with lentils, chick-peas, flax and other protein rich legumes.  Our local Wal-mart and Target both carry it and occasionally Target has coupons plus sales for great stock up prices.  If your local store doesn’t have it, Prime Pantry carries it for about the same price.

Any pasta will work in this dish, even gluten free pasta, so pick what works best for your needs.

Starting with frozen meatballs makes this super fast to throw together, but I’ll include a recipe for homemade meatballs at the end, just in case you prefer to do it yourself.

Meatball Casserole

Serves 8

1 jar, 24 oz, marinara sauce

3 cups water (just fill the empty sauce jar up and shake it up)

32 oz Turkey meatballs

14 oz bow tie or penne pasta

2 cups Mozzarella Cheese

For freezer cooking, pour the marinara, water and meatballs into a gallon baggie.  Press out air and seal.  Freeze.

For Oven Baking:  Thaw bag, pour into a baking dish with dry pasta and stir to combine.  Cover and bake at 350 degrees for 30 minutes. Top with cheese and bake uncovered for 15 minutes longer.

For Slow Cooker: Thaw bag and pour into a 4-5 quart slow cooker. Top with cheese and cook on low for 3 hours.

For Pressure Cooker: Thaw bag and pour into your instant pot.  Cook at high pressure for 5 minutes. Use quick release on the pressure.  Top with cheese and let stand a few minutes until it melts.

For Skillet: Thaw bag, Pour into a skillet.  Bring to a simmer, then cover with a lid and cook for 15 minutes.  Top with cheese and stick under the broiler until golden brown.

Homemade Meatballs

2 lbs Ground Turkey (or Beef, chicken, pork, venison, etc.)

2 eggs

1 cup Milk (Use Unsweetened Almond Milk of Dairy Free)

1 cup Italian style Bread Crumbs (Gluten Free: use Almond Meal or Gluten Free bread crumbs plus 1 tsp Italian Seasoning.)

1/4 cup parmesan cheese (Skip if Dairy Free)

2 Tbs Dried onion flakes

1 tsp salt

1/2 tsp pepper

Use a mixer to combine everything together.  Roll into 1 inch balls and place on a baking sheet with a rim.  Bake at 400 degrees for 15 minutes.


Dump and Go Slow Cooker or Pressure Cooker Quinoa Enchilada Casserole

It’s recipe 3 for our fill your freezer in 7 days challenge.  I hope beyond just giving you a few recipes, that I spark your imagination about how to adapt some of your favorite recipes for the freezer or even create some new flavors.

If you pre-dice your chicken, or used browned ground meat instead, this dish can be made in a skillet in just 20 minutes.  I love how in the slow cooker, it’s hands off until the end.  It’s truly a fix it and forget it situation.

This recipe is both fitness and family friendly.  To add calories and filling power, my growing kids serve theirs over a plate of tortilla chips, then top with sour cream and extra cheese.  I skip that part, then we all top it with shredded lettuce and chopped fresh tomatoes and salsa.

Be sure to rinse your quinoa before throwing it into your mix.  It removes the saponins that can taste bitter.  Since the grains are so small, I line my colander with a tea towel.

Dump and Go Quinoa Enchilada Casserole

1 lb boneless Chicken Breasts (If you bought it frozen, keep it frozen.  Thawing and refreezing raw meats changes the texture in an unappetizing way.)

1 Tbs taco seasoning mix

2 cans black beans, 15 oz each, drained and rinsed

1 chopped onion

1 cup dry quinoa, rinsed

1 can red enchilada sauce, 20 oz

1/2 cup water

Place all ingredients in a gallon baggie and freeze.  To cook, thaw just enough to be able to get everything out of the bag.  Pour into a slow cooker and cook on high for 3-4 hours, or on low for 6 hours. Shred the chicken with two forks and stir into the dish.  Top with shredded cheese, then replace the lid for a few minutes to allow it to melt.   Serve with a toppings bar.

To make in the pressure cooker, follow the directions above, except cook at high pressure for 10 minutes, following the manufacturers directions for pressure release before opening the lid.

Toppings suggestion:  Tortilla chips, shredded lettuce, fresh diced tomatoes, green onion, cilantro, sour cream, cheese, salsa, diced olives.

The leftovers reheat pack well in a thermos for hot lunch on the go.

Nutrition facts:  1/6 of the recipe without cheese or toppings yields: 381 Calories; 7g fat; 37g net carbs; 30g protein


Lime Chicken Tacos: A Freezer Meal That’s Slow Cooker and Pressure Cooker Friendly


Any meat that has to marinade makes a great freezer meal. Just don’t thaw it and refreeze it.  If your meat is already frozen, you can pour the marinade on it and put it back in the freezer.

Therea re two ways to make this into a freezer meal: 1. You can cook the meat through and then freeze it shredded and ready to serve, which saves time at the dinner time.  2. Or freezing it uncooked and in the marinade makes the freezer day prep super fast and easy. If you remember to pop it in the slow cooker or have an instant pot for faster cooking, this is a great option.

You’ll need 1 gallon freezer bag for this dish and then just your favorite taco toppings at time of serving.

I love how this dish is easily adaptable for all allergy and fitness needs.  For example, gluten free friends can use corn shells, or make a taco salad over corn chips. Keto friends can skip the honey and the shells or chips and make a big taco salad with full fat sour cream and cheese.  Dairy free friends can use avocado instead of dairy toppings.

Lime Chicken Tacos

Serves 4

1.5 lbs chicken breasts (These can be the ugly ones that are too thick or mis-shaped to grill)

1 Lime, zested and juiced

1 Tbs Olive Oil

2 Tbs Apple Cider Vinegar

1 tsp Honey

1 can, 4 oz, Green Chilies (If doubling the recipe, no need to double the chilies.  It saves money to use just 1 can while still giving great flavor.)

2 tsp Ground Cumin

2 tsp Chili Powder

1 tsp Minced garlic

A few dashes of cayenne if you like it hot

Combine everything in a Gallon size Freezer Baggie, press out the air.  Seal, Label and freeze.

To slow cook, place contents of the bag in a slow cooker and cook on high for 3 hours or on low for 6 hours. Shred with two forks and stir to coat in sauce.  Serve with a slotted spoon or tongs with your favorite taco toppings.

To Pressure cook, place contents of the bag in a pressure cooker. Add 1/4 c of water and cook at high pressure for 10 minutes.  Wait until pressure is reduced, or use quick release to bring down the pressure and remove the lid safely.  Shred chicken and stir into sauce. Serve with a slotted spoon or tongs with your favorite taco toppings.

Suggested Condiments: Tortillas 6″ or Tortilla chips, Shredded Lettuce, Diced Tomatoes, Diced Red Onion, Shredded Cheese, Sour Cream, Salsa, Guacamole

This is recipe #2 in our series, Fill your Freezer in 7 Days. Find more here.

Philly Pepper Steak Sheet Pan Freezer Meal

This delicious meal is fast to put together and cooks with hands off time.  Letting you pop it in the oven in the evening and unwind from the day’s tasks while it cooks.

You’ll use two 1 gallon freezer bags for the assembly.  The meat will marinate in the freezer, then cook up tender and flavorful.  It’s easier to slice cooked meat than raw meat, so I prefer to slice it after cooking.  If you know you’ll be too stressed to slice it at the time of cooking, slice it now, then reduce the cooking time in step 1 to 12 minutes.

If your family is on a regular diet, grab some sandwich rolls to make these into sandwiches. If you are gluten free you can serve it over brown rice, or low carb eaters can dish theirs over spaghetti squash or cauliflower rice.

This recipe is for 4 people, adjust as needed for your family:

Bag #1:

1 lb Flank Steak, or any boneless lean roast 3/4 inch thick.

2 Tbs cup Apple Cider Vinegar

1 Tbs Worcestershire Sauce

1 tsp Onion powder

1 tsp Garlic powder

1/2 tsp Salt

1/4 tsp Pepper

1/4 tsp cloves

Bag #2

2 Green Bell Peppers,Sliced

1 Onion (red or yellow), Sliced

8 oz Sliced Mushrooms

1/2 tsp Salt

1/4 tsp Pepper

Seal both bags, pressing out all the air first. Then label with the recipe name, today’s date, and the bag #.  Freeze.

Additional Ingredients: Provolone Cheese Slices and Sandwich Buns or Rice.

Cooking Instructions:

  1. Preheat oven to 400 degrees.  Line a rimmed sheet pan with parchment paper for easy clean up.  Place the steak in the middle and bake for 20 minutes (30 if it is still frozen.)

2. Spread the contents of bag #2 evenly around the outside of the steak. I doubled my recipe so I had to put veggies on top of the steak too.  Bake 15-20 minutes longer or until veggies reach desired tenderness.  Remove steak to a cutting board and cut into slices.  Return to the baking sheet and use tongs to stir it into the veggie mixture.

3. Top all with Cheese slices and bake for another 10 minutes or until cheese is gooey.  Serve on buns or over rice.

Picky Eater Ideas: Not everyone is a fan of peppers, onions and mushrooms.  You can substitute any vegetable for them including broccoli florets, zucchini strips, or Long green beans.

Do you have tips for helping kids eat their veggies?