Finishing Touches on the Master Bedroom

master bedroom 3

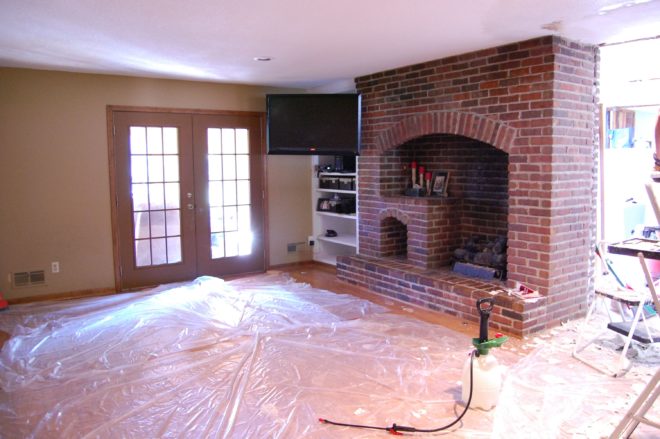
Our bedroom was a dreary place.  It was hopeless.  Short of knocking out the wall and adding extra windows, I was lost on how to breathe life into the space.  I allowed things to pile up around me in a clutter that didn’t have any business in a marriage retreat. The room was already gross….I didn’t see the need to protect it. It became the dumping ground for the whole house.

Master bedroom before

I was wrong.  Clutter is the enemy of peace. Even removing the pictures on the walls and the large bed frame allowed me to see the potential in the space much clearer.

Master bedroom quiet

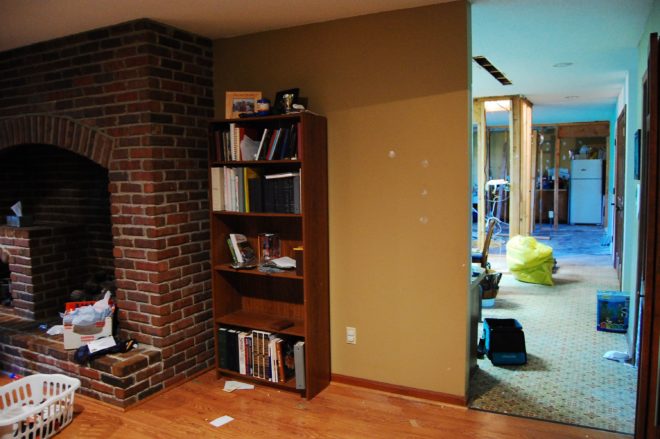
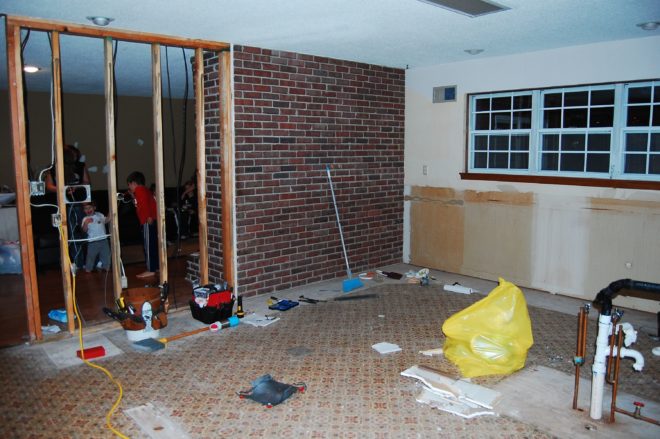
Without spending a dime, it was easy to rip up the old carpet, pop up the tack strip and pull the staples.

master bedroom painted

Fresh paint on the walls and trim, plus paint on the floor, made a clean slate for even better things. White trim made the room feel fresh.

master bedroom painted floor

nightstand in progress

Having to use what we already had, was a lovely limitation.  If I had the budget to buy anything I wanted, it would have been very hard to make a decision.  Instead, I spruced up our old furniture with a little paint.
painted nightstand

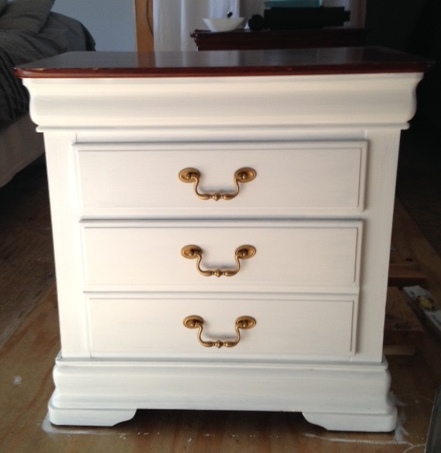
That same limitation gave us our gold lamps.

New lamps

Before I spent any money, I put all the things I was thinking about together in a power point collage, just to make sure it would look ok together.

Master bedroom mood board

 Our old ceiling fan could only take a 25 watt bulb, so we switched it out for a standard fixture with a little personality.

Master Bedroom After

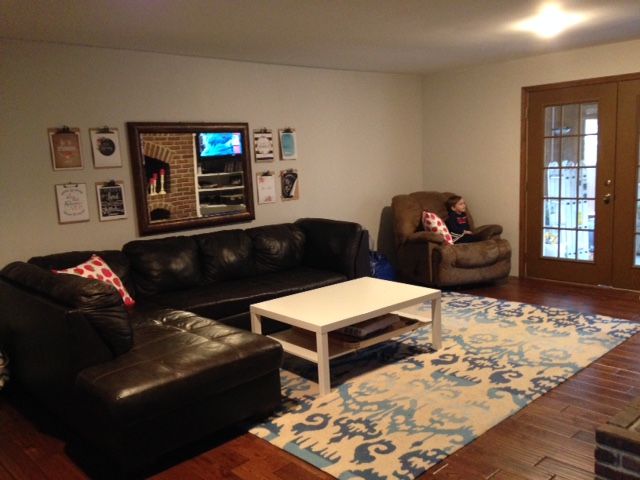
Layering in furniture and texture with the jute rug and curtains, cozied up the space and started to make it feel finished.

master bedroom 1

More texture comes from the faux bamboo blinds (They are $1.50 placemats and a $6 runner from Ikea thumbtacked over the windows.) and  faux sheep rugs ($12 Ikea rugs that I whipped stitched together) by the beds.  They collect dirt like I was afraid of, but clean up nicely with a toss through the dryer.

master bedroom 7

The gold tones and wood tones, plus the natural color of the placemats and jute rug add warmth and keep the mostly white space from being too sterile.master bedroom 6

Pillows add softness while the variation in shape make it visually interesting.  The long pillow is from Ikea and the square pillow forms are from pillow cubes.  I prefer to use feather pillows because they NEVER lose their fluff.  Feather pillows are the only pillows I’ve found that can be tossed and fluffed back to perfection every time.master bedroom 6-2

The peacock pillow cover is from Amazon and I’m waiting on the rest of my order to come to finish up the pillows on the couch and the bed. The white pillow on the sofa is still naked :).
master bedroom 5

The wood picture frame and carved wooden turtle (a gift from our friend in Hawaii) plus the plant, add warmth and life to the corner.  Plus mirrors on every surface we could manage them bounce the limited light around and really brighten things up.master bedroom 4

The white shams on the bed are filled with King feather pillows also from Pillow Cubes. Look at the difference between non-feather and feather pillows. I have a tutorial on sewing easy pillow covers here and plan to use it for the pillows that will end up on the bed. (The photo below also shows the difference between no dust ruffle and the no sew dust ruffle.)

Feather pillow cubes

I pulled way back to show you this final picture to try to capture the piece of plywood on the floor and the white curtains on the wall.  Under the plywood is a large hole where a sunken bathtub used to be, and behind the curtains (sheets thumbtacked to the ceiling) are studs, pipes, wires and insulation.  I can’t fix those two things right now. That lovely limitation almost prevented me from trying to change the room at all. The truth is I hardly notice them now.

master bedroom 2

I couldn’t make this room perfect, but my imperfect efforts still blessed my family.

 Pillow cubes provided the feather pillows for this post. All opinions are my own.

No Sew Bedskirt

When we were redoing our room last month, I was surprised how many little details make a space feel finished.  The bedskirt is one of those.

Master Bedroom After

Our previous bed had a wooden frame that hid the box springs.  We were ready for a new look, so kept the headboard only and put the bed on metal rails.  I needed a fast, frugal solution for hiding the box springs.

I found an easy answer in 2 twin flat sheets from Walmart. ($4.88 each.)  1 sheet would have done it, but then there would have been sewing involved.

Here’s a quick video, explaining how it works.  Something more permanent could be made with velcro and hot glue.  I plan to do that soon.  The pins work well, but my kids come and stand by the bed to talk to me in the night and step on the bed skirt–which pulls out the pins… Changing the sheets was easier than I thought.  Just by remembering the skirt was a little fragile I could work around it without pulling it all apart.


master bedroom 1

Moss Covered Monogram

In the Cozy Minimalist class, I learned that plants breathe life into the room.  My family room is land locked and light deprived.  Real plants wouldn’t survive a week in this space, so a little creativity is in order. (The plants in the picture are fake IKEA plants.  Cute…but too small for the space?  I’m looking for a frugal way to overflow that shelf with green.)

painted fireplace moss letter

After some looking around pinterest, I thought a moss covered letter  on the new painted fireplace would be perfect.  The space above my fireplace isn’t huge–22 inches total.  So I opted with a 15 inch letter.  I could have gone SUPER frugal and cut a letter out of cardboard.  In the end I paid $5 to have a ready made letter because I wanted the depth.  you can see the side of it from the front door and it looks better to be thick and sturdy.

The fireplace still looks bare, so I’m thinking about garland options. Maybe I’ll make this when we drive to Colorado. Or this.

moss letter 9

This project took me 1 hour including driving to Hobby Lobby to get the letter $5 (50% off from $9.99.) And the moss sheet $6 (40% off coupon from $9.99.)  I also used scissors and a marker.  The project would have gone faster, but those sheets are extremely sticky and I kept getting caught in it like a mouse in a sticky trap.  I regret my decision not to film it, because I think it would have gone viral for how ridiculous it was….you’ve been warned.

moss letter a

Unfold your moss sheet and place your letter in the center.  I drew the lines on it with the marker and cut along it with scissors.  Then peeled off all the paper backing.

moss letter b

I pressed the letter onto the sticky moss.  At this point, it’s good to mention that you want the RIGHT side of your letter face down.  This is pretty important if your letter is directional, like a B.  Thank goodness that C’s are good both directions because I wasn’t super careful.  As you go, SAVE YOUR SCRAPS.  You’ll need them until the very end.  Then if you want, you can throw the mess away.

moss letter c

Then I started pressing up the moss and sticking it around the outside, trimming off the excess so it would lay flat agains the wall.  Where it curved, I snipped it to the letter then folded it up overlapping the excess while keeping it smooth. The cool thing about this project is the moss is so forgiving.  If you end up with a hole you can just stick a scrap in it and no one will be able to tell.

moss letter d

To go around the inside curves I snipped it like the outside, but this time instead of overlapping it left gaps of triangles. moss letter 1

moss letter 2

I just cut little triangle scraps and stuck them in to fill in the gaps.

moss letter 3

The corner ended up with a triangle flap.  I just cut it off flush.

moss covered letter 7

TaDa!

moss covered letter 5

I went super fancy on the hanger and hot glued a paper clip to the back. It’s such a lightweight piece that a paperclip is just the right thing.

Fireplace and moss letter

When Spending Money Saves Money

My mom is amazing.  She was my Skylarks and Orioles leader, and Den Mother for my brother.  She taught Sunday school and led the junior church.  She cooked a sit down meal for us every night and made breakfast almost every morning. While we waited for the bus she read Uncle Arthur bedtime stories so we would have a good dose of values before school. She formed a family worship group where we would gather in homes with other families and have child centered Bible lessons. She sewed all of my clothes and did craft shows and had garage sales to bring in extra money.  She made sure I could cook and sew and clean and care for children before I left home.  And took time to really listen to me.

She was so busy giving us the best childhood ever that home decor wasn’t high on her priority list. Who can blame her?  It took awhile to realize that I was interested in interior design. I would visit well done spaces and wish I could put something together like that.  Everything I attempted looked like a different hot mess than the one I started with.

living room 12301

Decorating disaster circa 2009

I remember the first time I ever painted a room.  I had 2 kids under the age of 3 and could only paint in 10 minute spurts while I cared for them.  I used ziplock baggies to keep everything fresh for the weeks it took me to finish one room.  But the feeling of accomplishment and freshness from that experience germinated an interest in interior design that has grown larger and larger.

I had to experience a lot of decorating failures before I figured out the things that I like.  Things like light and bright neutral walls that allow accessories to take the spotlight.  White trim! Fewer, larger pieces of art and a minimalistic style.  I spent years devouring home decor blogs, magazines and books.  Even after those years of following the experts, no room in my house felt quite right.

When the Nester announced her Cozy Minimalist decorating class, I wanted to sign up right away.  I’ve learned more from her blog over the years than all my other sources put together.  I paused at the $89 price tag.  Then I realized if I was going to keep working on my fixer-upper, room by room, this class could save me from wasting money on the wrong things.  If I only learned one new thing that averted a buying disaster, the class would pay for itself.  So I signed up.  YES! My frugal self paid $89 for a virtual class and admitted it publicly.

master bedroom 6-2

It was the best decision ever.  For one thing, it gave me the courage and steps I needed to turn my master bedroom disaster into a serene space.  I did the whole thing with cash I gathered from selling clutter around the house. The space isn’t done, because spaces are never done.   There will always be tweaking and changes to make, but I don’t have that feeling that something is “off” like before.

I didn’t spend less on decorating stuff before I took the class, and when I was done I still had a space I didn’t love. The class changed the types of things I shop for and ultimately saved me from buying the wrong things.  It paid for itself by showing me how to use what I have and then focus my shopping in the right direction.

That $89 class is now available as a self-study course for just $39.  PLUS you can get $10 off if you follow this link and use Angela Coffman in the referral box.

Here are more pictures of what other students in the class were able to do.

If home decor isn’t your thing, but you need to do your own decorating anyway, you need this class.  It’s 4 sessions of step by step how to go from hot mess to cozy and well put together.  This class taught me more in 4 weeks than 4 years of research did previously. It sure beat trying to figure out the decorating thing on my own.

The Risk of Painting Brick


There are a lot of things I love about our family room.  It’s open concept so we can see the kitchen from our comfy sofa.  It’s big with lots of options for furniture placement.  It has yummy hand scraped hardwood floors and French doors leading out to a sunroom and deck.family-room-2015

The room has a unique fireplace that was constructed from the bricks removed during the demolition of the old stock yards in downtown Kansas City.  The bricks are a good color tone with enough variation to give texture and interest without being gaudy.

fireplace-before

The room is dark.  It’s landlocked and even during the lightest part of the day, needs a light on for normal activity.   Even with the lights on it feels dark.

It was even darker before we painted over the dark olive beige with a pale gray.  Painted the trim white, and took down the wall between the family room and the kitchen.

dsc_0605

dsc_0613

My gut has been telling me the dark brick has to go if I ever want a light and bright space. It’s so massive that it absorbs a ton of light, and the inside is stained black from soot.  I’ve tried several methods to clean it up, but it’s deep into the porous surface of the brick.  I’ve lightened it some but the stain is still there.

white-french-doors

In a last ditch effort to save the brick, I decided to paint the french doors white to bring in as much light as I can.  It helped a bunch and every time I walked by my heart gave a little leap of joy.  As much as the little things we did improved the space, it only made the dark brick stand out more…and not in a good way.

fireplace-end

When we took down the wall between the rooms, there was an unfortunate seam in the brick never meant to see the light of day.  I was imagining seeing the cute exposed brick wall from the front doors….but that seam is NOT cute.   We plan to cover it with a floor to ceiling chalkboard with a wide white frame all the way around. SOOOO since I was going to cover it up completely, I took a risk and tested a white wash technique first.

I loved it and hated it at the same time.  My mom told me it looked dirty, but my online friends from the Cozy Minimalist class told me it was beautiful.  I finally got up the nerve to start on the part that would be seen.

brick-part-way

I spent a few hours painting, and then wore out.  You can see the top left corner and the inside has been done.  At this point, I was pretty sure my mom was right and I had ruined it.  Then I remembered The Nester telling us, “You can’t ruin something you already hate.”  It took several weeks for me to find the nerve to finish the project.  I decided if I hated the whitewash look I would paint it solid white.

fireplace-and-moss-letter

The paint I chose tends to settle during the painting process, so the fireplace got lighter and lighter as I went on.  I had to go back over the places I started with to make it blend with the rest of the brick.  It ended up lighter overall than I had planned, but I love it anyway.

This is just an iphone picture, and doesn’t do the space justice.  The brick finally feels like it goes with the rest of the room.  I quick made a moss covered monogram to hang on the new whiter brick, and have plans to style up the space more with inspiration from here and here.

I’m KEEPING the original brick on the backside where it is exposed in the dining room.  Here’s a picture of the back side of the fireplace back during our construction phase.  I can’t believe I’ve never taken a picture from this direction “finished.”  Ok, we aren’t finished yet, my buffet table on the brick wall is still those stacked flooring boxes with a tablecloth on it. But we’ve made progress since this.

dsc_0672

Choosing the type of paint for the brick was a challenge.  Brick is hard to strip paint from, no matter what.  Latex paint CAN be removed from brick with this stripper or this one, but latex paint is not heat friendly.  My fireplace has a gas insert, and while it is too expensive for us to use right now, we have hopes one day to make it more efficient.  We didn’t want to permanently eliminated our option of ever using the fireplace again.  I thought about using latex only on the outside and using heat proof grill paint on the inside, but it only came in black.  Painting the massive inside of the fireplace black would fight against my goal of light and bright.

While searching for paint that is heat friendly, I came across milk paint.  Milk paint is permanent on brick. It soaks into the pores and becomes one with the material.  It doesn’t bubble, crack or peel when exposed to high temperatures.  And unlike traditional lyme white washing, milk paint won’t rub off on hands or clothes once it’s cured.  Going with this option meant never being able to go back to raw brick again.  That’s scary for me, because I’m kind of fickle when it comes to decorating.  I took the risk because letting fear trap me into keeping a look I hated was worse than never being able to go back.

There are lots of different brands of milk paint.  I chose this one because it keeps longer than the rest while still being REAL milk paint. Some milk paints are only good for 24 hours after mixing up, but this one lasts 6 weeks.  (I loved having a time limit though, or I might not have finished even now.)  The paints that are “like” milk paint but not really made with milk, I didn’t trust.  I wasn’t sure they would have the heat proof quality I was looking for.

The paint instructions say to mix it equal proportions with the powder and water.  I did that first to make sure the powdered mixed up well, then added 2x more water for a whitewash look.  My finished formula was 1/2 cup paint powder to 1 1/2 cups water. I brushed it on with a natural bristle brush, stippling it into the texture when necessary, then used an old flour sack tea towel to wipe it off.  The wiping off part was key to an even texture and removing brush strokes.

Just for fun, here’s a before and after:

fireplace-before-and-after

P.S.  Thank you for making it safe for me show you my imperfect house and imperfect pictures.  I’m holding back the urge to point out all the flaws. I know no apology is necessary–because we’re friends like that.


One Pot Cheesy Buffalo Chicken Dip

 Our guest recipe today is from Aimee of The Captivating Corner. If you need a no mess dish to take to a gathering, for hospitality, or an after school snack, this one has your back.   If you are really in a hurry it can be made on the stovetop too.

 
Here is an oldie but goodie appetizer. It is a personal favorite of mine, I have had it so many times that I have lost count. Maybe it is new for you? Seriously no matter if I am entertaining at my own house or going over to a friend or familys place of residence for entertainment, you can guarantee that this will be there as an appetizer! 
 

Ingredients: 

4 cups Shredded Chicken

1 cup Cheddar Cheese

1/4 cup Hot Sauce

1/4 cup Ranch Dressing

1 package cream cheese

Steps: 

In a crock pot, put in cream cheese, 1/4 cup ranch dressing, and 1/4 cup hot sauce. 1 cup cheddar cheese and 4 cups shredded chicken. After 1 hour stir ingredients. Cook ingredients for an additional 3 hours or until cream cheese is melted. That’s it folks, a one pot wonder. You can’t get simpler than this recipe. That is part of the reason why I enjoy a crock pot so much!

The dip can be paired with a wide variety of foodie snacks. My favorites include crackers and celery. I have also had it with pretzels and tortilla chips.

What event would you take this appetizer to?

One Pot Wonder: Cheesy Sausage and Pasta

I’m excited to introduce this guest poster to you today!  She has a yummy recipe to share that’s perfect for those nights when you don’t want to wash a lot of pots and pans.

Hello!  I am Terri from Our Good Life blog and I am here as a guest host for our friend, Angela.  I am a retired elementary school principal and I know the value of a one pot meal!  My family is grown and gone, but my husband and I are busy retirees with a full schedule!  This meal was popular with my family and I hope you like it, too!

There is no better time saver than a one pot meal! It is a much healthier way to cook than to buy a boxed meal. One pot, skillet, or crockpot and you are ready to cook! It is a quick clean up as well, which is another way to cut down time away from your family. This quick meal uses whole wheat pasta, canned tomatoes, and turkey kielbasa to make this rich, delicious meal. Fresh veggies and yummy cheese make this a kid friendly meal. I know my family enjoys it!

One Pot Cheesy Sausage and Pasta

One Pot Cheesy Sausage and Pasta

by Terri Steffes

Prep Time: 10 minutes

Cook Time: 20 minutes

Ingredients (4 servings)

  • 1 28 oz can crushed tomatoes
  • 1 c vegetable broth
  • 1/2 c water
  • 6 oz whole wheat rigatoni
  • 8 oz turkey kielbasa, sliced
  • 1 medium onion, roughly chopped
  • 1 green or yellow pepper, roughly chopped
  • 1/2 t minced garlic
  • 1/2 t salt
  • 1/2 t pepper
  • 2 T Italian seasonings
  • 1/2 c shredded, low fat mozzarella cheese
  • 1/4 cup parmesan cheese, grated

Instructions

Pour tomatoes, broth and water into a dutch oven. Add in pasta, stir. Add sausage, onion, green pepper, and seasonings. Turn on high, bring to a boil. Stir, then turn to medium heat. Let cook 10 minutes, stirring occasionally. Taste noodles, let cook until desired doneness. Turn to low, add cheeses and stir until melted. Scoop into individual servings and top with grated parmesan cheese.

Powered by Recipage


Variations: I have replaced the peppers with leftover broccoli with great success!  Any favorite type of pasta, rigatoni, shells or elbows will work in this recipe but you may have to adjust the cooking time depending on the noodle.   Happy cooking!

One Pot Wonder: Chicken Pasta Salad

This refreshing pasta salad, can be ready in just 10 minutes! Welcome, my guest blogger Blake from Style-Island as she shares her spring recipe.

one-pot-chicken-pasta-salad-header

I don’t know about you but many weeknights, especially once the weather gets warm…the idea of slaving over a hot kitchen is not appealing. When you still need to pull off an awesome and delicious dinner, one pot recipes come in handy.

As the weather warms up, it’s time to put away the soups, and take out the spring salads starting with this one pot chicken pasta salad. This dish is packed with protein, and perfect for spring!

italian-chicken-pasta-salad

1 bag bowtie pasta

Grilled chicken strips – 1 Pound

2 Cups grape tomatoes

2 cups baby spinach

1/4 cup ricotta salata

1/3 cup mozzarella – cut up into squares

Boil pasta 8-10 minutes. Mix everything together in pot. Add 3 tbsp olive oil and 3 garlic gloves. Stir occasionally. Serve warm or cold. 

one-pot-pasta-salad-spring-2


It’s One Pot Wonder Week!

one pot wondersOooooooh, I’m so excited!  One Pot Wonders are deliciously easy meals that
require minimal clean up.  They often work well for outdoor cooking over an open fire with a skillet. (A flame is ok, no need to wait for coals.) And a lot of them can go in a freezer bag for make ahead prep, and dump and go cooking.

This is my preferred cooking method when I’m in a hurry, low on groceries, or tired of washing dishes. (And by preferred method, I mean using one pot on our indoor stove, not an open flame.) It’s perfect when the fridge is mostly bare, because you can combine bits of leftover things and turn it into one BIG dish.  If that sentence just grossed you out, try to hang on a little longer.  There are a few “rules” to make sure you get something delicious at the end.  Here’s what you need:

1.  Flavor theme:  Southwest, Italian, Oriental, BBQ….. For best results, stick to one flavor profile.

2. Protein:  Ground beef, Shredded chicken, Ground Turkey, Smoked Sausage, Breakfast Sausage; Italian Sausage; Eggs; Shrimp; Salmon…

3. Vegetables: Southwest: bell peppers; onions; corn; tomatoes. Italian: everything. Oriental: Everything, but especially baby corn; sugar snap peas; bamboo shoots; water chestnuts. BBQ: corn, carrots, onions, mushrooms; sweet potatoes; potatoes.

4. Starch: Pasta; Corn; Potatoes; Sweet Potatoes; Beans; Rice.

5.  Sauce or herbs; Cheese

I’ll be featuring recipes of tried and true one pot wonders the rest of this week.  I’m sure you can think of some you’ve had before:  Frittata; stir fry; fried rice; skillet lasagna; (hamburger helper….)

What’s your favorite one pot wonder?  Leave a comment and help us with ideas.


Freezer Bag Cooking: Lunch and Dinner

Freezer Bag Recipes lunch and dinner

Yesterday I shared with you some really simple Freezer Bag Breakfast Recipes perfect for camping or just to make ahead for busy moments.  Today I’m going to give you my best Freezer Bag Lunch and Dinner recipes.  When meals are packed frozen in a cooler, you need less ice and they gradually thaw to be ready when needed. (My FAVORITE part of this series is how often I can use the word smoosh <3.)

 Dutch Oven

Dutch Oven Pizza

Crust: 1 2/3 cup water; 1 Tbs yeast; 1 Tbs olive oil; 2 Tbs Honey; 1 tsp salt; 4 cups flour.  Mix together, kneading right in the bag, then press out the air and freeze.

Sauce: 6 oz tomato paste; 1/4 cup water; 1 tsp sugar; 1 tsp garlic powder; 1 tsp onion powder; 2 tsp parsley flakes; 1 tsp basil; 1/4 tsp oregano; a few dashes of oregano.  Mix in a smaller baggie and freeze.  Snip the corner to easily spread onto the pizza crust.

Additional ingredients:  Shredded mozzarella cheese; browned ground beef, pepperoni;

This is enough for 2 pizzas. Spread the thawed crust in the bottom and up the sides a bit of your well seasoned dutch oven.  Top with sauce, cheese and desired toppings.  Top with a lid. Bake for 20-3o minutes with 7 briquettes under the oven and 21 on the lid.
Sloppy Joe

Sloppy Joes

2 lb Ground meat (I use a combination of turkey and beef.)

1 cup diced onion

1 cup diced bell pepper

2 cans, 8 oz tomato sauce

2 tsp chili powder

1 tsp garlic salt

2 tsp Worcestershire sauce

Brown the ground beef, peppers and onions together, drain.  Place the tomato sauce, chili powder, garlic salt and worcestershire in a freezer baggie.  Smoosh it around.  Add remaining ingredients and smoosh to mix evenly. Seal well and lay flat to freeze.  To prepare, squeeze thawed contents into a dutch oven or saucepan and heat through. Serve on buns or stuffed into pitas with slices of cheese.


goulashGoulash

l lb macaroni noodles (dry)

8 cups tomato juice

4 tsp sugar, xylitol or similar

1 tsp salt

1/4 tsp pepper

2 tsp garlic powder

1 lb ground beef, browned and drained

1 cup chopped onion

1 cup chopped bell pepper

8 American cheeses slices

Brown ground beef with onion and bell pepper, drain.  Combine all but the cheese slices in a baggie (pasta should still be dry.)  Seal, and smoosh flat to freeze.   To prepare, pour contents of the bag into a casserole dish or dutch oven.  Top with cheese slices.  Bake at 350 for 45 minutes (For a Dutch oven: 7 hot coals on the bottom 21 coals on the lid) or until heated through and pasta is soft.

simple-spaghetti-008-400x266

Spaghetti

8 oz broken spaghetti noodles

4 cups tomato sauce

3 cups water

1 tsp basil flakes

2 tsp parsley flakes

1 tsp salt

dash of cayenne pepper (opt)

1 lb ground beef

1 cup onion

Brown and drain ground beef with onion.  Add all ingredients to a freezer bag (use the noodles dry.)  Smoosh flat and freeze.  To prepare, pour thawed contents of the bag into a pot, bring to a boil and simmer for 15 minutes or until pasta is tender and dish is thickened.

Fajitas

2 lb boneless, skinless chicken breast, sliced into strips.

1 green bell pepper

1 red bell pepper

1 yellow bell pepper

1 red onion

1 white onion

1/4 cup olive oil

1/4 cup lime juice

1 1/2 Tbs Seasoned Salt (like Lowry’s)

1 1/2 Tbs oregano flakes

1 1/2 Tbs ground cumin

1 Tbs garlic powder

1 Tbs chili powder

1 Tbs paprika

1 tsp salt

In a large baggie combine the oil, lime juice and herbs and spices.  Smoosh all around.  Add the chicken and sliced vegetables.  Press flat and freeze.  To prepare, thaw the bag. Use tongs to lift the meat and vegetables out of the bag into a hot skillet, discard remaining marinate. Stir fry until meat is cooked through and vegetables are tender.  Serve with tortillas and salsa.  (Other toppings as desired: lettuce, cheese, chopped tomatoes, sour cream, guacamole….)

Fiesta Chicken Bowls

2 lb boneless, skinless chicken breasts, cut into bite sized pieces
1/4 cup lime juice
1 bunch cilantro, chopped
1 lb corn kernels
1 tsp garlic powder
1 chopped red onion
1 can, 15 oz  black beans, drained and rinsed
1 tsp cumin
1 tsp salt
1/4 tsp pepper
Combine everything into a freezer bag and smoosh flat to freeze. To prepare, thaw bag.  Pour entire contents into a hot skillet and sauté until meat is cooked through.  Layer bowls with crushed tortilla chips and chopped lettuce.  Top with chicken mixture and serve with salsa, cheese, and ranch dressing.

Teriyaki chicken over Rice

2 lb boneless skinless chicken breast, cut into bite sized pieces

1 lb sugar snap peas

1/2 cup soy sauce

1/2 cup pineapple juice (I drain it from canned pineapple)

1 tsp fresh grated ginger

1 tsp garlic powder

Combine all ingredients into a freezer bag and smoosh to freeze.  Freeze 4-6 cups cooked brown rice in a separate bag.  To prepare, pour contents of the bag into a skillet and saute until chicken is cooked through. Heat rice, by simmering the bag in hot water for 2-3 minutes.  Serve Teriyaki chicken over rice.

Taco Soup

2 lb ground beef or turkey

1 cup chopped onion

1 lb corn kernels

2 cans, 15 oz each black beans, rinsed and drained

1 can rotel tomatoes, undrained

4 Tbs taco seasoning

Brown ground beef with onion, drain.  Combine everything in a freezer bag.  Smoosh flat to freeze.  To serve, pour contents of the bag into a stock pot or dutch oven. Add 1 cup of water. Heat through.  Serve with Frito style corn chips and cheese or sour cream.