Freezer Bag Cooking: Breakfast

Freezer Bag Recipes Breakfast

Prepping food at home and freezing it in baggies takes up less space in the cooler for camping.  Things stay colder longer this way. (Here’s hoping they thaw out in time for cooking. I’ll let you know on that one.) Even if you aren’t planning a camping trip, these recipes can easily be cooked in a regular kitchen and make rushed mornings that much easier.

Today is just about breakfast.  Tomorrow we’ll talk about dinner and then desserts :).  All of these recipes are good feed our family of 8.

Quick tip: Be sure to label your bags with a sharpee.  A few weeks later pancake batter and frozen smoothie can look kind of similar.

Breakfast Recipes

protein pancakes 033

Pancakes

3 cups flour

1 Tbs sugar or stevia blend

1 Tbs baking powder (or 1 tsp baking soda plus 1/4 tsp cream of tartar.)

3 eggs

3 Tbs oil

3 cups milk

Blend all ingredients together and process for 1 minute.  Pour into a gallon freezer baggie and squeeze out the air.  Lay the bag flat smooshing all the batter into an even layer and place it on a cookie sheet or tray to freeze it flat.

To cook, thaw the batter.  Then snip off a lower corner of the bag and use it to pipe the batter into a hot skillet.  (I’m going to test this method on my protein pancake batter and let you know how it freezes.) If you don’t want to use a blender, you could also just dump the ingredients in the bag and smoosh it around. It won’t be as smooth, but it will be ok.

Hash Brown and Egg Casserole

1 lb frozen hash browns (Raw potatoes don’t freeze well, so if you want a homemade substitute, cube leftover baked potatoes. For a low carb substitute, try frozen cauliflower bits or diced radishes.)

1 lb bulk sausage, browned and drained

1 cup diced onion

1 cup diced bell pepper (I like the baby bell peppers because of the pretty colors.)

1 cup sliced mushrooms

1 cup shredded cheese

8 beaten eggs

1 cup plain yogurt or sour cream

2 tsp salt, 1/2 tsp black pepper

Beat yogurt or sour cream and salt and pepper into eggs.  Pour into a gallon baggie and add remaining ingredients. smoosh around until well blended.  Seal well, removing all air. Lay flat and freeze on a tray to keep it flat. To bake, pour thawed casserole into a dutch oven.  Use this handy guide to decide how and where to place your coals: http://www.dutchovendude.com/campfire-cooking.shtml Bake at 350 for about an hour.  You’ll need around 24 hot briquetts, 6 underneath and 18 on the lid.

This casserole can be made without all vegetables (but why?!) To make it dairy free, 1/2 as much plain almond milk can be subbed for the yogurt and the cheese can be left out or replaced with Daiya cheese.  I’m slightly milk sensitive, but found Daiya cheese (cheddar variety) to be pretty gross and would rather just skip it.

Apple Muffins

¾ C milk

½ C applesauce (or oil)

1 egg

2 C flour

½ C sugar

3 t baking powder

1 t salt

½ t cinnamon

1 med apple, pared and chopped

Mix everything together in the gallon baggie, then freeze flat.  To bake, snip off a corner and pipe into a seasoned cast iron muffin tin OR fill hollowed out orange skin halves 2/3 full with batter. Wrap loosely with aluminum foil (to give room for rising batter.) Nestle down into the hot coals (right side up!) and bake for about 1o minutes.  Any muffin batter can be baked this way.  Imagine chocolate in an orange. (If you compare recipes, the difference between a muffin and a cupcake are minimal….)

Omelets

Use a quart sized freezer bag for each person.  Crack in 2 eggs then add whatever you like:  spinach, onions, peppers, mushrooms, tomatoes, ham, bacon, sausage, cheese etc.  Mush it all around, then freeze.  To cook, drop the bags in a large kettle (or dutch oven) of boiling water.  Boil for 8 minutes.  Only put in enough bags that can float freely (you don’t want them resting on the bottom of the pot.)

Smoothies

Blend up your favorite smoothie ingredients, then freeze flat in a freezer bag.  Thaw until slushy, cut off a corner and pipe into drinking glasses.

Portable Yogurt

Fill snack size baggies with a half cup of flavored yogurt.  Fold over and tape the zipper seal to the side and freeze firm. Snip off the end and push up to eat. Credit

Quick Oatmeal

This doesn’t need to be frozen, but goes in a baggie….so here you go.  Add 1/3 cup quick oats; 1 Tbs sweetener (brown sugar, coconut sugar, or xylitol etc….); 2 Tbs dried fruit; and 1/4 tsp of flavor (Cinnamon, nutmeg etc.)  Other flavor options: 1 Tbs chopped nuts; 1 Tbs mini chocolate chips;  1 Tbs peanut flour; 1 tsp flax meal; 1 tsp chia seeds; 1 Tbs cocoa powder; 1 Tbs dry milk; scraped vanilla bean.  To prepare, pour contents of the bag into a mug.  Add 2/3-3/4 cup of boiling water and let stand for 5 minutes.

Just for fun, let’s clear up some confusion about the different types of oatmeal.

1. Whole Oat Groats: look similar to wheat berries and are the hulled seeds of the oat plan. Since the seed is intact, there is no danger of oils going rancid. These take a long time to cook.

2. Steel cut oats: Whole oats that have been chopped into pieces for faster cooking.

3. Old-fashioned rolled oats: Whole oat Groats that have been rolled on a press. Oats can be thick rolled if the setting is changed on the roller.

3. Quick Oats: Rolled oats that have been chopped into smaller pieces for faster cooking. Nutritionally no different than Old-Fashioned roll oats.

4. Instant Oats: Quick oats that have been steamed and re-dried for faster cooking.  There is likely some nutrition loss in the heat process, but instant oat’s bad reputation mostly comes from the sugary additions in the prepackaged individual serving variety that make it so yummy.  By packaging up your own flavors you can control the quality of the ingredients and nutrition profile.

We are going camping!

lit up tent

I’m terrified!  I have great memories of family camping as a child.  We went several times a year, almost always to Watkins Mill where they have a fabulous swimming lake and a gorgeous paved bike trail.  In the autumn, we would lie on lounge chairs after riding at least 10 miles, glistening with sweat.  If we were still enough, butterflies would come and land on us and lick up the salt from our skin. It was peaceful and renewing. At least for us kids. As I think back on things, Mom had to work pretty hard to give us such a relaxing time.

stock-footage-a-monarch-butterfly-sits-on-a-person-s-hand

I couldn’t wait to start a camping tradition with my own family!  I begged Darren to take us.  I did all the planning and packing, just like my mom did when I was growing up. Except things were different for us. I was 7 months pregnant with WD and it was the hottest day of the year. The first night, my 23 month old daughter cried all night long.  We helplessly comforted her while listening to our neighbor’s Harley revving into the wee hours of the morning.  The next day,  I begged Darren to take us home.  He said, “No.”

Watkins Woolen Mill State Park and State Historic Site, Lawson

We groggily continued with our plans to enjoy the area.  The swimming lake had been drained for repairs and the bike trail was torn up in the section that went over the dam.  Undaunted I strapped my  toddler daughter in the bike child seat and headed on the 5 mile trail around the lake.  When I got to the torn up dam I had two choices, go back the other way and ride 5 miles back to the start or carefully ride the rubble.  It was 104 degrees, I was exhausted—none of this had been fun so far.   I chose the rubble.   In my attempt to ride carefully, I fell way behind Darren who was pulling our older 2 children (aged 5 and 3 in a double bike trailer.)  He was completely out of ear shot when I fell off the dam, taking my pregnant self, bike and back seated baby with me.  Thank the Lord we had helmets!  They were dented but we were relatively safe.  I was bloody and Heather was crying pretty hard.  I put her back in the seat and walked the bike back to our campsite.  I left a trail of blood in the road.   When Darren saw me, I didn’t have to beg to go home.  We just went.

Watkins Mill Bike Trail

We tried camping again 5 years later. This time we went with friends who knew what they were doing and agreed to do the cooking if we would help with clean up and paying for food. I packed no supplies except a borrowed tent, a sleeping bag and a hand crank flashlight. (Yes, not even a pillow or a lawn chair.) The first night, I sat up all night sitting at the campground supplied picnic table, cranking my little flashlight with all my might and pointing it into the woods.   My arm got tired really fast, but I had to keep my babies safe from those loud, stick-popping sounds coming from the woods.  The best part of that trip was the FOOD!  Oh man, my friends knew how to fix a mean campfire meal.

With my frequently pregnancies, illnesses, and financial strains, we have only taken 2 family trips with all the children.  We would like to fix that now that life seems to be settling down for us. Camping is one way to afford a family trip, enjoy lots of together time and see the country.  So off we go!   Here’s what I’ve learned:

1. Prep work is the key to a successful trip.  Planning food in advance can help make the trip more relaxing for all.

2.  The right gear is important. Battery flashlights are better than hand crank ones in this situation :).  We will invest in a few small pieces of gear this time, but are borrowing some things to help keep the trip affordable.  If we go camping again, we will be able to buy a couple of things next time too.

It’s a short list, because I’m awful at camping :).  I’ve love to hear your tips in the comments.

Tomorrow I’m going to share some camping friendly recipes I’ve gathered.  If you aren’t planning a camping trip, don’t worry.  These are perfect at home freezer meals too!

How to Make Everyone Insane….

Answer: Start a bunch of home improvement and don’t finish any of them….. In the midst of the insanity I can see life getting a little better bit by bit, so I keep doing it.

I reached a point where I couldn’t take it any more….the disorganization, dirt and 45 year old carpet with disintegrating pad.  I dove into a bunch of projects pretty much simultaneously. We don’t have much of a budget for each space so we’re doing some unorthodoxed things…like thumbtacking placemats over windows, painting sub floors, and cutting curtains in half so we can have 2.  In the past few weeks:

1.  Caleb’s room: Removed carpet and wallpaper. Painted walls and subfloor. New rug, new bedding, new curtains, new desk, lego organizational area. Still need: Lego desk, dust ruffle….and doors.  Doors would be really nice.

Calebs room before and after

2. Painted the Family Room French Doors white and started to white wash the fireplace. Bought supplies for a giant chalkboard.

family room 2015

family room fireplace

Plus that cabinet on the ground, to the right, with all the stuff on it belongs on top of the fridge.  We now have the screws in hand to take care of that. Happy Dance. The chalkboard will cover the end of the fireplace that the cabinet is leaning against. It has an unsightly seam on it that use to be hidden under a wall.  We discovered it when we opened up the floor plan and it’s been visible from the front door for 2+years.

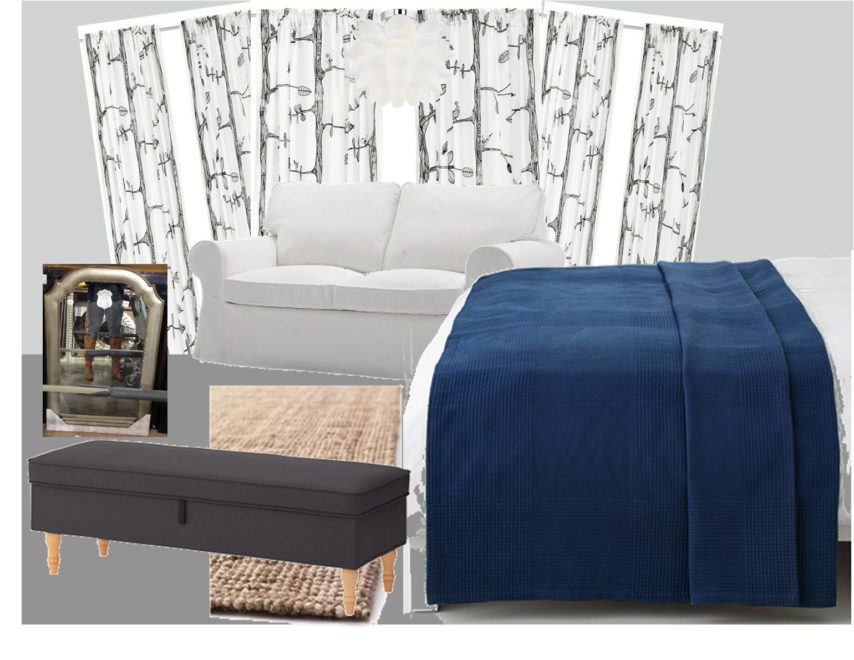
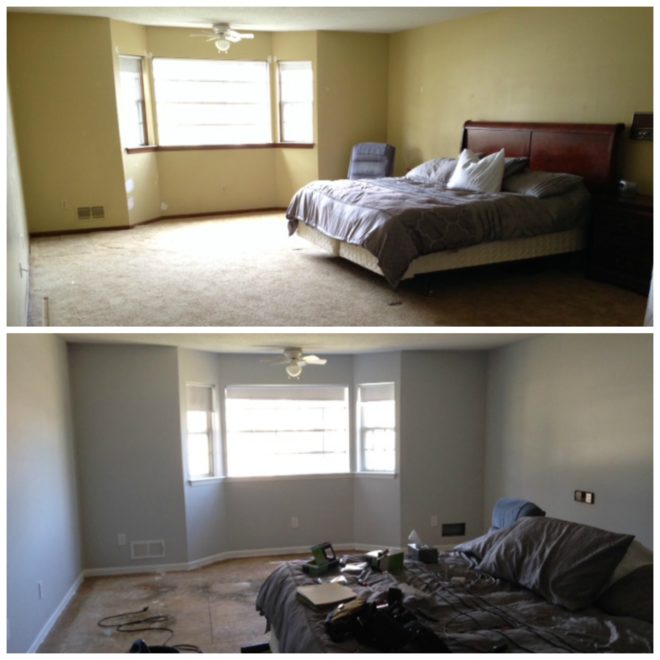
3. Master Bedroom: Removed Carpet.  Painted subfloor. Deconstructed bed. “new” rug, sofa, curtains, light, lamps, mirrors, side table, plants…..Still needs pillows and artwork….later

Master Bedroom before and after

4.  Girl’s Bathroom: Removed wallpaper and popcorn ceiling.  Still needs Skimcoat, paint on walls and trim.  New faucet, new toilet. Tile around sink area.  Refinish tub and sink top so they will be white.  Shower curtain, window shade and bamboo blind. Towel hooks…..don’t make me go on.

Girl's bathroom mood board

5.  Entry: Took carpet off stairs (I did this before Christmas actually.) Still needs a coat of stain on treads and bannister and white paint on trim. Still need to paint walls…but parts of the room will need scaffolding…

12481_10206462857233179_6967099384590296891_n

All of these jobs are on a gentle pause while I figure out how in the world to do the next steps.  When I get stuck in one space, I start on the next one.  It’s a bad habit.

In the meantime, I’m getting ready for our Spring Concert, taking the choir to World’s of Fun for a play day, and preparing graduation music.

Totally Unrelated News: I’m 1 contact away from earning a trip to ATLANTIS BAHAMAS with MomCeo.  If you are at all mildly curious about how I earn money with MomCeo, put in your info and let me give you a call.  I would be super sad to be this close and not qualify for the trip, plus I think it would really bless your family too.  Atlantis is the place Dave Ramsey took us when we were finalists with his Total Money Makeover Contest.  I can’t express how awesome it would be to go back as a successful small business owner.

Tips for a Low-Work/High-Profit Garage Sale

Garage Sale Tips

Having a garage sale can be a lot of work, but it can also raise a lot of money.  Here’s how we do it to minimize our time spent and maximize our money earned.

1.  Have a staging area in your house, out of the way of daily life.  I have a small area in the unfinished portion of our basement where I can stack tubs to hold our stuff we are purging.  When someone outgrows a piece of clothing, or I find a toy we no longer play with, I put it in the tub to wait for garage sale day.  When I fill a tub, I put a fresh one on top and keep filling.  After each sale I return the empty tubs to the staging area and start again.  This has an extra benefit of time delay.  I can be ruthless with filling the tub and if I figure out I really did need that item after all, it’s still there.

Bonus tip: Keep a pen and price tags on top of the tubs and price things as you put them in the tub.  Then on garage sale day the hardest part is already done.

2.  Price Tags:  Have everyone label their price tag with 2 unique initials.  Then it’s easy to keep track of who earned what.  It’s better to price your items individually then to just expect people to ask what each item is.

3.  I like to print my tags on address label sheets.  3 tags fit on one lable, so it’s cheap and easy:

garage sale tags

I have pages with $1.00; $.50; $.25; $.10 and then a mixed sheet with $10, $5, $2, and $3 tags. For seldom used prices I use masking tape and a marker.

4.  Keeping Track:  Use a spiral notebook and make tabs with masking tape, giving each person their own set of pages–One page for each day the sale is open.  Label the tab with their 2 initial code so that you can turn right to that page easily.  In addition have a legal pad for adding up totals for your customers.

Example: A customer is buying several items all from different people.  On the scratch pad, write down the prices and the initials it belongs to, all in a list together.  Add up their total, take payment and give their change.  Then the customer can leave while you transfer the amounts to the individual pages according to the initials.  As you transfer an amount, cross it off your legal pad.  If there’s a long line of people, you can keep a tally on the legal pad and transfer the amounts to the individual pages during a lull.  As long as you cross of things as you go, you won’t lose track.

5. Signs: Make high Quality signs that you can use year after year.  The most important information is the word “Yard Sale or Garage Sale, or just SALE” and an arrow with the direction.  Addresses, dates, and times just clutter up the sign and are hard for drivers to read anyway.  You can make your sign waterproof with packing tape or contact paper.  Take down your sign after you close each evening.  This prevents vandalism and stops people from wasting their time driving to a sale that isn’t there.  It’s just better manners to take your signs down when you aren’t open.

Good sign: garage-sale-signs-new-bench-008

Bad Sign:

garage-sale-signs-new-bench-001

Bonus tip:  The metal framework from an expired political sign is a good starting piece for garage sale signs.

6.  Invite lots of friends to join you for your sale.  The more items you have, the more people will stop and shop.  But insist they price their items in advance and assign them their unique 2 initial code to put on their tags.

7.  How bad is your garage?  Start cleaning it a week in advance if it’s been awhile.  If you garage sale several times a year and just need a basic sweep out, you can do that 2 days before.

8.  The day before your sale, set up tables and hanging racks inside your garage.  Designate areas for clothing, toys, housewares, etc… and label them so other people bringing items know where to put them.

9.  Have a sign up sheet for helping to watch the sale.  That way 2 people are around at any one time, but no  one is stuck there all 4 days.

10.  I used to be strict about opening a sale on Wednesday, but April showers forced us to open Monday this time and it was wildly successful.  There’s no bad day of the week to have a garage sale if the weather is good ;).

11.  Post your sale everywhere with pictures: Craigslist, facebook, instagram.  Cross-post your high price items like strollers and furniture with their own ads.  Just be sure to delete the ads as things sell.  Kindly let people know that you won’t be holding items.  I didn’t do that and still have items for friends who requested them but didn’t come get them.  When the sale is over, I like to be cleaned out.  That’s the point of the process after all.

12.  Have a half price day.  A few years ago we started making our last day half price.  Guys!  It’s like mad dogs that day.  We make more money on our half price day than we do any other day of the sale.  It’s all going to be donated at the end of they day, so don’t get hung up on prices and what things are really worth. For things that are $.25 we just sell them 2 for $25 so we don’t have to worry about pennies.

13.  Have a counterfeit pen.  I’m sad I have to write this, but it’s just a fact of life these days. We got a counterfeit $20 at our last sale and didn’t catch it until later.  The paper didn’t feel right, but it was close enough to throw us at the time.  A counterfeiter can buy something small at a sale with a fake bill and then get good money back in change.  Likewise, be suspicious of someone paying a small amount with $100 bill. Counterfeiters are getting good enough that their bills might have the strip in them or be undetectable by a pen. The one we received wasn’t that great. I think seeing that pen come out will discourage a lot of the funny business.

14.  When it’s over have a plan for where the leftovers will go.  Some places have a truck and will come pick up the things.  We found some places had restrictions on home improvement items or size of furniture, so it’s good to ask.  And we also found it best to schedule the pickup in advance or you might be holding onto stuff for awhile.

P.S. 5 years ago I wrote a post on garage sales.  There’s still good stuff there.

P.P.S. This is an excellent value, but only available for a short time.

Garage Sale Season is Here!

Why I have Garage Sales

We had a garage sale last week.  That on top of a public speaking gig and choir contest kept me offline most of the time.  I didn’t get rid of any big ticket items at our sale but still made $450 on bric-brac.

I talk to a lot of people who would rather just donate their stuff instead of going through the hassle a garage sale.  I don’t have a problem with that at all.  The thrift stores do a good work for charity and need good quality donations, and if you itemize for taxes you get a monetary benefit without all the work.  Here’s why I choose to do a garage sale anyway:

1.  It’s immediate cash.  We are gathering an envelope fund for our family vacation this summer, camping in Colorado.  We won’t see the tax benefit from a donation until next January which won’t help us take that trip.  We rarely take a vacation, so most of my garage sale proceeds go for home repairs/remodeling projects or to cover clothing needs for our big brood of kids that our regular budget can’t handle.

2.  I can sell things for a cheaper price at my garage sale than the thrift stores can.  I like giving families who need it a chance to get it cheap.  It saves their pride to be able to pay for things themselves verses taking a donation from a charity facility.

3.  I still donate to thrift stores.  When our yard sale is over, I take everything that’s left to a donation site so I get both the cash in hand and a tax benefit.

4.  I love talking to the people who come to shop.  I’ve met my neighbors in the new neighborhood this way, and even connected with some blog reading fans :).

5.  My garage gets clean twice a year.  We have a sale in April before it gets hot and in October after things have cooled down a bit.  I am motivated to organize and tidy my garage before each sale :).

My mom comes and helps me with all my sales, she’s the garage sale Diva! Plus I invited several friends to bring stuff which gave us a super huge sale that wasn’t all my stuff.  All combined our sale brought in nearly $2,000. Tomorrow, I’ll give you my tips for a low-work/high-profit garage sales.

P.S.  I recommend this.

Read These This Weekend

Hi Friends, there are 3 blogs I want you to read.  These ladies are among my favorites and they all have a similar message:  We are perfect because Jesus completes us, but that doesn’t mean we’re flawless.  Those flaws can be beautiful, because they are real.

Don’t get me wrong this is not an “I’m ok, You’re ok” message.  It’s the “YOU have value, because God made YOU” message.  I’m all for improving ourselves and stomping out sin.  I’m against hiding or not trying something new because we don’t think we can do it good enough.  It’s good to remember that we’re all a lot alike: beautifully flawed.

1.  Home Decor:  Nesting Place Her motto is “It doesn’t have to be perfect to be beautiful” Nuff said.  Her imperfect is definitely beautiful. She’s the reason I took a risk in my master bedroom the last two weeks.

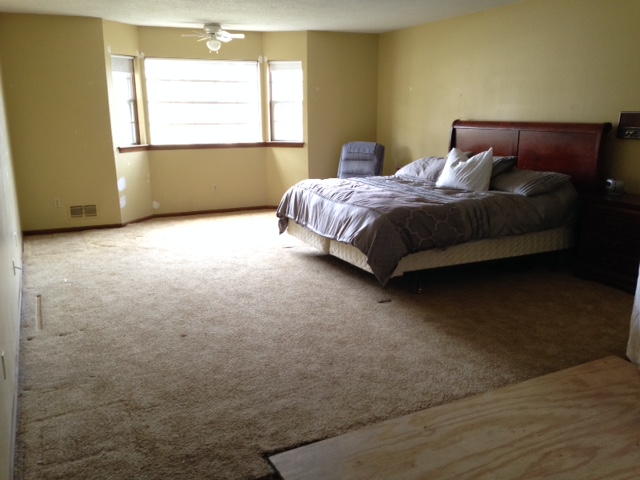
To turn this:

Master bedroom before

Into this:

Master Bedroom After

Even unfinished, it has gone from my yucky place to my favorite place.

2.  Makeup: Maskcara  This girl is the queen of highlighting and contouring.  If you have fat cheeks, she’ll tell you they’re beautifully youthful.  If you have hooded eyes, she’ll show you a picture of every super model with hooded eyes just to prove how gorgeous you are.  You can’t get past her without feeling like the most beautiful creature.  She can teach you how to do this:

lucy

And this:

10e98a58a2eef038d147545be5969ee8

All while almost convincing you that you’re too beautiful to wear makeup at all.

If you can’t see beauty in your naked face, you won’t feel beautiful with makeup on either.

3.  And Mothering:  Finding Joy  This girl will not make you feel inadequate for eating box macaroni, or buying your Valentines ready made at Dollar Tree.  She will love you where you are and remind you that you are the best Mother for your kids. They don’t want any other. No tutorials, no recipes, just encouragement.

love,

Angela

New Project: Girl’s Bathroom

I’ve started on a new project in our house, and I haven’t finsihed Caleb’s room, my room, or the entry.  This makes my husband crazy.  He works differently than I do (slow and careful), and I need him to do a couple of things before I can move on in the other areas.  It could take him awhile to get to it, and by a while I mean months to years. While I wait for him to get a “round tuit” I get busy somewhere I have the skills to tackle. PLUS I’m learning new skills so I don’t have to rely on him for as much.  For this project I need to learn how to wire a GFCI outlet and change a faucet….I’m so thankful for YouTube.

DSC_0003

We have two bathrooms upstairs to service all the kid bedrooms. One we’ve named the “boy bathroom” and this one is for the girls.

DSC_0002

It is green, green, green. Green shower/tub, green toilet, green walls, green wallpaper, green towel bars and hooks, and green floor. Combine that with the dark wood, and it’s a bit dreary.

DSC_0007

It’s narrow and crowded without any linen storage, too.

Floor

I’m keeping the floor, it’s made of thick vinyl tiles that look like glass cubes.  The previous owners chose to accent the olive color in the pallet, but I’m hoping to bring out the emerald and pale blue instead. DSC_0009 DSC_0008
We’ve already started removing the wall paper and found some mold issues behind it.  There is also some serious drywall trouble around the shower and window areas caused by there not being a working exhaust fan for years.  We fixed the ventilation, so it’s safe to make some repairs.

Girl's bathroom mood board

Here’s a mood board to show you what I have in mind.

I’m going to finish scraping down the popcorn ceilings, and removing wallpaper backing, but for now we’re headed to the zoo :).

P.S.  I really love that wallpaper, but it’s $150 a roll.  1 roll could make a nice impact in the space, or I could try to fake it with a bird stamp.  What would you do?

Master Bedroom Refresh

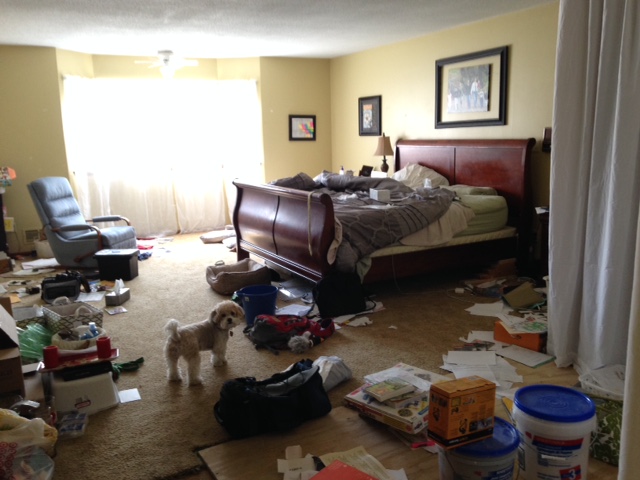
I’m feeling a lot better and dove head-first into a new project.  As part of the Cozy Minimalist course with the Nester that I’m taking, I had to choose a room for my project.  I got that assignment while laying on my bed in this:

And I thought, “This is the room I hate most in my house.”  I thought this room was off limits, because to do anything in here I needed to move our doorway first.  Why paint when you’re going to redo the drywall, right?  Then I thought I’d better scrape down the popcorn ceiling and get a drywall guy over here to skim coat it so that the mess of that didn’t ruin my newly painted walls, but that was going to cost $$$.  And then we needed our plumbing fixed so we could put up the walls that will be there forever….which would be about $9,000, and 5 years of saving.  So I sat in this horrible space in my own mess and felt sorry for myself.

Then I thought, why not?  This has to get better or I’m going to go crazy. If nothing else I could clean.  So I picked my bedroom as my project room.  Our first official assignment was to quiet the room.

It only took me a couple of hours.  Seriously?  What was I waiting for?

With the walls all cleared off like that, I thought about painting.  It wouldn’t be too much trouble, really.  And if I have to wait 5 years on all that other stuff, why not? I used the leftover paint from my son’s room.

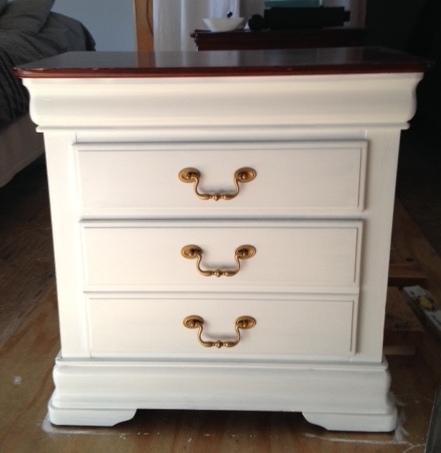
After the walls were done, we ripped out the carpet and painted the trim too.  I mean, at this point it was super easy to do it with hardly any furniture in there and all. While I was waiting for the trim coats to dry, I  decided to paint my nightstand.  It’s the same paint….and the brush was already wet.

I left the top the original finish and used gold leaf rub and buff to brighten up the drawer pulls.

I’ve been tired of my footboard for awhile, so Darren found a set of bed rails in the basement and switched our bed to that.  Our headboard will still work with this system.  I have plans to update the headboard a bit, and now it makes sense to get a bench at the foot of the bed for putting on shoes and storing extra bedding.  I’ll also need to make a bed skirt.

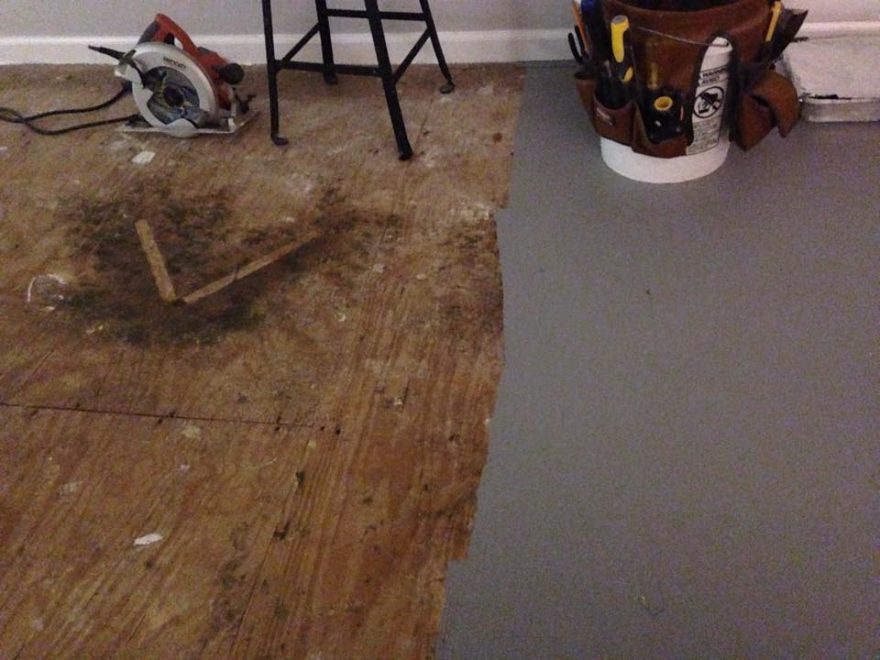
Then, the room looked so good, I went to work on that horrible sub floor. There were chunks out of it, staples everywhere and bits of the carpet pad had adhered to it.  It looked like camo flocking.  I did my best with a paint scraper, pliers, wall spackle to fill in  the missing chunks, and then painted it.  I could load up the roller with paint and fill in all the little holes and cracks since gravity wouldn’t make drips on the floor like it would on walls.

While I was running my errands I slipped into Old Time Pottery just to see how much mirrors would be.  I’d like to hang some over our newly painted nightstands, to bounce around light.  They had these gorgeous mirrors, but the frames were scratched up.  On a whim I went to customer service and asked if they gave discounts on damaged merchandise and they gave me 25% off on the spot.

We’ve wanted to get rid of the ceiling fan for 3 years and this seemed like a good time to shop for one.  I found this blog post with ideas.  It was several years old, but #3 caught my eye.  When I clicked over it was on sale 50% off with free shipping and free returns.  Sold.

I like to put rugs down when I paint sub floor, but my budget for this project is super tight.  After buying the light and the mirrors, I was feeling a touch of buyers guilt. I checked rugsusa.com, but even with the 75% off sale I couldn’t make a decision. Then I checked craigslist and found a 9×12 jute rug for half of the lowest price I could find anywhere online.

We are planning a garage sale next week and I hope to raise the cash to buy the rest of the items from the mood board above (I’m basically going to give my life savings to Ikea.)  If you don’t hear from me for awhile, I’m cleaning out my garage.  If you thought the before picture of my bedroom was bad…..the garage is much, much worse.

Plywood Countertops Revisited

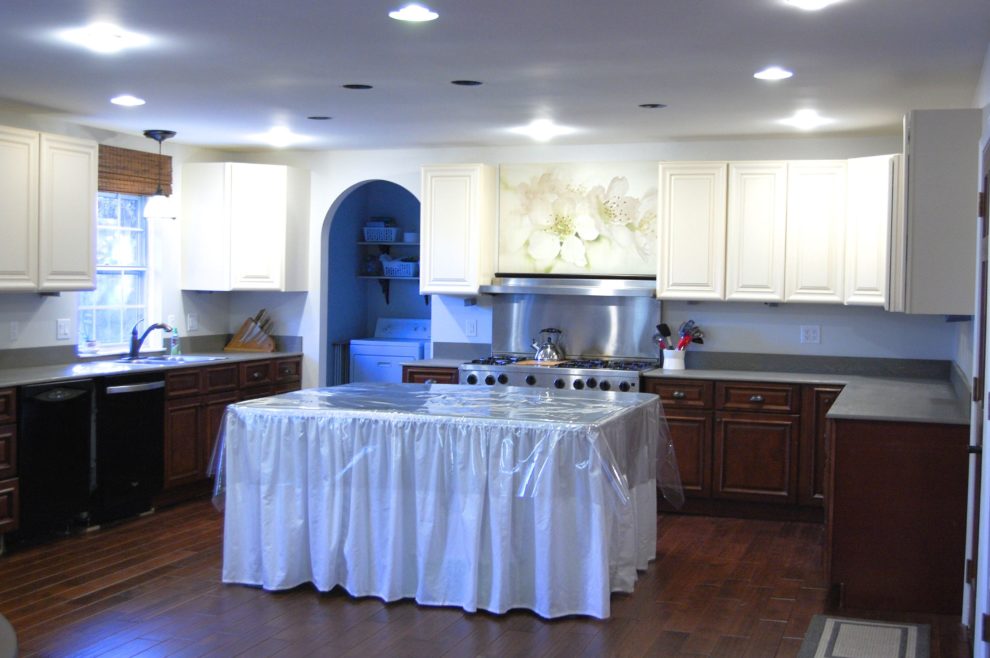
It’s been a few months since we finished our plywood countertops, and they aren’t as awesome as I was hoping.  You can see the planning stages here and the finished product here.  The marine poly has scrubbed off in places.  It’s not flaky or chipped so you would notice, but it’s wearing through in places (probably from lots of washing) where we are seeing bare wood and water is getting in.  The seams are the worst.  I might have been better off if I had caulked the seams with paintable caulk instead of using wood putty…..but in any rate, it’s a mess.

I’ve heard of wood countertops working for other families, but not for any families with 6 kids and a kitchen that sees as much action and messes as ours does.

I signed up for the Nester’s Cozy Minimalist class (love it so far and the first class isn’t even until tomorrow) and another student recommended this:

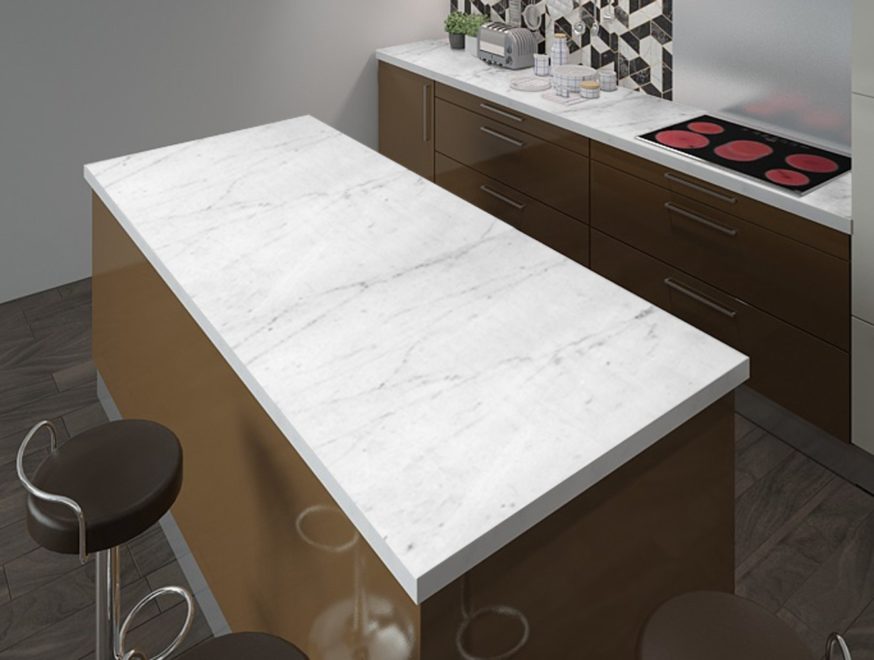
It’s a pvc adhesive film that is super durable and looks like real stone.  Some people have to touch it to believe it isn’t real.  This would seal up our wood and help our temporary countertops last as long as we need them to, probably more than 10 years.

There are some good youtube videos showing how to use it.  Would you ever do something like this?