Update on the Zone Cleaning for Kids

We’re two thirds through the summer so I feel like I can safely update on how our zone cleaning is going.  If you missed the first post describing our system, find it here. First of all, it’s still going!  That’s a win in my book since most of my efforts at chore charts have ended by the 2nd week.

Here are a few photos of zones in action:

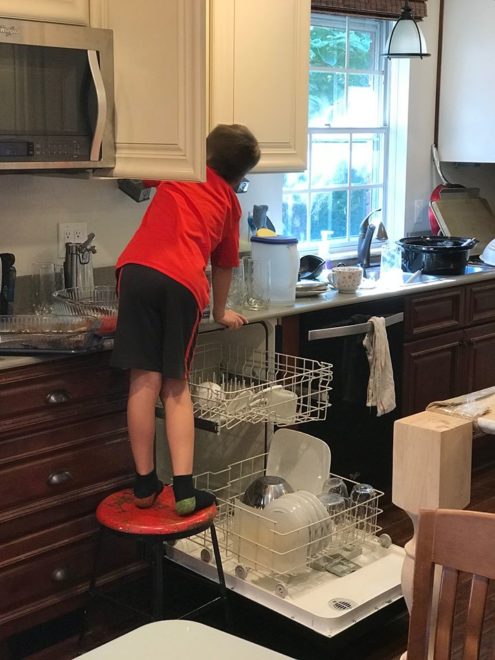
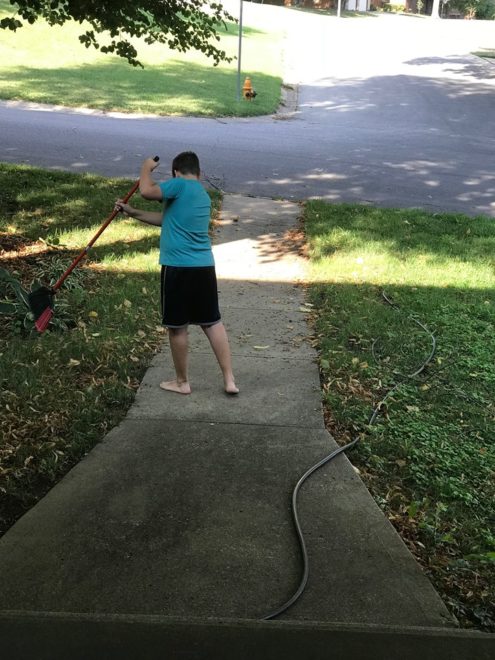
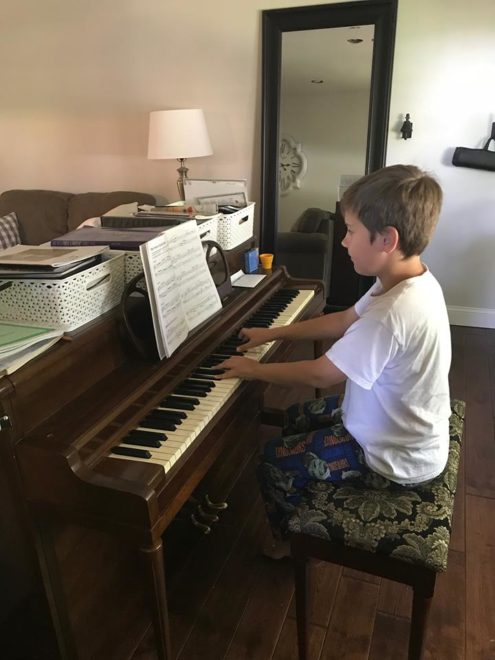
I show these photos as they are because I want to be transparent that our house isn’t magazine ready at all times just because we’re doing zone cleaning.  It’s not perfect for sure, illustrated by the boy practicing the piano in pajamas (and my clutter all over) even though getting dressed is higher up on his list.  I’m focusing on the fact that the boy is PRACTICING.  The amount of music progress we’ve made since the charts came out is staggering and worth the whole effort by itself.

So what’s working?

  1.  The fact that we have a consistent plan. The boys are thriving on the consistency and are helping to hold each other accountable in a mostly good natured way.
  2. I have passcodes on all the devices (except for the shared chrome book they use for school.)  Even the ones they bought with their own money.  So they have to bring it to me before they can get on it, which means I have the chance to ask if they are done with their zones.
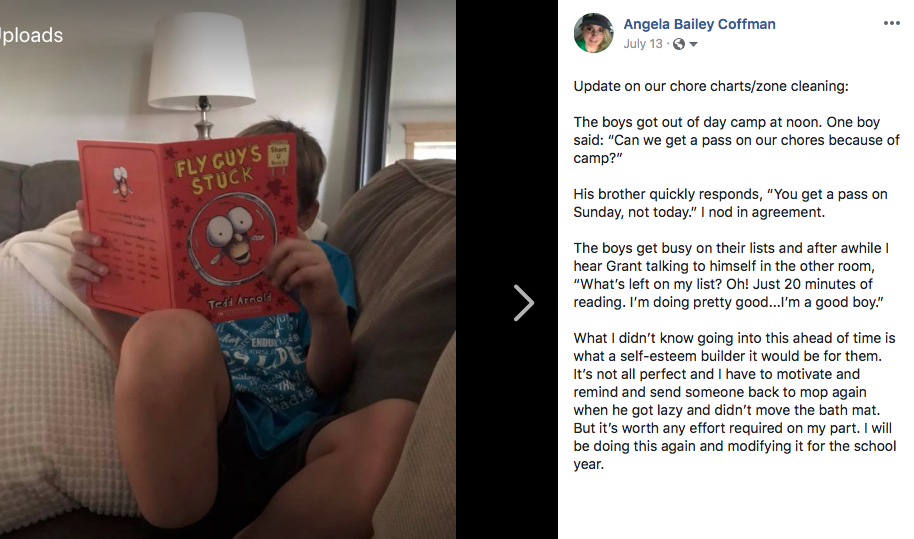
  3. The boys are getting a lot of pride out of their zones. Check out this facebook post:

5.  We had a fail one day where I caught all the brothers in a dark room under a blanket watching a video on the Chromebook. The video was on my approved list but nobody had done anything on their list. They were all still in PAJAMAS!  It was 9am and I gathered up every electrical device in the house and locked them in my room.  I was like, “Bummer.  I’m so sorry this happened. Don’t worry, tomorrow we start again.  You can have everything back tomorrow, after your zones are done, as long as you get today’s zone work done too.”   There was weeping and wailing and gnashing of teeth.  It’s the kind of day that you PRAY for when you are doing a system like this, because they knew I meant business and that I WOULD follow through.  We’ve never had a problem like this again.

6.  I’ve had the opportunity to teach them how to do some new chores that they hadn’t done before.  Like secrets about getting the pink mold out of the bathroom, how to clean the shower without getting your hands dirty, and what it means to be truly clean.  Plus they’ve finally learned where all the dishes go in the kitchen! I try really hard not to be too picky, but after we’d been going several weeks, I started doing inspections and sending kids back to redo sub-par work.

7.  This is the most consistent we’ve ever been with reading and music practice!!!

What’s not working?

  1. I can’t remember the order of the zones and the boys often can’t find their paper on Sunday when it’s time to trade.  I’m constantly asking, “Who’s in this zone?” It would help if I had a row of nails for them to hang their clipboards on when not in use. Then we could find them easily and I could see who goes where.  It would also help if I made up a file with all the zone assignments for the year.
  2. The list is pretty overwhelming for Grant (he’s 7 with some sensory issues.)  Some days it makes him want to curl up in a fetal position and never get out of bed.  I often work his zones with him, teaching him how to do things along the way.  He does help and as long as he’s working too, I’m fine with it.  I’m thinking about making separate, shorter zone sheets for him to rotate through that are different from his older siblings.
  3. Since the kids are able to pick and choose what to work on in their zones, several items never get done….like cleaning around the base of the toilets, scrubbing the bath tub or wiping down the cabinet fronts.
  4. Sometimes the work is just poorly done and I have to send them back to do a decent job.  This definitely takes more management than it seems.  The boys will get lazy and not set a timer, do a 5 minutes job in their zone and think they are done.  I have to be consistent with accountability on spending a good quality 20 minutes in their zones.  The more consistently I check on them the less likely they are to try to get away with stuff.  In the beginning I had to check every time, and I used it for a chance to give them atta-boys as often as I can.  Now I only have to check a few times a week. Because they never know when an inspection will pop up, they do good work most of the time.
  5. Sometimes I need help later in the day with emptying the dishwasher or setting the table.  Invariably the boy asked to help says, “That’s not my zone.” or “I already did my 20 minutes.”  They are not allowed to respond to me that way when given a direct request and in the scheme of the amount of work required to run our house 20 minute is NOTHING.  So we’ve had a lot of correction to do in this area and it’s still a work in progress.

What do you think?  Do you have any chore tips or stories for us?


No More Mess! A strategy that really works

As usual, this post is about transferring responsibility to the kids.  That doesn’t mean that we get to sit back and do nothing, but once this system is in place it’s much less stressful than normal.

No More Mess

I couldn’t wait to go to college.  For the first time I could set my own rules and try out life on my own while still bringing my laundry home every weekend — independent, but not tooooo independent.

I only took the stuff that I needed to survive and happily moved into the dorm shared with 3 friends from home.  For the first time in my life I kept my room clean.  Spotlessly clean.

Before 2

Was it because I only had a few things?  Partly.  Was it because I finally felt responsible for my own space?  Partly.  Was it because I was determined to show that I was a mature adult?  Partly.

Heather's Room

The REAL reason was the college inspected our rooms and bathrooms every Wednesday, and if we failed in any small part, we had to pay a maid to make it right.   I was broke enough.  I didn’t want to give up extra money each week just to wallow in filth.

Why did the school care that much?  If we were filthy, then mold, rodents and bugs could become a problem.  They were protecting their property and rightly so.  Either we could clean ourselves or hire someone to clean it for us.  The school didn’t care either way as long as the room got clean. As parents we have just as much right to protect our property and our sanity by requiring our kids to keep their rooms clean and keep the food in the kitchen.

The Plan

  1.  Help your kids sort their items Konmari style, keeping only the things that spark joy.  If they still have too much stuff, offer to box half the things to trade when they get bored with what they have.
  2. Give all the items they are keeping a specific home (labels are a nice touch.)
  3. Give a short list of expectations
  4. Inspect weekly (or daily at the start if you are building habits) You might have a learning time period when the kids get a treat for clean spaces
  5. Charge them for a maid if they need one

Do you think it would work at your house?

This has been day 14 of our series 31 Days of Kids and Money

P.S.  I have to be really honest here.  Not all of our kid rooms are clean right now.  The ones that we have Konmaried are doing well and we’re still in the process on the rest.  We proved the system worked at our old house and now we’re working to get back to that happy place.  A lot of it depends on me being consistent with the checking, the rewards and the consequences.  Sometimes I think It would be easier to just clean the room myself, BUT that’s not good for the kids.  How amazing would it be to grow up and be a tidy adult?   I want that for them.


Are You Spring Cleaning With Toxins?

cleaning supplies

Every day I hear about a friend with cancer.  I don’t know if cancer is really on the rise, or if social media means I just find out about it more.  These aren’t strangers though.  These are my friends: some young, some old, some live near me, some are across the country.  The cancer part of our prayer list is really long.

I hate cancer.   No one knows the cause of an individual illess, unless there was a big environmental problem such as smoking or prolonged asbestos exposure that is glaring.

Baby after bath

On the other hand there are chemicals that are KNOWN to cause cancer used in common every day products like baby shampoo, laundry soap, hand sanitizer, and air freshener.  We might not be able to avoid all risk factors leading to cancer, but we can do something about THIS.

Don’t be mislead.  Just making your own cleaning products will not keep you safe. If your recipe contains ammonia or bleach, it’s not safe.  Plus, many recipes such as homemade laundry detergent, are a combinations of purchased ingredients. Does the soap base for your homemade detergent have SLS, SLES, parabens or 1,4 Dioxine in it?  If it does, it’s not safe.

I made a video for you that scratches the surface of what you should look out for.  Below I’ve added a lot of links below to source the information that’s in the video.  If you want to do your own research, it’s a starting point.


Click here to request more information.

More Resources

 What to look for in laundry detergents

Tide to reduce not eliminate 1,4 Dioxane

More on Tide and here

More on Laundry

Baby Shampoo

Triclosan

Breast Cancer and Triclosan

Dishwashing Products to Avoid

Is Ajax hand dishwashing detergent safe?

National Cancer Institute Speaks out about Formaldehyde

Cancer.org’s list of known cancer causing agents

How Toxic are Your Cleaning Supplies?

What’s so Dangerous about Bleach?

More on Bleach

Even more on bleach

Clorox corporate’s defense of bleach

6 Common Household Products known to cause cancer

5 Household products that increase your risk of  breast cancer

More on Breast Cancer prevention

Why you should avoid Ammonia

More on Ammonia


What can I get for $1?

money 1

I like to shop at Dollar Tree…..a lot.  I know it’s not quality stuff.  I’m not expecting quality…not really, lol.  I am expecting to afford it and to have choices.  There’s something nice about going into a place and knowing I can afford to buy anything I want.

I used to buy my cleaning supplies there too, but about a year ago I found someplace better.  They sell most of their products in concentrated form.  So you buy one bottle and it dilutes into a spray bottle to make 6 bottles of cleaner.  This comes to around $.87 each.   It’s not a HUGE savings over Dollar Tree, I’ll admit.  The main benefit is these products are safer, healthier and work better than what I was using before.

They have over 400 products to choose from which include cleaning, laundry, vitamins, protein powders, sports nutrition, shampoo, first aid, cosmetics.  It’s a lot of stuff.

Women cleaning a window 3

Here are my 7 favorite products:

1.  Laundry stain remover:  This stuff will take chocolate ice cream out of a white dress, dried on, discovered the next day.  (No bleach.)

2.  Laundry detergent:  Super concentrated formulas only use 2 Tbs per load.  When it’s on sale for buy 1 get 1 $1.99 it costs less per load than Arm and Hammer powder and is formulated to not fade or pill your clothes.  Mine has a pump on it that perfectly measures each load.  No mess, no overuse. Love it!  And since it’s concentrated the 96 load bottle is small enough my kids can handle it too.

3.  Tub and Tile Cleaner:  This stuff is amazing!  Spray it on, wait a couple of minutes and wipe or rinse.  If you haven’t cleaned in awhile, this stuff will make it ok.  It works great on mold, soap scum, and toilet ring.

4.  Solvent:  This uses safe ingredients to remove stuff like permanent marker, gum, paint, fingernail polish etc….  It has over 101 uses–including stubborn odor removal.

5.  Sport Drink:  This stuff is perfect for fixing dehydration from sports, working out, hot weather, or adrenal problems.

6.  Disinfectant:  This  kills 99% of bacteria and viruses–without toxic chemicals.  (It’s powered with Thyme oil and Citric Acid.)  It is proven to kill MRSA!!!!!!  It is safe to use on toys that will end up in mouths.  Use it on door knobs, counters, cutting boards, toilet handles, toys, light switches, steering wheels, musical instruments, phones….any place germs might linger

7.  Dishwasher Detergent:  available in gels or soft packs this stuff has sheeting action that leaves your dishes crystal clear without additional rinse agents needed.

So that was just 7 products out of 400. I haven’t even tried everything yet.

P.S.  We just tried their shampoo/conditioner.  Our old stuff was giving Heidi hives.  Her hives cleared up in a couple of days after we made the switch and our hair is a lot more manageable now.  I have thin, fine hair.  Heidi’s is thick, coarse and dry–we use the same formula…go figure.

This company works similar to Costco, except it’s online.  You become a member and then can order at a discount. If you want to pay full price, that’s ok too, and the prices are still pretty reasonable.  Normally discount memberships are $35, but they are only $1 until December 22nd.

If 7 more of my readers decide to give it a try before December 22nd, the company will send me some love.  If you want more details (please don’t make rash decisions without details!)  Click here to put in your request and I’ll call or email you.


What Are all Those People in Line for?

Have you ever walked or driven by a huge line…and been all insecure? Like they know something awesome is going to happen and you don’t have a clue?

That almost happened to me.  Ok, it happened this week but the good news is there are still 5 days for us to join in and we don’t have to leave our house or stand in line.

us154-d3159cb8-2b6f-41d4-a449-c77ed8a67cc1-v2


This is a huge set of resources on how to be a better everything.  Purchased separately they’d cost $698 which doesn’t include $200 in additional bonuses.

BigBookBundle

It’s available as a ($29.97) pdf set or a ($39.97) Kindle set, but I couldn’t help to notice that the pdfs were $10 less.

If you buy through the links here, some of the proceeds goes to support the blog and helps my family, but it doesn’t cost you a dime more.

I’m off to grab my set.  If you are thinking about getting it too, you should know the sale ends Monday night.

Crocheted Half Circle Rug

When I finished the rug, DH said, “What do you think of it?”

What do think?  I love it!  I hugged it when you weren’t looking.  I did dances around it, took off my socks so I could really feel it under my feet.  Knowing how he feels about crochet, I only said, “I think it turned out pretty good.  What do you think?”

Do you know what he said?  He said, “It’s awesome.  And it didn’t really take you that long.”

“And it was free.” I pointed out.

“Um, except for the 3 skeins of yarn and a canvas drop cloth.”

“Those don’t count” (Has he not been to the craft hoarders school of positive thinking?) “No new money spent, means free–duh. Besides I have half the supplies left, so I could make another one and sell it on Etsy to recoup the amount of money I didn’t spend on supplies.  So it cost half of free.”

I think he might have rolled his eyes.  I feel sorry for him.

I wrote down the pattern after I finished the rug so I plan to make another just to test it and make sure. Might be a few “interesting” parts in the instructions until I work it out for you. A seasoned crocheter won’t have trouble. I adapted the rug pattern from a fine string crocheted vintage doily in my collection.

***************************************

Yarn:  3 large skeins (The super huge ones that cost $10 each but go on sale for 50% off all the time–so wait or use a coupon, please) of worsted weight cotton yarn (like wash cloths are made from.)  Size P hook. This is enough to make 2 :).

Good to Know: These are in American Crochet Terms

Abbreviations:

ch = chain

ss = slip stitch

sc = single crochet

dc = double crochet

tr = triple crochet

cl = cluster

p = picot

2-dc-cl (or 2-tr-cl)= cluster of 2 dc (or 2 tr). To make cluster, hold back the last lp of each st on hook and work 2 dc or 2 tr) into st or sp specified, then yo and through all 3 lps remaining on hook.

3-dc-cl (or 3-tr-cl) = cluster of 3 dc (or 3 tr). Make as above, working 3 dc 9or 3 tr) insted of 2 and work final yo through 4 loops remaining on hook.)

P3 is a picot made with 3 chains.  To make a P3, ch 3 then slip stitch into the 3 ch from the hook.

************************************

Foundation: Ch 10; join with a sl st to form a ring.

Rnd 1: Ch 2, 2-dc-cl in ring, ch 3, [3-dc-cl, ch3] 11 times all in ring; join with a sl st to top of first cl.

Rnd 2: (Sl st, ch 2, 2-dc-cl) all in first ch-3 sp. ch4, [3-dc-cl in next ch-3 sp, ch 4] 9 times. Ch 1, turn.

Rnd 3: (Sl st, ch 2, 2-dc-cl, ch 2, 3-dc-cl) all in first ch-4 sp, ch 2. *[3-dc-cl, ch2] twice all in next ch-4 sp; rep from * around, ch 1 turn.

Rnd 4: (Sl st, ch 3, 2-tr-cl)  all in first ch-2 space, ch 5 [sc in next ch-2 sp, ch 5, 3-tr-cl in next ch-2 sp, ch 5] 7 times, sc in next ch-2 space; ch5; 3-tr-cl in final ch2 sp.

Rnd 5: Ch 6, sc in next ch-5 lp, [ch 5, sc in next ch-5 lp, ch 6, sc in next ch-5 lp] around (final sc goes in top of last 3-tr-cl).

Rnd 6: sl-st, ch 2, 2-dc-cl; (ch 2; 3-dc-cl) twice all  in first ch-6 lp; * sc in next ch-5 lp; ([3-dc-cl, ch 3] twice, 3-dc-dl) all in net ch-6 lp; rep from * around.  sc in top of final  ch-5 lp. (May have error at the end.)

Rnd 7: St st in next (sc and cl), (sl st, ch 3, 2 -tr-cl, ch 5, sc) all in first ch-3 sp, * (sc, ch 5, 3-tr-cl) all in next ch-3 sp **, (3-tr-cl, ch 5, sc)  all in next ch-3 sp; repeat from * around, end at **

Rnd 8: Sl st in first 2 ch of ch-5, (sl st, ch 1, sc) all in next ch, *ch 5, sc in 3rd ch of next ch-5, ch 5, sc between next 2 cl **, ch   5, sc in 3rd ch of next ch-5; rep from * around, and at ** (except at the end just sc in final st since there aren’t two clusters here.)

Rnd 9: * 7 Dc in next ch -5 lp, sc in  next lp**, ch 4, sc in next lp; rep from * around, end at **

Rnd 10: * Ch 3, 3-dc-cl over first 3 dc of 7-dc group, [ch 5, join 3 -dc-cl] twice **, ch 3, sc in next ch-4 sp; rep from * around, and at ** (note: joint cluster means the first stitch of the next cluster is in the same spot as the last stitch of the previous cluster.)

Rnd 11: (Sl st, ch 1, sc, ch 5 sc) all in first ch-3 sp, ch 5, [(sc, ch 5, sc) all in next ch-5 sp, ch 5], [sc in next ch-3 sp, ch 5] twice; *[(sc, ch 5, sc) all in next ch-5 sp, ch 5] twice, [sc in next ch-3 sp, ch 5] twice; rep from * around

Rnd 12: *Ch 1, sc in next sp, [ch 3, sc in next sp] 4 times, ch 1**, sc in next sp; rep from * around, end at **

Rnd 13: (Sl st, ch 1, sc) all in first ch-1 sp, *3 sc in next ch-3 sp, ch 1, (sc, hdc, dc, tr) all in next ch-3 sp, tr in next sc, (tr, dc, hdc, sc) all in next ch-1 sp, ch-3p**, sc in next ch-1 sp; rep from * around

Rnd 14: Sc across front of mat, evenly spacing the stitches.  (I took 60 stitches to get across mine.)

At this point it will look a little wonky.  Throw it in the washing machine on gentle.  This will shrink up the yarn a bit and wet it down so you can block it.

Once it is out of the washer, lay it flat on a towel (or clean carpet) and tug it into shape.  Make sure the front edge is perfectly straight and all the picots are pulled out. Let it dry overnight.

At this point, you can use it as is.  I chose to add a canvas backer so I’d have something to attach a non-slip liner to.

To make a canvas backer, place the rug on a canvas drop cloth (I chose the stiffest one in my stash).

Cut out the canvas to match the size of the rug (I skipped the picot part and just cut it straight behind them.) Finish the edge with a zig-zag stitch or serge the edge.  Then pin the canvas to the crocheted rug. (Don’t skip the pinning part, because crochet stretches and will be a mess if you just try to run it through the machine without pins–trust me, I tried it.)

Use a long stitch and coordinating thread to stitch the rug to the canvas around the edges.  This works best if the crocheted side is down towards the feed dogs so the yarn doesn’t get caught in the pressure foot. Also make sure you can see the yarn peeking around the edge, otherwise your backer will show from the front.

If you want to attach a non-slip mat, cut it to fit and then hot glue it to the canvas back.


It will look even better when we get the dishwasher installed and finish the trim under the cabinets, but those things don’t’ affect my enjoyment of the rug in the least!  I can see one used as a bathmat or at a bathroom sink too. I’m considering an oval version to go by Heather’s bed….


Simple Green vs Mean Green

DSC_0541

I first used Simple Green in Nevada at the house we rented during our Frontsight Training. The homeowners installed a brand new stainless steel glass top range the first day we were there.  I was the first human to ever cook on it.

I arrogantly stuck two whole sweet potatoes in the oven for an hour.  No foil, no cookie sheet.  You can guess what happened.  Yep, black sticky baked on, burned on, through both oven racks and all over the oven floor goo.

I thought since it was still hot and fresh that I’d just wipe it up—nope.  Not gonna happen.  That stuff was seriously stuck on. And surprisingly hard and brittle.

Thankfully the homeowner had a bottle of Simple Green in the laundry pantry.  It took several spray and scrub attempts but the oven was restored to like new condition within the hour.

Present Day: We are selling our kitchen appliances to make room for the new design and I decided they would be worth more clean :).  I shopped all over for a bottle of Simple Green and finally found one at Ace hardware.  This stuff is special–not many places carry it.

On my next stop at Dollar Tree I found a bottle of similar looking stuff called Mean Green.  It was only $1 so I thought it would be fun to compare the two.  In the following pictures, I sprayed Simple Green on the right side of the oven and Mean Green on the left.

They are not the same product–and they did mix somewhere in the middle of the oven–not a smart thing to do.  But I’m still alive to tell the tale.

Here’s how they compared:

Amount:  Simple Green 24 oz     Mean Green 20 oz

Cost:  Simple Green $5  Mean Green $1

Dilution:  Simple Green Concentrated up to 30 times  Mean Green didn’t specify

Toxicity:  Simple Green claimed non toxic but keep out of reach of children,  avoid contact with eyes and fumes

Mean Green:  Contact poison control immediately if ingested, avoid contact with eyes, skin or fumes

Odor:  Both had a mild cleaning agent scent Simple Green had a touch of pine to it which was stronger smelling than Mean Green

Cleaning Powder:  I couldn’t tell a difference between the two.

DSC_0542

DSC_0547

Tips:  Let the cleaner sit at least 3 minutes before wiping, but not long enough to dry.  Wipe up the first layer (paper towels are very effective for this, but expensive.) Then spray, rest, and wipe again.  The stuff will come off in layers until the cleaner can penetrate all the way to the oven.  Wear rubber gloves for either cleaner.  Use a plastic scraper (like what comes with baking stoneware) for big chunks. You’ll need to follow up with a glass cleaner on the doors since both cleaners left a streaky residue.

Final verdict:  The cleaners didn’t work as well on 1 year old baked on junk as they did on fresh stuff.  For some spots my old baking soda and dishsoap with a scrub pad is still better.  But if toxicity isn’t an issue for you the Mean Green seemed to have  just as much cleaning powder as the Simple Green for a lot less money.

Magical Messy Microwave Cure and Busy Bag Swap

I haven’t forgotten about the magical messy microwave cure,  but first I wanted to tell you about a wonderful party I’ve been invited to–A Busy Bag Swap!  So far there are more than 40 ladies coming and the hostess is having it at a church so we can all be together.  The huge group is divided into groups of 10.  We are each bringing 10 of the same bag and signing up so no one brings the same thing in their group. Then everyone goes home with 10 new activities!

There are tons of ideas for busy bags on Pinterest.  I’m making these pizza factories from secondstorywindow.typepad.com:

pizza factory from second story window

I researched printing the color cards at Kinkos.  They wanted $1.19 a copy if I used their card stock; $.53 if I brought my own.  I decided to print at home.  I need 30 colored copies on card stock–we figured we could refill 2 ink cartridges at Costco and be under budget compared to printing at Kinkos.  I have a no heat laminator that will come in handy to making everything last a long time and should have enough laminator on hand to do the project.

lemon

Now for the Microwave Magic:  Fill a glass cup with 1 cup of water and a splash of lemon juice (don’t get fancy, cheap from concentrate like they sell at Aldi is fine.)  Microwave on high for 2 minutes, then leave the door shut for 5.  Do something else.  Wipe down your counters (hmm), Eat a snack (ok!) Something like that.  Then take a damp rag and just wipe it out.  Everything will come off with no effort thanks to the power of steam.  If you have a pretty messy job, you’ll need to rinse your rag out a couple of times.  But that’s it!

Oven Cleaning–Ewww

This is not my favorite topic.  It brings the bad emotions I mentioned back in the child room cleaning post.  Mostly because I usually put off the chore until the burned food smell fills the house and sets off the smoke alarm. It happens because some recipe goes totally wrong and spills over on everything.  (Not really an atta-girl moment.) And I don’t bother to clean it up right away, which just lets those feelings fester.

apple pie

Completely random picture that is happier than oven cleaning. Though it might relate loosely since the pie was baked in an oven.

Then I get so desperate that I buy a can of oven cleaner that has a bunch of warnings about cancer, children dying, brain damage.  That kind of stuff.  And then I hear on the news that the same oven cleaner has been recalled because it wasn’t as safe as they thought. What???? So my oven never gets cleaned until the day we rip out our kitchen, realize that our 1 year old oven wouldn’t work in the new design and we might be able to recoup some of the costs by selling it on Craigslist, except that when the prospective buyer opens the oven door, Ewwwww.

Really Dirty Oven

It took some time, but I had that oven sparkling like new in time for showing that evening.  And I never touched a caustic chemical.  There’s nothing like the thought of losing a bunch of money to get my feet in gear.  Before I forget, even though the chemicals aren’t harsh, I recommend wearing gloves since they are very drying.

Baking soda and dishsoap

In a filthy burned on oven, you have two things going on.  Grease and Carbon (It’s like the black stuff that forms when you catch a marshmallow on fire–love them that way.)  So to clean it up, you need to find products to address those two things.  I like dish soap to attack the grease and baking soda to work on the carbon.    I mix the two together to make a paste that looks a lot like cake frosting.

Frosting consistency

Rub it into the spots and let it set for a little while.  Then use a Scotch pad (in non-scratching variety) to work it into the yuck.  It’s best not to use water.  After awhile your Scotch pad will fill up with baking soda and you will have to rinse it out.  Be sure to squeeze out as much water as possible, since water makes the mixture less effective.  It took me awhile since my oven was so bad (I’m talking about the oven I sold, the oven in my NEW house needs cleaning desperately and if I wasn’t throwing a birthday party today, I’d be cleaning it right now.  Really…  I would… I think.)

Spread the mixture on the trouble spot

This even works on the oven glass–like magic.  When you get all the stuff rubbed off, use a soft cloth or paper towel to buff up the rest of the baking soda.  Rinsing it out doesn’t work very well.  It’s best dried and then vacuumed out.  Then dusted away.

Progress

There are other oven cleaning theories out there, that sound slightly easier than mine.  But I have yet to try them.  The next one I want to try is here:  http://housekeeping.about.com/od/kitchen/qt/bksd_oven.htm