DIY Pompom Trim Blanket

We have a bonus room over our garage that I’m using for my office/craft room/guest room.  It has a high vaulted ceiling and the previous home owners used every inch of floor space by not putting in knee walls.  The wall shown here with the window in it, is the only wall in the room that you can put furniture against and even that contains the tall laundry chute.  (I’m tempted to rip this out and just have a hatch in the floor.) Also the thread cabinet on the wall and the sewing table are going to new homes.

The whole room is paneled in 1970’s press board. It would look darling painted white, except for where the roof leaked many years ago, and warped the boards. I’m not sure what to do about that….so I’ve left it natural while we worked on other rooms. I used to have bright blue and white chevron curtains on the rods but am ready for a change.  I’m living with nothing while I decide what will be next.  There are outlets everywhere in the room, on the ceiling and on the floor.  It’s a crafter’s dream and strange all at the same time.  It’s going to be tricky to lay the floor in here, which I hope will happen December 26th.

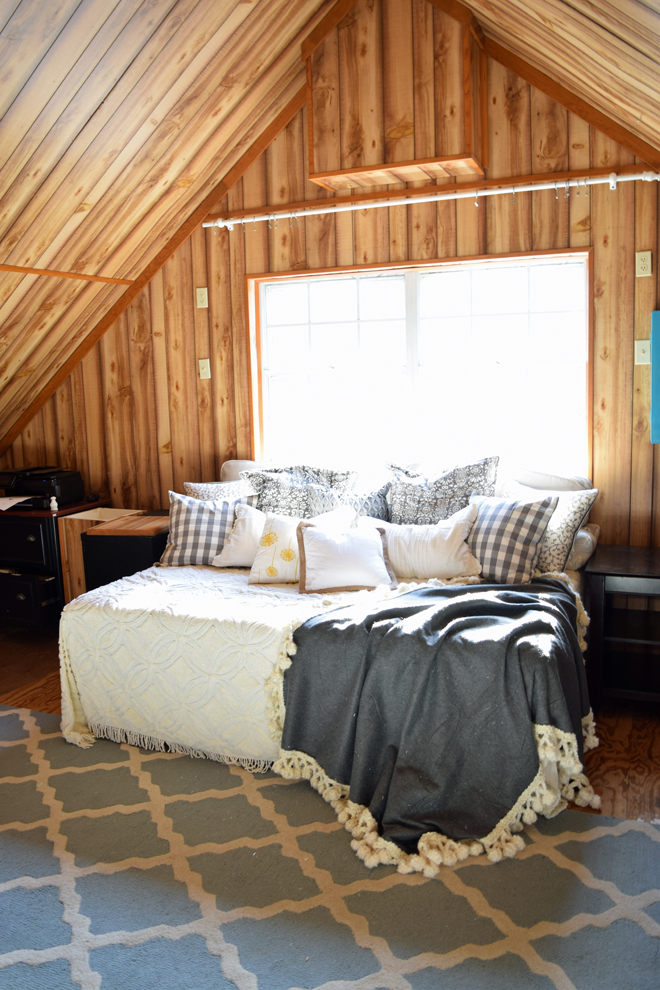
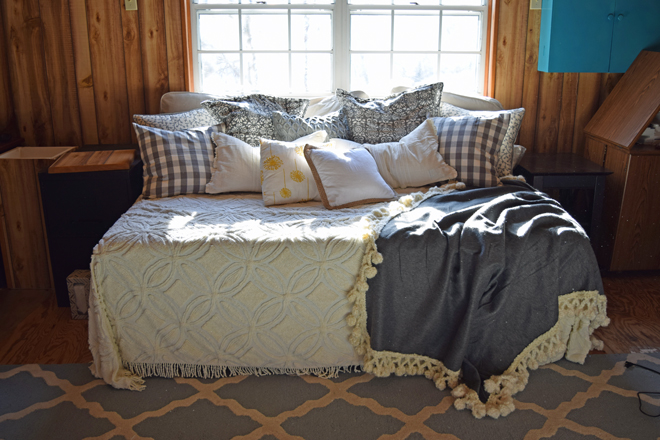
After subjecting our guests to sleeping on an air mattress with a lumpy hide-a-bed mattress thrown over the top, I decided to invest in a more substantial guest bed.  I found this bed frame for a queen bed that folds up into a small square, yet the reviews said it was sturdy enough to use as an every day bed frame.  When folded, the bed frame perfectly fits in a triangle shaped cubby hole in the corner of the room by the furnace utility closet and tucks out of the way when not in use.

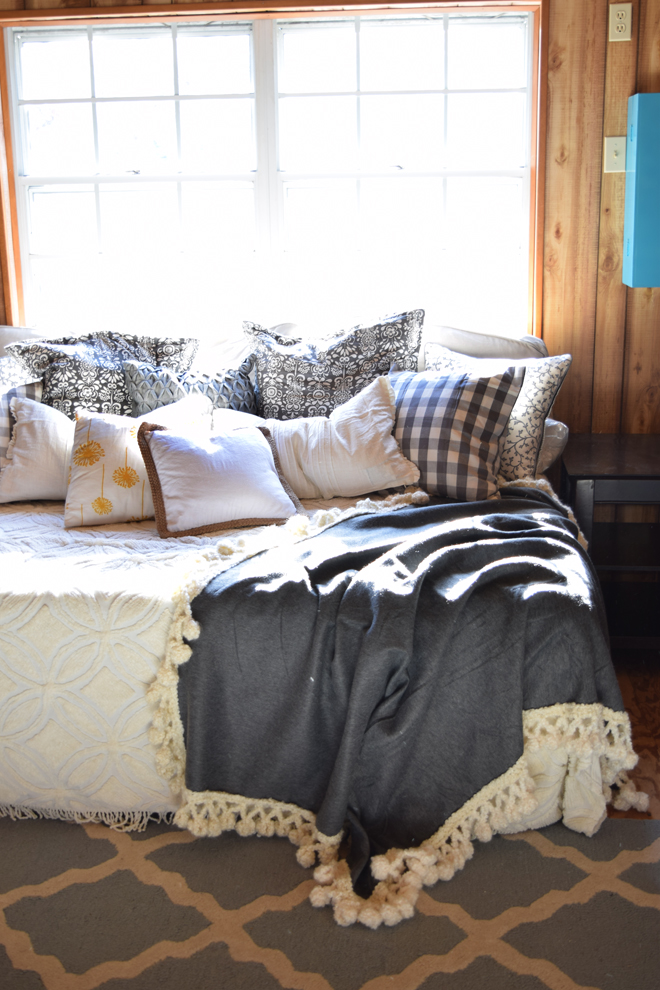
The bed frame didn’t require a box spring. I went to Ikea and tried out all their mattresses and came home with this one.  I had first thought to get an all foam mattress, but this one was surprisingly more comfortable.  It came vacuum sealed and rolled up in a cylinder shape, which made getting it home really easy.  I could imagine it sliding into the cubby beside the bed frame when not in use.  When I cut the plastic and the mattress fully expanded in the room, it was clear it wasn’t tucking behind anything.  SOOOO, my brilliant idea left me with a folded up bed frame in the corner of my office and a mattress on the floor.   Then I saw this blog post from ZevyJoy.  She explains how she used a $50 Ektorp slip cover to turn a queen bed into a daybed for their family room.  Since queen daybed frames were running $300-$1200 online, I thought this was a fabulously frugal alternative.

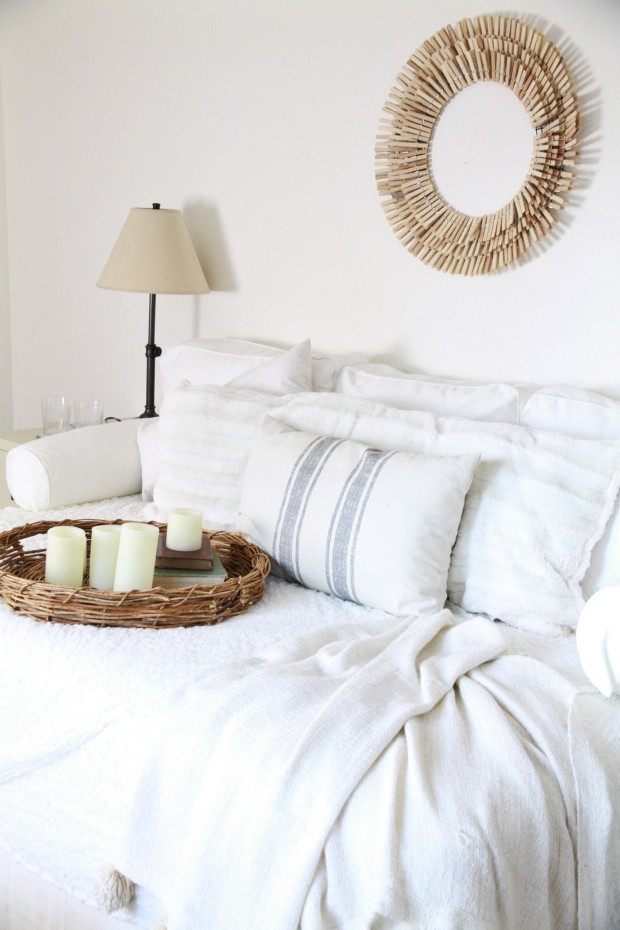
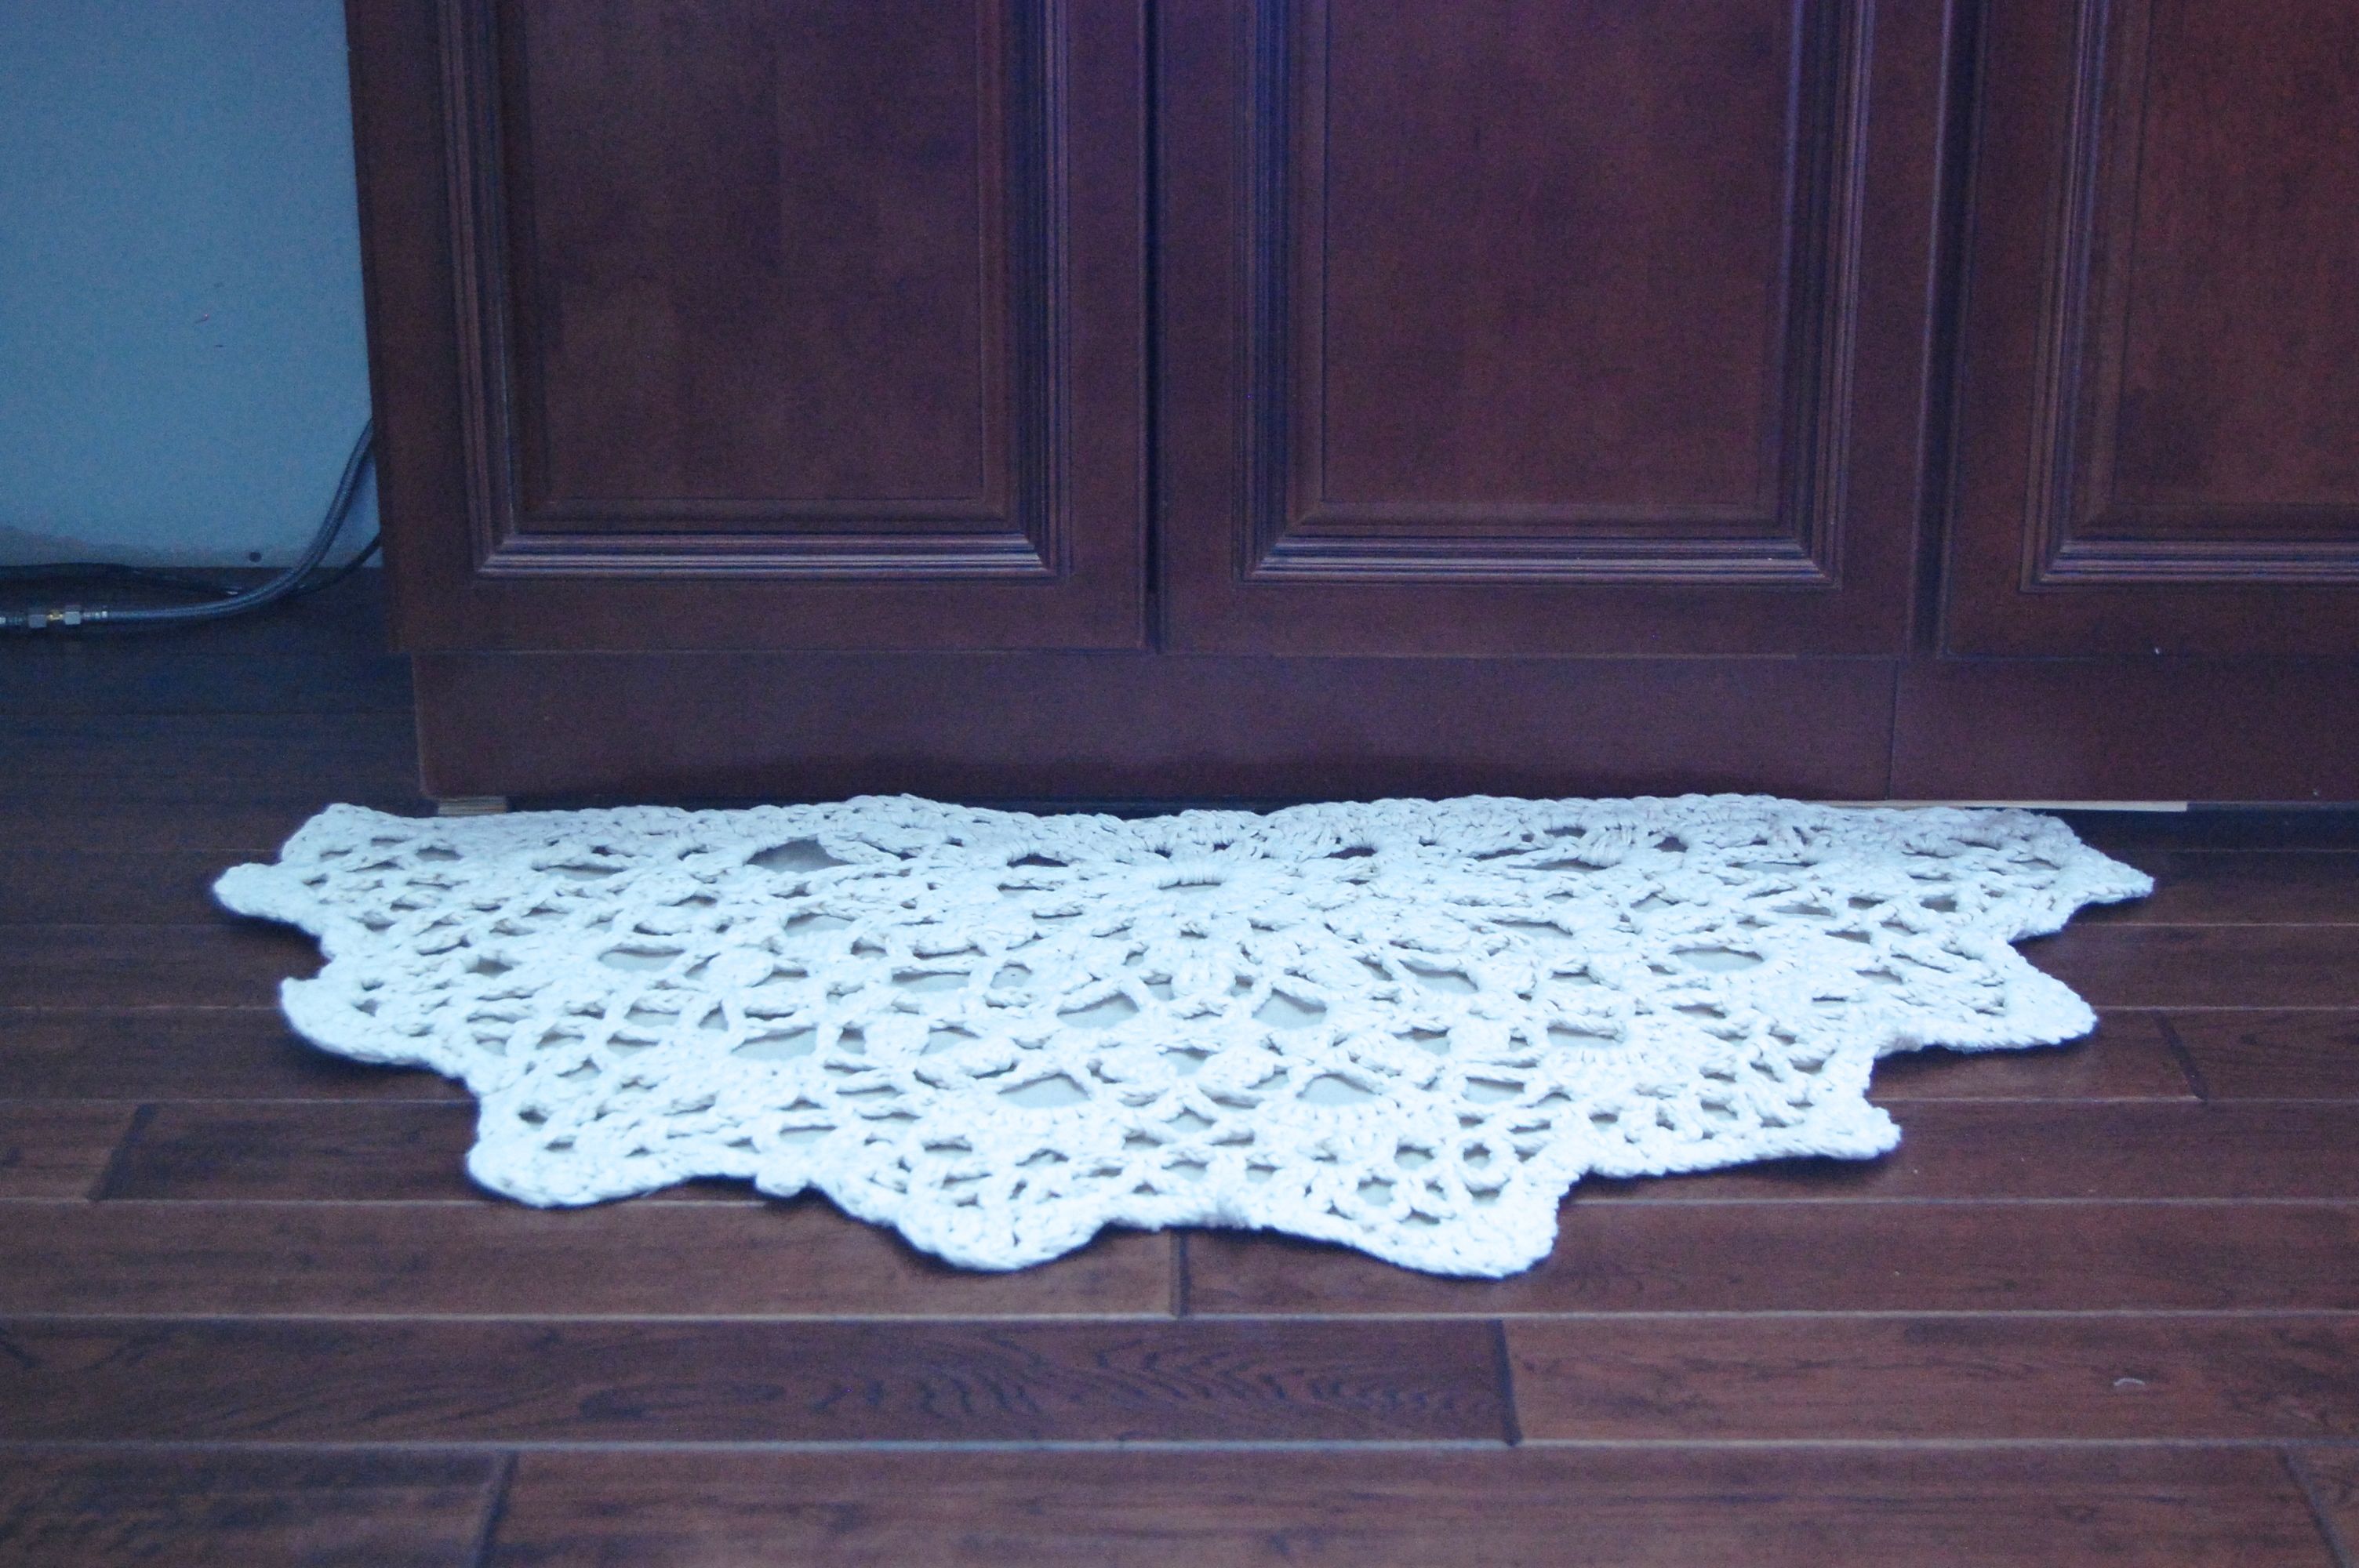
I made one more trip to Ikea for an Ektorp slipcover, some pillow forms and pillow covers to make my own version at home. (The shopping trip that inspired this post.) The effect is limited with the paneled walls and bare plywood floor (except for the well loved rug I threw down for feet safety, but it still beats the mattress on the floor vibe.  I used as much of what I had as possible.  The ektorp cover is stuffed with my spare feather pillows that I had been collecting for a few dollars at a time at second hand and salvage shops.  The chenile bedspread was in a free bin at my neighbor’s garage sale, because her new puppy had chewed a few holes in it.  (After mending it’s hard to find the damaged spots in all the texture.)

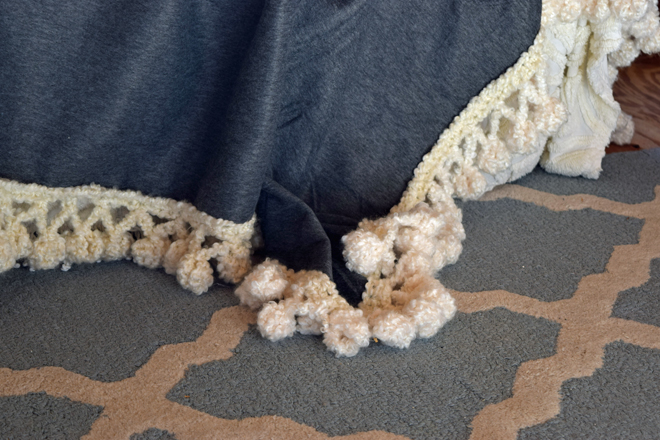
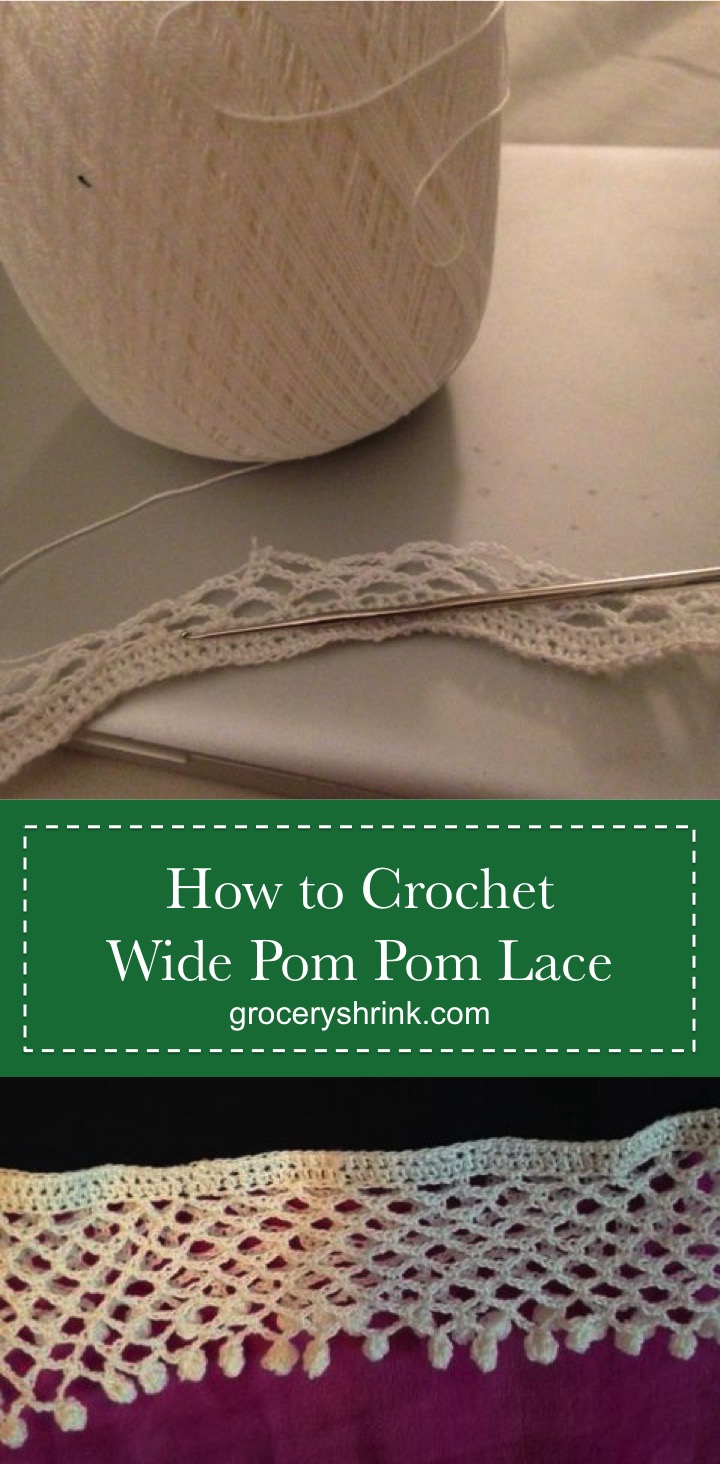
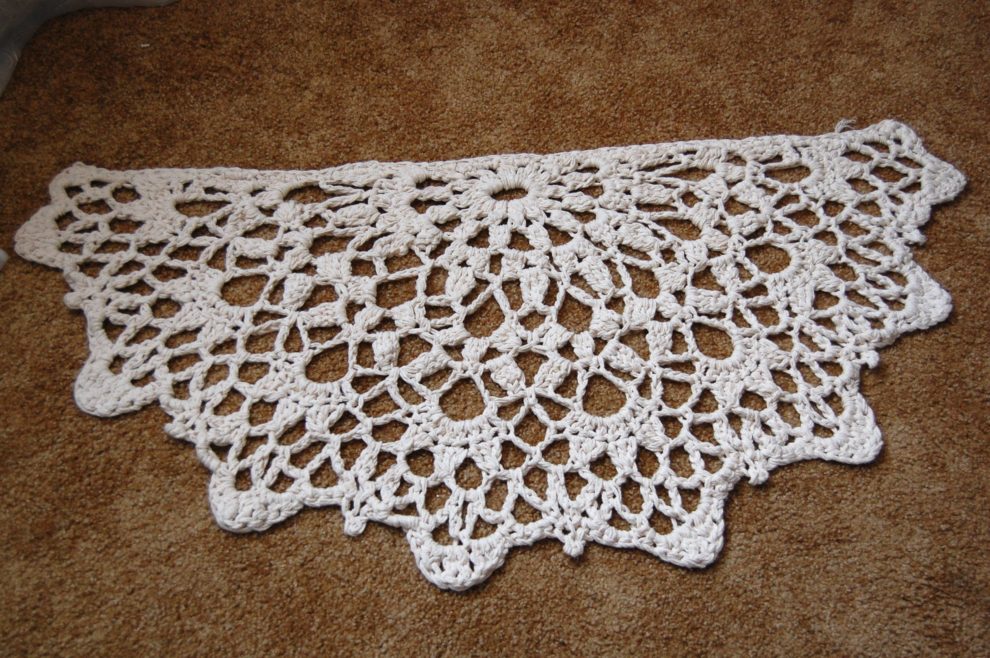
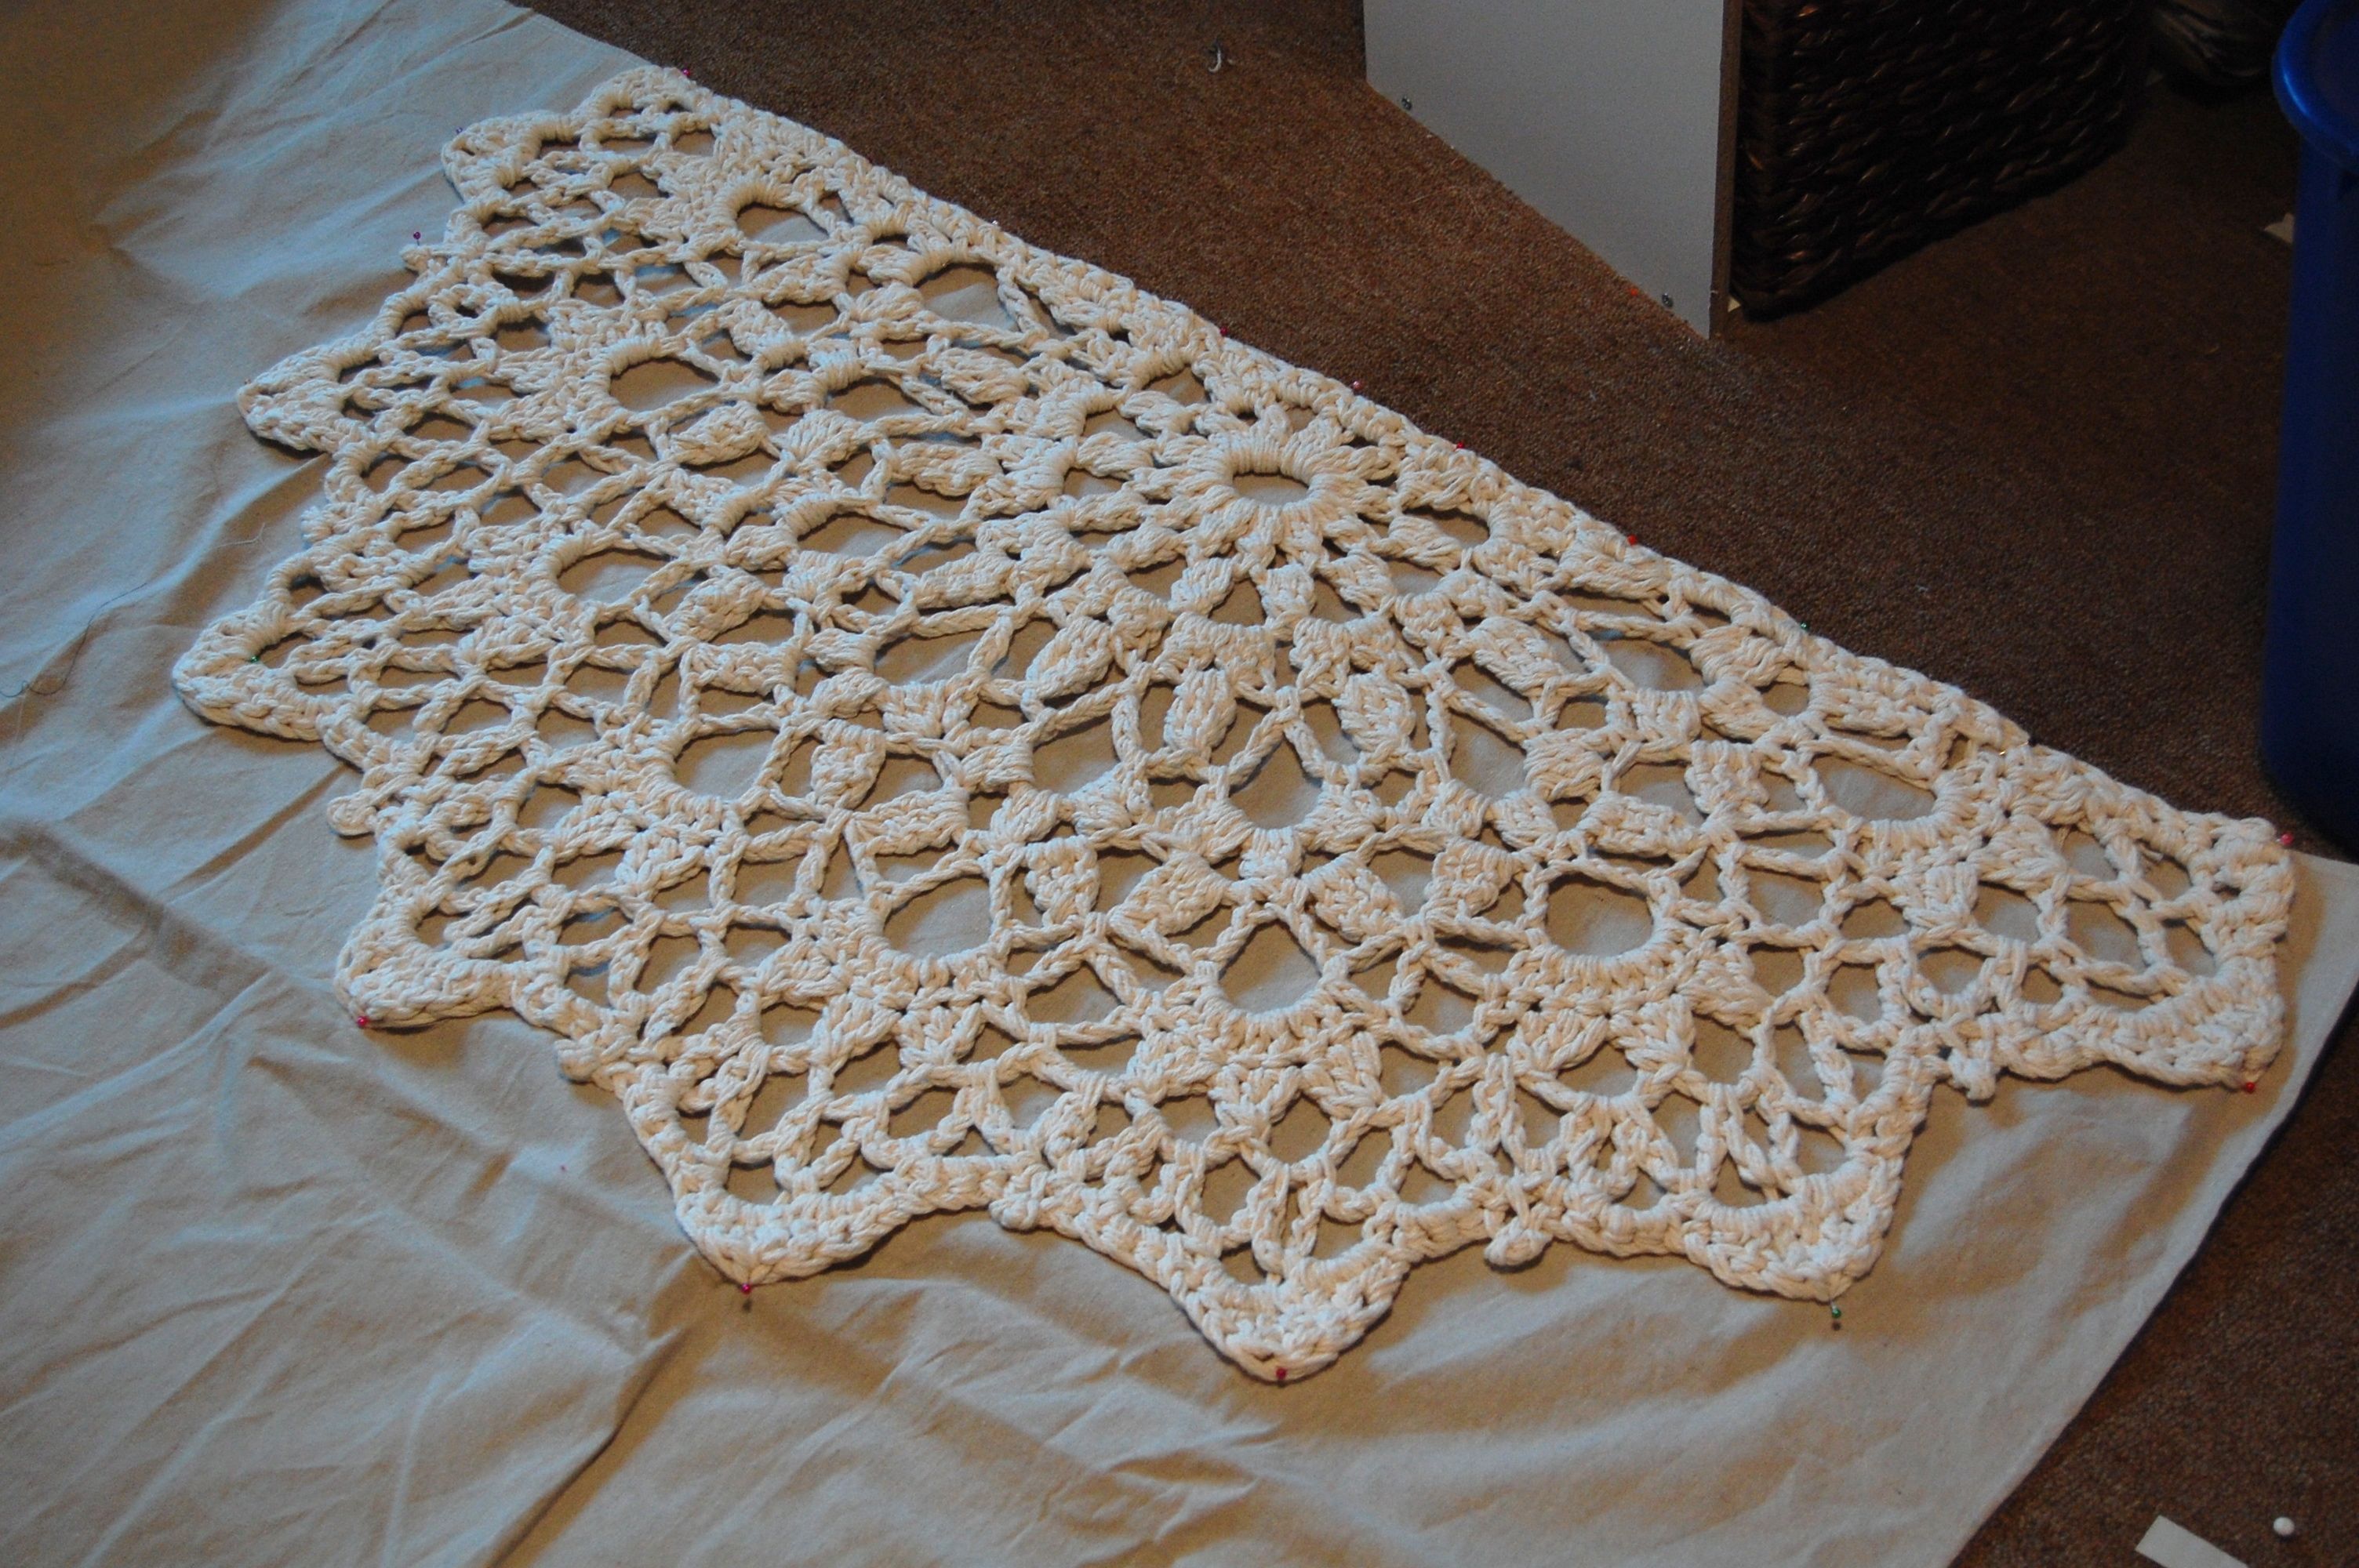
I love the texture of a chunky pompom throw and wanted one to cozy up the guest bed, but they are crazy expensive. The thought of wrapping a thousand homemade pompoms to sew to a blanket wasn’t very appealing, and I’m not a fan of finding strings all over the house that fell out of said homemade pompoms.  Crocheted pomopms are FAST and cannot lose strings.  I started with an Ikea Polarvide throw for $3.99.

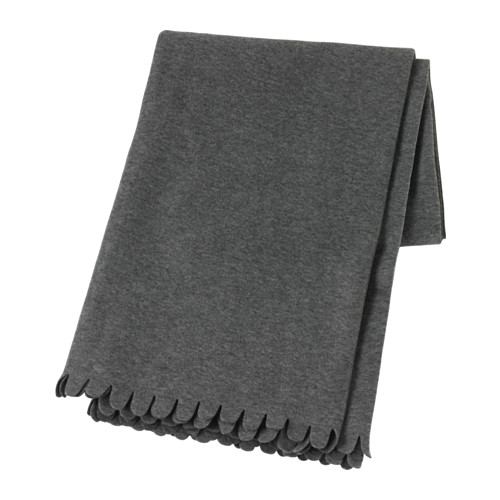
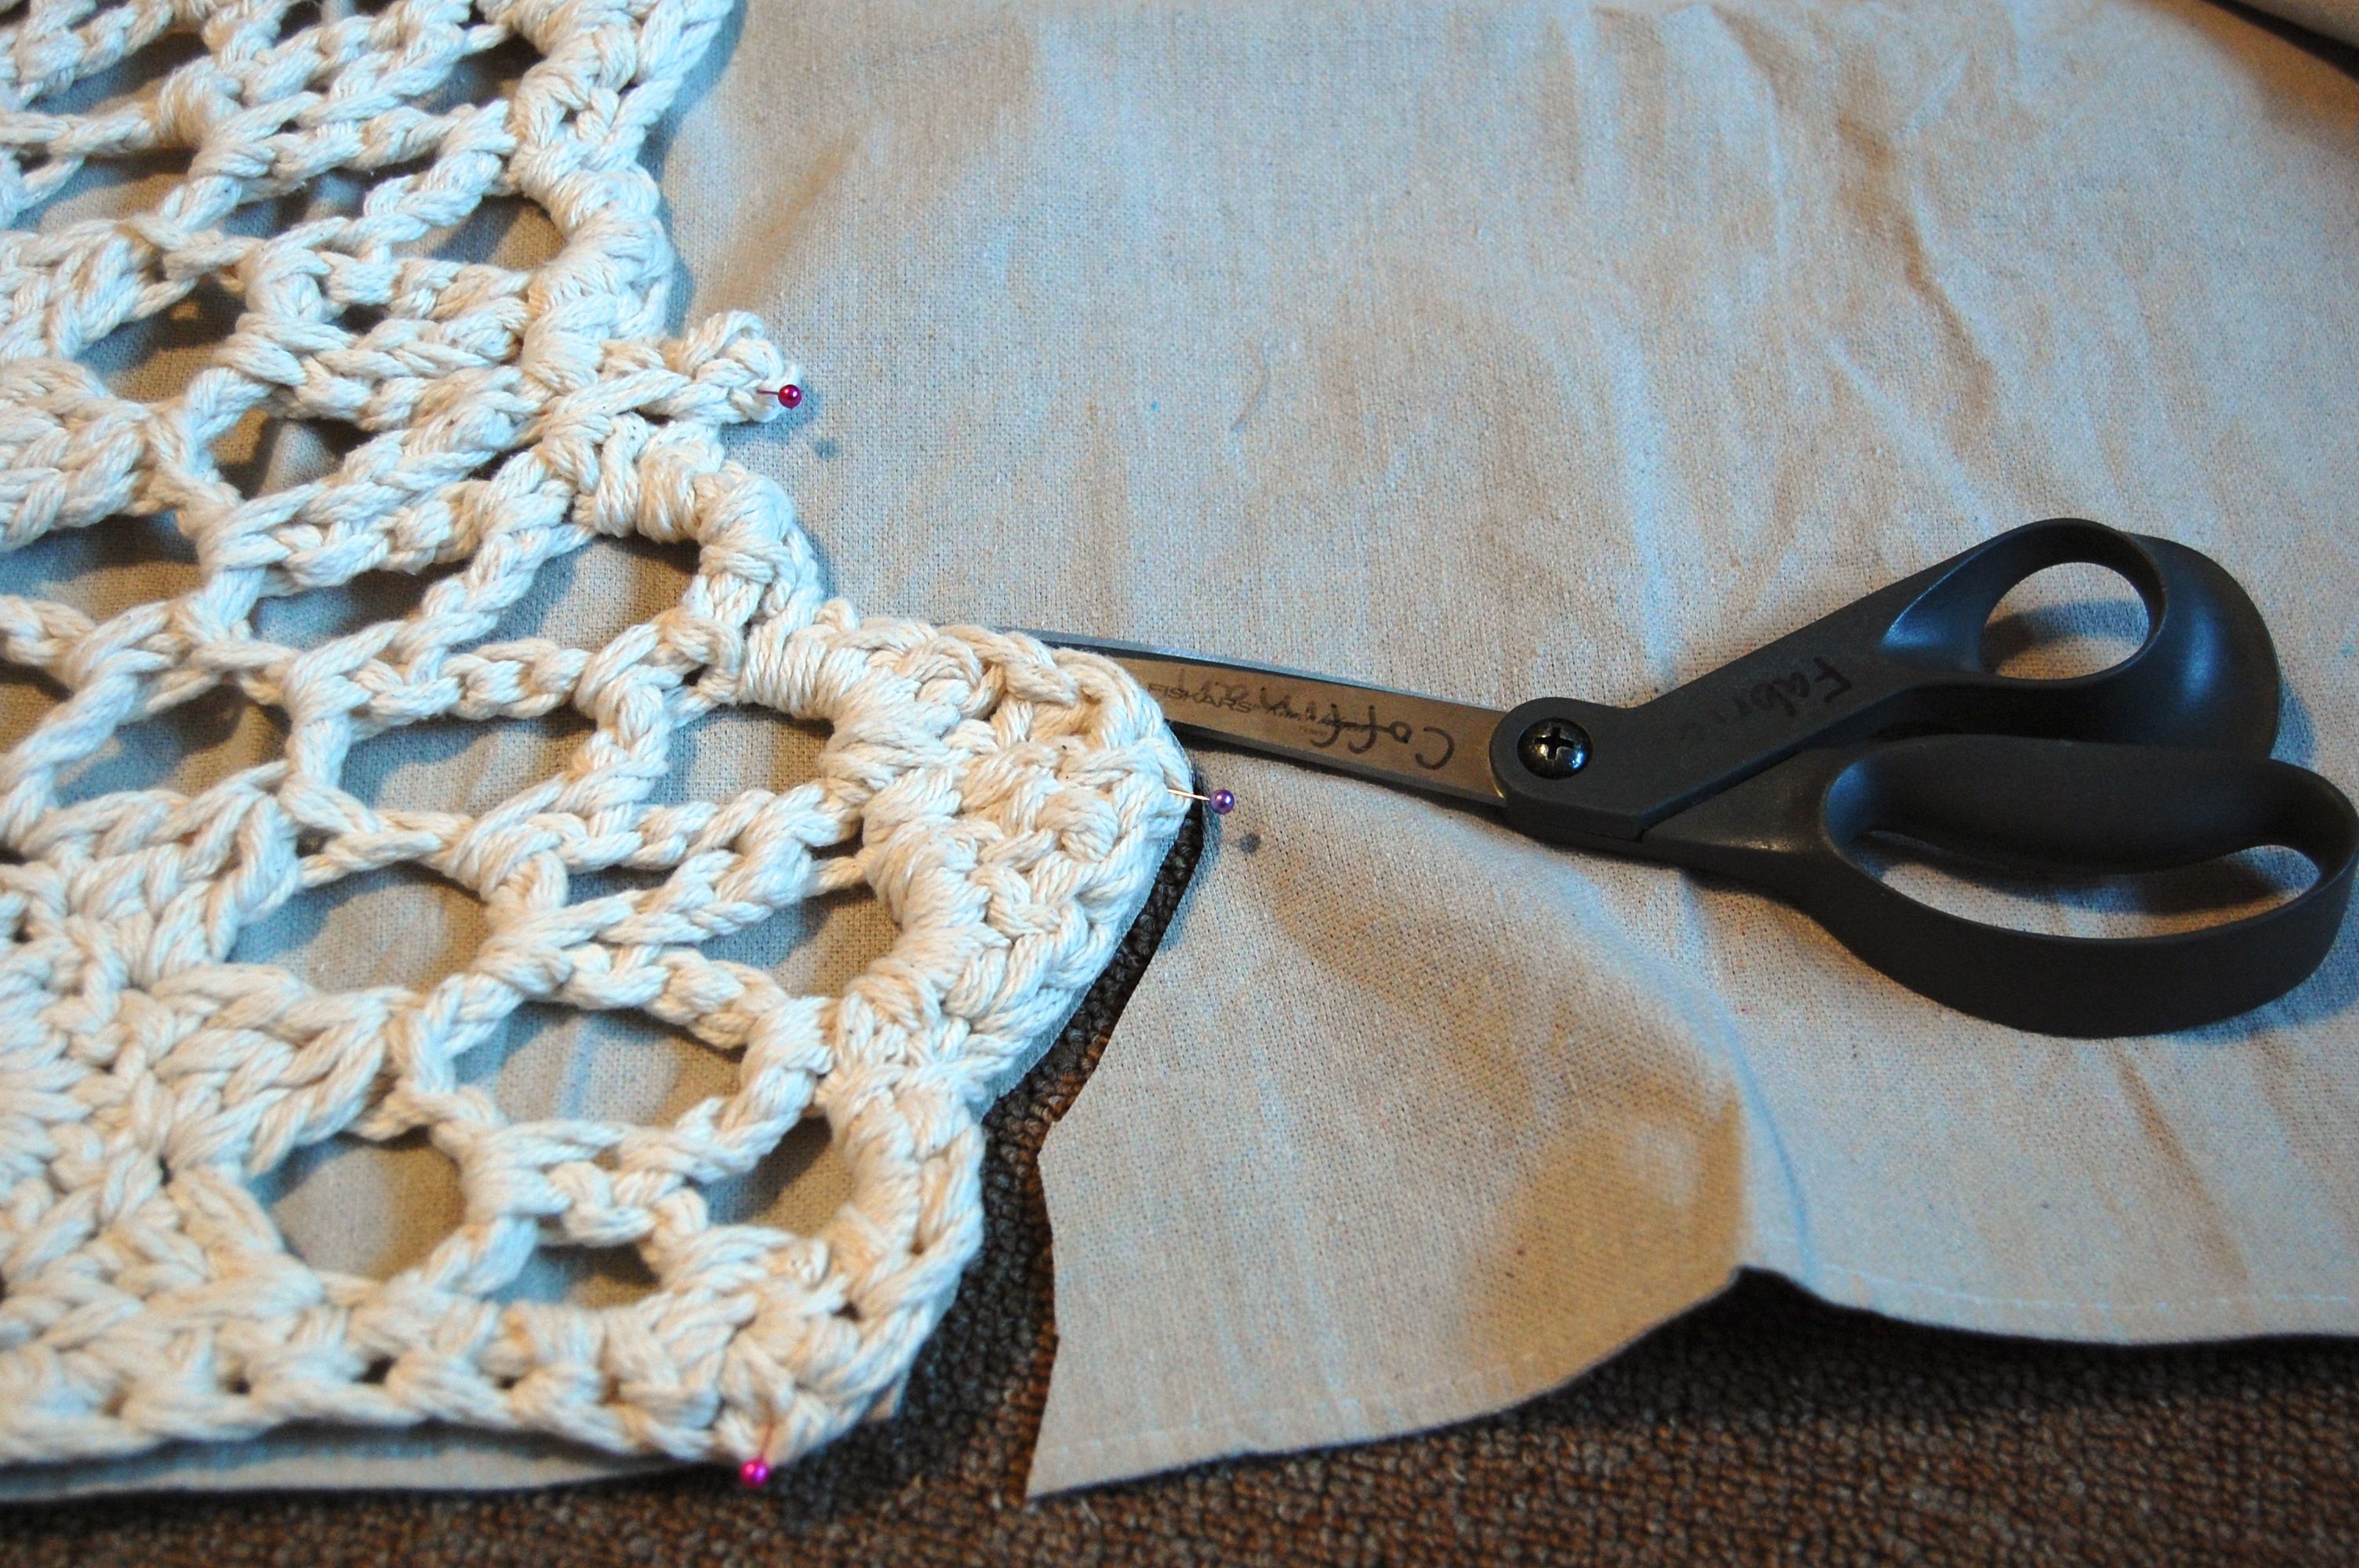
The scalloped edge is adorable, but not great for this application.  I just grabbed my good fabric scissors and cut them off, ending up with a pile of petal shapes that I saved in a baggie waiting for inspiration for another project.

I chose Lion Brand Homespun Thick and Quick in Dove for the poms.  I wanted a chunky boucle yarn, to make it go faster and give the poms a furry texture.   It took almost all of 2 skeins to get around the blanket. At $8.99 a skein that would have upped the price of the throw quite a bit, but you probably guessed I used a 40% off coupon at Hobby Lobby for each skein.  (The final project cost was $14.79.)

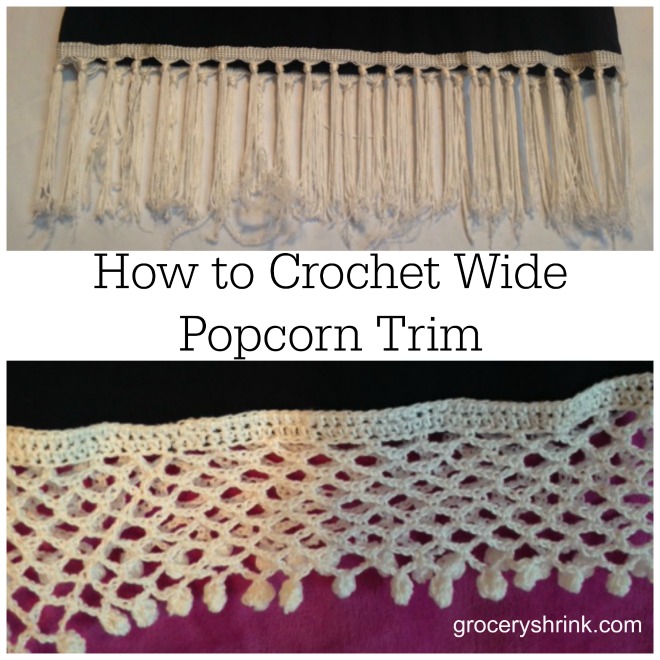
I used a P hook from this set, but you can use any size and any type of yarn you prefer.  Start by chaining long enough to go all the way around the blanket.  After I had a fairly long chain, I started pinning it to the blanket as I went so I’d know as soon as my chain was long enough.  It also kept that huge chain from twisting.  Join with a slip stitch to close and single crochet in each chain around.

To form the pom: chain 6 and form a 3 double crochet cluster in the 3rd chain from the hook.  *Chain 3, then form another 3 double crochet cluster in the 3rd chain from the hook.  Slip stitch to fold those two clusters in half and form a ball.  Then chain 3, skip the next 3 single crochet stitches from your foundation row and single crochet in the next stitch.* Continue from * around.  Finish off and weave in the ends.

When you get to the end, if you don’t have a exactly 3 chains to skip, it’s ok to skip 2 or 4 or whatever is left.  It won’t show in the final blanket.

Here’s a video from Bella Coco that gives a nice visual:

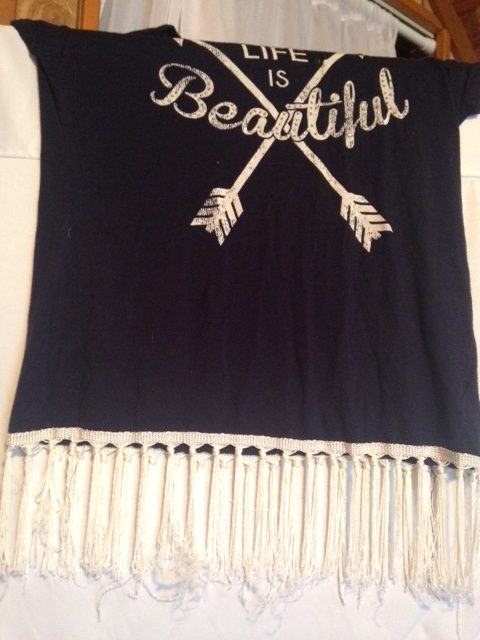
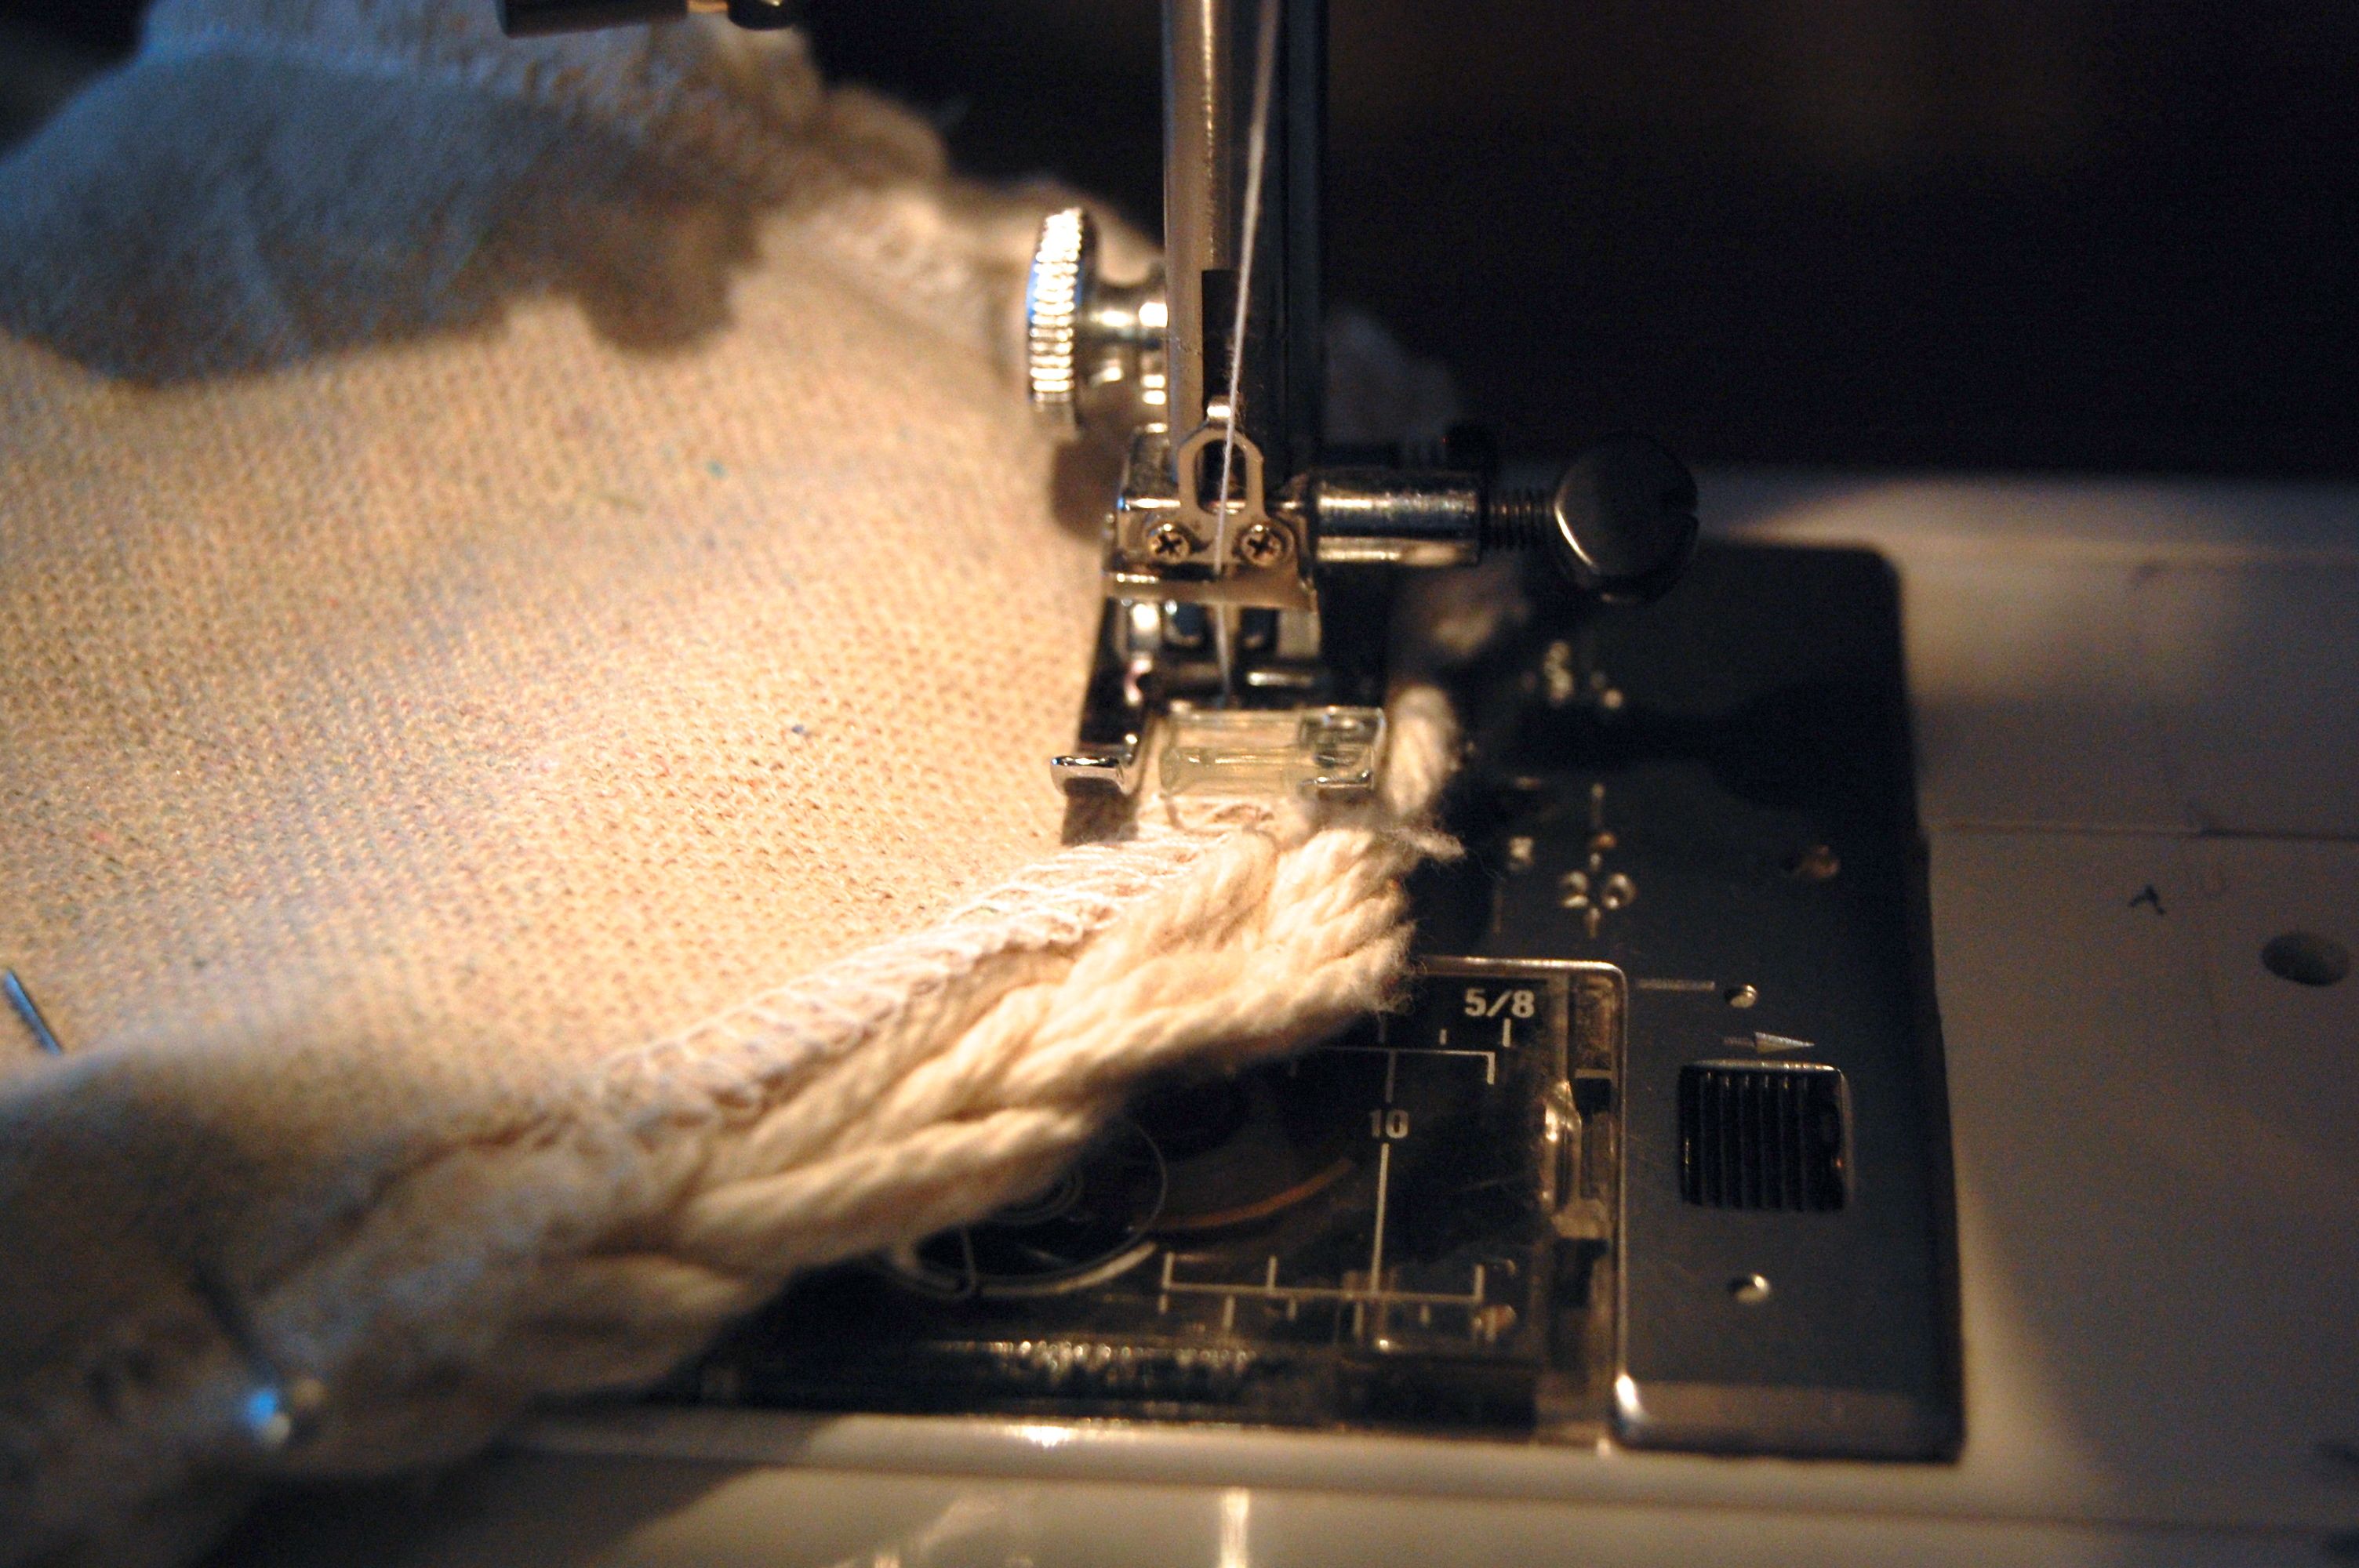
When the edging was all finished, I used a long zigzag stitch on my machine to attach it to the blanket, using cream thread on the top and gray in the bottom so the threads would blend away.  The only problem was the chunky boucle kept getting caught in my presser foot.  Several times I wondered if hand stitching would have been the better plan.

How to Crochet Wide Pompom Trim

How to crochet wide popcorn trim

The second adorable shirt Heather bought had fringe on it and the phrase, “Life is Beautiful.”  When we were shopping, I loved how she walked right by the snarky shirts and reached for the ones with encouraging messages.

Fringe shirt 1

The swingy fringe fit her playful personality perfectly.  But the first time we washed it, it unraveled and tangled.  Boo. (The screen print looks worn but it was made this way on purpose, so it’s still smooth and soft.)  Read more

Pins I Love 4-5-14

 Click the photos to go to the source and find out more:

carrot play doughSugar Free Easter Basket Gift Idea

clean a glue gun

DIY Rainbarrell

We are getting new gutters. It would be a great time to set something like this up!

Crochet Alphabet letters

These would be great in the diaper bag for times we have to wait (like at vision therapy.)  Maybe make 2 sets for matching games.

Easter Toad in Hole

Use a daisy cookie cutter for a Spring theme “toad in the hole”

Blessings bags

Keep these bags in your car for giving to the homeless.

How to pack mini-cupcakesHow to pack mini cupcakes for the road 🙂

Crocheted Half Circle Rug

When I finished the rug, DH said, “What do you think of it?”

What do think?  I love it!  I hugged it when you weren’t looking.  I did dances around it, took off my socks so I could really feel it under my feet.  Knowing how he feels about crochet, I only said, “I think it turned out pretty good.  What do you think?”

Do you know what he said?  He said, “It’s awesome.  And it didn’t really take you that long.”

“And it was free.” I pointed out.

“Um, except for the 3 skeins of yarn and a canvas drop cloth.”

“Those don’t count” (Has he not been to the craft hoarders school of positive thinking?) “No new money spent, means free–duh. Besides I have half the supplies left, so I could make another one and sell it on Etsy to recoup the amount of money I didn’t spend on supplies.  So it cost half of free.”

I think he might have rolled his eyes.  I feel sorry for him.

I wrote down the pattern after I finished the rug so I plan to make another just to test it and make sure. Might be a few “interesting” parts in the instructions until I work it out for you. A seasoned crocheter won’t have trouble. I adapted the rug pattern from a fine string crocheted vintage doily in my collection.

***************************************

Yarn:  3 large skeins (The super huge ones that cost $10 each but go on sale for 50% off all the time–so wait or use a coupon, please) of worsted weight cotton yarn (like wash cloths are made from.)  Size P hook. This is enough to make 2 :).

Good to Know: These are in American Crochet Terms

Abbreviations:

ch = chain

ss = slip stitch

sc = single crochet

dc = double crochet

tr = triple crochet

cl = cluster

p = picot

2-dc-cl (or 2-tr-cl)= cluster of 2 dc (or 2 tr). To make cluster, hold back the last lp of each st on hook and work 2 dc or 2 tr) into st or sp specified, then yo and through all 3 lps remaining on hook.

3-dc-cl (or 3-tr-cl) = cluster of 3 dc (or 3 tr). Make as above, working 3 dc 9or 3 tr) insted of 2 and work final yo through 4 loops remaining on hook.)

P3 is a picot made with 3 chains.  To make a P3, ch 3 then slip stitch into the 3 ch from the hook.

************************************

Foundation: Ch 10; join with a sl st to form a ring.

Rnd 1: Ch 2, 2-dc-cl in ring, ch 3, [3-dc-cl, ch3] 11 times all in ring; join with a sl st to top of first cl.

Rnd 2: (Sl st, ch 2, 2-dc-cl) all in first ch-3 sp. ch4, [3-dc-cl in next ch-3 sp, ch 4] 9 times. Ch 1, turn.

Rnd 3: (Sl st, ch 2, 2-dc-cl, ch 2, 3-dc-cl) all in first ch-4 sp, ch 2. *[3-dc-cl, ch2] twice all in next ch-4 sp; rep from * around, ch 1 turn.

Rnd 4: (Sl st, ch 3, 2-tr-cl)  all in first ch-2 space, ch 5 [sc in next ch-2 sp, ch 5, 3-tr-cl in next ch-2 sp, ch 5] 7 times, sc in next ch-2 space; ch5; 3-tr-cl in final ch2 sp.

Rnd 5: Ch 6, sc in next ch-5 lp, [ch 5, sc in next ch-5 lp, ch 6, sc in next ch-5 lp] around (final sc goes in top of last 3-tr-cl).

Rnd 6: sl-st, ch 2, 2-dc-cl; (ch 2; 3-dc-cl) twice all  in first ch-6 lp; * sc in next ch-5 lp; ([3-dc-cl, ch 3] twice, 3-dc-dl) all in net ch-6 lp; rep from * around.  sc in top of final  ch-5 lp. (May have error at the end.)

Rnd 7: St st in next (sc and cl), (sl st, ch 3, 2 -tr-cl, ch 5, sc) all in first ch-3 sp, * (sc, ch 5, 3-tr-cl) all in next ch-3 sp **, (3-tr-cl, ch 5, sc)  all in next ch-3 sp; repeat from * around, end at **

Rnd 8: Sl st in first 2 ch of ch-5, (sl st, ch 1, sc) all in next ch, *ch 5, sc in 3rd ch of next ch-5, ch 5, sc between next 2 cl **, ch   5, sc in 3rd ch of next ch-5; rep from * around, and at ** (except at the end just sc in final st since there aren’t two clusters here.)

Rnd 9: * 7 Dc in next ch -5 lp, sc in  next lp**, ch 4, sc in next lp; rep from * around, end at **

Rnd 10: * Ch 3, 3-dc-cl over first 3 dc of 7-dc group, [ch 5, join 3 -dc-cl] twice **, ch 3, sc in next ch-4 sp; rep from * around, and at ** (note: joint cluster means the first stitch of the next cluster is in the same spot as the last stitch of the previous cluster.)

Rnd 11: (Sl st, ch 1, sc, ch 5 sc) all in first ch-3 sp, ch 5, [(sc, ch 5, sc) all in next ch-5 sp, ch 5], [sc in next ch-3 sp, ch 5] twice; *[(sc, ch 5, sc) all in next ch-5 sp, ch 5] twice, [sc in next ch-3 sp, ch 5] twice; rep from * around

Rnd 12: *Ch 1, sc in next sp, [ch 3, sc in next sp] 4 times, ch 1**, sc in next sp; rep from * around, end at **

Rnd 13: (Sl st, ch 1, sc) all in first ch-1 sp, *3 sc in next ch-3 sp, ch 1, (sc, hdc, dc, tr) all in next ch-3 sp, tr in next sc, (tr, dc, hdc, sc) all in next ch-1 sp, ch-3p**, sc in next ch-1 sp; rep from * around

Rnd 14: Sc across front of mat, evenly spacing the stitches.  (I took 60 stitches to get across mine.)

At this point it will look a little wonky.  Throw it in the washing machine on gentle.  This will shrink up the yarn a bit and wet it down so you can block it.

Once it is out of the washer, lay it flat on a towel (or clean carpet) and tug it into shape.  Make sure the front edge is perfectly straight and all the picots are pulled out. Let it dry overnight.

At this point, you can use it as is.  I chose to add a canvas backer so I’d have something to attach a non-slip liner to.

To make a canvas backer, place the rug on a canvas drop cloth (I chose the stiffest one in my stash).

Cut out the canvas to match the size of the rug (I skipped the picot part and just cut it straight behind them.) Finish the edge with a zig-zag stitch or serge the edge.  Then pin the canvas to the crocheted rug. (Don’t skip the pinning part, because crochet stretches and will be a mess if you just try to run it through the machine without pins–trust me, I tried it.)

Use a long stitch and coordinating thread to stitch the rug to the canvas around the edges.  This works best if the crocheted side is down towards the feed dogs so the yarn doesn’t get caught in the pressure foot. Also make sure you can see the yarn peeking around the edge, otherwise your backer will show from the front.

If you want to attach a non-slip mat, cut it to fit and then hot glue it to the canvas back.


It will look even better when we get the dishwasher installed and finish the trim under the cabinets, but those things don’t’ affect my enjoyment of the rug in the least!  I can see one used as a bathmat or at a bathroom sink too. I’m considering an oval version to go by Heather’s bed….


Crocheted Baskets Vs. Target

I’ve been makin’ stuff, because it’s Spring break–and besides cleaning up vomit, I needed a diversion. (Yep, 5 of the 6 kids are down with the flu–and it’s been lasting 4 days for each of them–sigh.)

I purchased 3 huge skeins of natural cotton worsted weight yarn after Christmas (using a gift card :).) I was planning to make 4 baskets to hold piano music for the kids.  Inspired by these cuties from Ravelry:

basket2_small2

I made up my own pattern to get something square and sized for the books and dug in, holding 3 strands together and using a huge size P hook. The thing was slow going and super floppy.  I set it aside, discouraged and still unorganized in the music department.

A few months later, I found these baskets at Target:

13946258_121010024625

They were the perfect size, cost less than crochet, so much faster and already sturdy.

DSC_2746 DSC_2744 DSC_2745 DSC_2743

(Don’t mind the hole in the wall and the cans of paint at the end of the cabinet…I don’t even see them anymore.)

I bought the Target baskets–immediately, but I had the yarn leftover and a guilty conscience about what to do with it.  I had been eyeing these rugs on Etsy for awhile. And really the price isn’t too bad.  But since I had the stuff, I decided to attempt a DIY.  It was easy to unravel the partial basket and recoup the yarn.  It hurt my husband more than it did me who yelled, “What are you doing!?” as he watched me tear out hours of work.

He’s not a big fan of crochet.  It takes my time and he can think of a hundred things more fun to do together (wink.) The last thing he wanted to see was undoing the stuff he thought was a waste of time to begin with.  What was he going to think of this new project?  I’ll show you tomorrow.

Feeling Blessed and Free Baby Crochet Patterns

The readers here are amazing.  One of you sent my son a pair of shoes so I wouldn’t spend the money left in my clothing budget, even though the money was there.  She wanted me to get a head start on our 200 ways to save $100.   Another reader emailed to ask me what sizes the kids are because her friends are always looking for places to pass down clothes.  And our family worship group has taken turns bringing us dinner for the month of October after we found out our foundation needs help.  It’s more than we deserve.

Heidi and I crocheted a few baby hats over the weekend for the Women’s Clinic.  Thinking too much about myself and our drama is a pathway to depression.  So we decided to break the cycle and do something for someone else.  We used this free pattern:

1-157e1539fd

Hat picture belongs to www.AestheticNest.com

The hat worked up super fast.  We could make a hat in less than an hour all while visiting together and building our relationship.  My niece got in on the action too. There’s nothing as much fun as making something for a baby! And doing it with friends is even better.

And then I crocheted up this little peacoat for my new niece or nephew. By adapting what I learned from making the girl hat above I made a matching hat inspired by this one.  I also made a little tie onesie to go inside the jacket. It  is meant to help the mother feel the joy of the blessing that is coming in the midst of the overwhelm of daily life.  Sometimes at the beginning of a pregnancy it all feels surreal and can be overwhelming when there’s already a house full of children.  Holding something for the new baby helped me feel a connection to the new life.  And hearing the heartbeat helped a bunch too.  So even though the new baby isn’t due until May, we are giving the little package to the mother tonight.

Baby Boy Crochet Layette

 I had so much fun with these projects (all from stash too–so no new money spent) that I started this sweater for Grant:

a6bff6baa208e04d7f3f12417c18659a

I had gathered all the supplies one week at a time, using a 40% coupon for each skein of yarn and have had them for awhile.  I plan to make the brown part on the arms a lot shorter to match the length of ribbing on the rest of the sweater and am using YouTube videos to learn all the little parts of knitting (like how to cast on and SSK.)

Now that I see this list of projects, I see why my house is a wreak.  Forehead slap.

We have settled into a routine with dinner at a table all together and homework in the one room left with furniture in it.  Sometimes there are more stories and laughter than progress on homework, but it’s happiness to be spending time together as a family again. We are resting from projects and just living.  Next week we have 3 foundation companies coming out to give estimates.  Until then, we are finding a new normal in our space.

I’m starting to look forward to cooking again.  I gave myself a head start by putting a breakfast casserole in the slow cooker last night.   Darren said I could assemble a few of our lower cabinets if I wanted to put some of my dishes away on the main floor.  That sounds like a good plan to me :).  I’m gathering a list of crock-pot breakfast recipes and autumny foods that can be made without an oven. I’ll post on what turns out well.


Lace Fingerless Gloves

Instead of sewing my afghan squares together, I made these:

fingerless gloves

From this free pattern (click the photo below to go to the pattern) (Argh–cue angry pirate sounds–wordpress is deleting my links so I put a hard copy below the picture.  You’ll have to cut and paste):

68092d6efeeac68ea4379f15cf372631


http://bethsco.blogspot.com/2011/11/ripple-lace-fingerless-gloves.html


I like them in a color better than white.  It takes some of the saccharine sweetness out of it.  But white was my only sport weight yarn in stash and I was still resting from an illness while I stitched.  This pattern is super fast and I was able to complete a pair of gloves in a couple of hours.  (They’d be good for stocking stuffers if you have a tween or teen, or trendy teacher on your list.)

Which one do you like better?

This polka dot afghan was supposed to be part of Heather’s room reveal.  That was crazy.  As if I had time to sit and crochet with all the other projects.  But I’ve taken it with me for car rides and appointments and meetings, and now it’s time to make a decision on how to sew the squares together.

Do you like Rainbow?

image


Or Random?

image

There’s one square left to stitch up.  In rainbow mode it would be light blue.  In ‘random’ dark blue.

This was my inspiration photo: I didn’t have all the colors, so went more simply. I used only the small dot squares in solid colors.

0e790a8bebb521a7086058ff97fad65a

From Made by Do. Click picture to go to the tutorial for this afghan.

I had originally thought to make mine random too.  But the rainbow has a nice orderly feeling to it.

I’ve been in bed for 2 1/2 days with a kidney infection (follow up appointment on Tuesday).  So if you follow me on Pinterest, I apologize for filling up your main page with Christmas ideas and crochet tutorials.  I decided while I lay (lie–hmmm, That’s why I teach choir) here I decided to get a jump start on Christmas planning.

I lost all humility and told my husband I AM A GENIUS.  You know why?  Last year on December 26th I took a few moments to take notes on our last Christmas, including what gifts went over well and are a definite re-do; what I’d like to do differently with decorations;  and updates for my Christmas card list. So when I went to brainstorm for Christmas 2013, half the work was done for me and the ideas were really good.

Like:  Make a bound photo book  for Great-Grandma.  Her mind isn’t clear and it’s hard for her to remember everyone’s names, so it will be easy to make that part of the book. And maybe if I start now on Teacher gifts, I’ll get them done on time….maybe.


Chevron Chrocheted Throw Tutorial

Crochet throw 290

Crochet throw 292

Crochet throw 304

My husband called me a yarn hoarder.  That’s how it began.  He quickly repented since hoarding isn’t something you joke about in my family.  It’s a real possibility–and it runs deep.  I have rules to follow to make sure I’m not hoarding, like 1.  Don’t buy more than 6 months worth of something and 2.  It doesn’t matter how good a deal it is, don’t buy it unless we NEED it.  But hoarding still scares me.  My grandmother had an entire bedroom filled with yarn–we think there was a bed in there, but we can’t be sure, since you opened the door to a wall of yarn.  There was a small head space to the room so you could climb up on the pile of yarn and go inside and pick out something to work with.  If I show any signs of that kind of behavior, drive me to Mr. Neubauer’s office (the best therapist in town). If I refuse to go, just tie me up and throw me in the car. He’ll know what to do.

So when I was cleaning out my office and found two large  packages of cotton yarn that I purchased 10 years ago, I knew something had to happen.  Either that yarn was going into the yard sale, or it was going to BE something.  I made a statement about a month ago that I don’t make afghans.  They take too long.  So I decided an afghan would be the best thing to make–makes perfect sense right?  I say things like NEVER right before I do that exact thing.  Like two weeks ago when I said I’d never be in a flash mob dance…but I digress.


(Scrappy would be cute too!  My heather would love all sorts of bright colors on a throw for her room.)

I had the yarn for 10 years because it was beautiful–100% cotton.  I purchased 1-10 pack of white and 1 of ecru when it was super cheap at Cargo Largo. It was too special to use on just anything so I was saving it for the perfect thing.  The perfect thing will never come, because it doesn’t exist on this side of Heaven.  Thanks to the Nester I’m embracing imperfect beauty.


Source: r.ebay.com via Annslee on Pinterest


I enjoy chevrons right now too, so a simple chevron pattern was easy to decide on.  If I were buying exactly the yarn I wanted, I’d buy navy and white so the chevron’s would really pop.  But remember, this isn’t about perfection, It’s about not being a hoarder and using up what I have.  So I have a very subtle white and ecru throw that looks amazing on my chocolate leather sectional instead.

The Pattern:

Any worsted weight yarn (I used cotton–alpaca would be my second choice–soooo soft!) Approximately 20 oz of each (This is the weight of cotton–other yarns weigh less per yard—not sure how to advise you on them since my balls of cotton did not have a yard amount on them. I’ll bet an internet search would show how many yards of worsted cotton per ounce–if you find out leave it in the comments part.)

Size F hook or any size to achieve gauge. (Gauge doesn’t really matter–it’s a throw, but if you crochet super tight you’ll use up too much yarn and make your throw too small and heavy, so might as well check and go up a hook size or two if you need to.)

Gauge:  4 rows is approximately 2 3/8″ tall; 26 stitches is approximately 6 3/4 inches wide.

Finished dimensions: 43″ x 60″

Foundation : Ch 169 (or any multiple of 13–39 chains would make a perfect scarf :).)

Row 1: Dc in 4th ch from hook. Dc in next 3 st; 3dc in next st; *dc in next 5 st;  sk next 2 st; dc in next 5 st; 3dc in next st* rep from * to* 12 times. dc in last 5 st.

Row 2: Ch 2; turn. Sk next st; dc in next 5 st; 3dc in next st; * dc in next 5 st; sk next 2 st; dc in next 5 st; 3dc in next st. * Rep from *to* 12 times. Dc in next 4 st; dc 2 tog.

Repeat row 2 until throw is as long as you like. I switched colors every 2 rows and twisted the yarns together at the ends so I didn’t have to cut the yarn at every color change.  Bind off and weave in ends.


image

Here’s a tip on switching colors from row to row, so you don’t have to cut and weave in ends all the time.  Twist the color you aren’t using around the color you are at the end of the row, so that it carries up with you as you go.  It will barely be noticeable and saves yarn and time.  (Photographed above.)  The very last yarn pull through on the last row before the color change should be with the new color.

image

When You are at the end of the ball of yarn (see above) save the very last pull through and use the new yarn.  (Below)
image

Then tie the two ends of yarn together in a single knot (this is an extra step that makes extra sure nothing will unravel.)

image

Then as you finish the row, crochet over the two short ends to hide them in the stitching.  Then you won’t have to go back and weave them in later.  This saves soooo much time!
image

Here’s a close up on the pattern (above).  Notice the 3dc section always happens in the center dc of the 3dc section from the row before it.  Sometimes I would be watching TV or talking while I worked and lose count, but as long as I got that 3dc in the center of the row below it, it all worked out.

Christmas Gift Tutorials 3

It’s not too late to whip up these lovely things for the holidays.

1.  Petal Pillow:  http://www.cluckclucksew.com/2008/09/petal-pillow-tutorial.html

2:  Gathered Cluth:  http://noodleheads.blogspot.com/2010/04/gathered-clutch-tutorial.html

3.  Ruffly Headband:  http://heart-of-light.blogspot.com/2009/06/ruffly-headband-tutorial.html  

4.  Knitted ear warmer:  http://imtopsyturvy.com/index.php/knit-ear-warmer-with-crochet-flower/