Making the Most of Your Christmas Budget

making-the-most-of-your-christmas-budget

It’s technically still summer and autumn colors aren’t even here, but I want to talk about Christmas just a smidge.  Even though we only give 2 gifts to our kids,  Christmas stresses me out if I don’t plan ahead.  Far AHEAD.  Truthfully, sometimes I still freak out—but this helps.  It’s what I’m doing today, so I thought I’d screen capture a summary of my movements and thoughts as I plan.

I made a little video for you showing how I budget for Christmas and how I buy each item at the lowest price possible.  I hope it helps take some stress off of you this holiday season!

Here are the video notes plus some extra stuff that the video missed:

  1.  Plan to set aside money every month for Christmas Gifts, and know what your total budget will be by the end of the year.

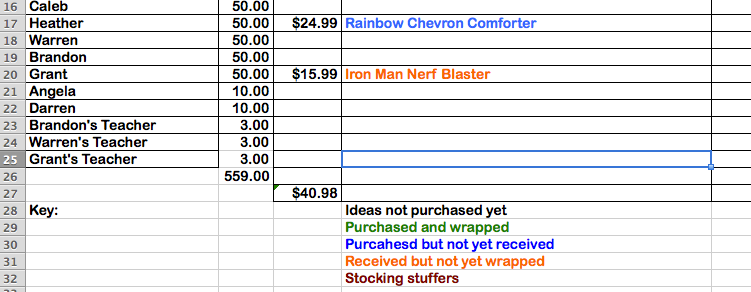
2.  Make a list of all the people you need to buy for and put a dollar amount by each name.  This list total should equal the amount you’ve budgeted for the year.  You might want to add some extra lines for Hostess Gifts or other unexpected exchanges.

3.  Next to each name, brainstorm gift ideas.  I use color codes to tell me if it’s just an idea, or if I’ve placed the order etc.  I also write in the actual amount spent so I can track my spending and not just the budget.  If I buy more than 1 item, I add a line so each item and actual price is on it’s own line.

2016-09-14_10-30-07

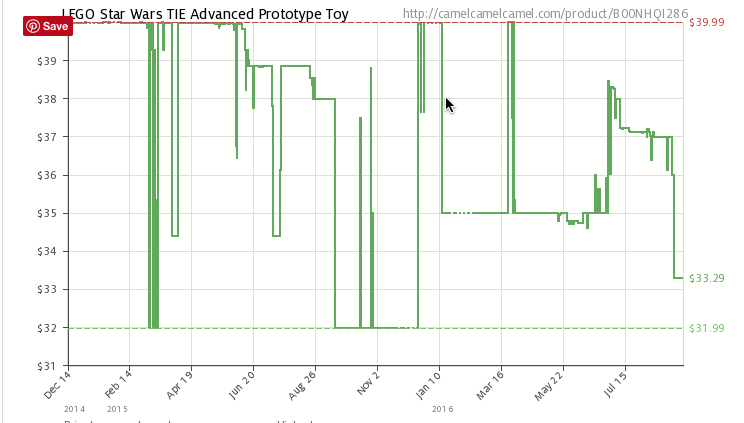
4.  When shopping on Amazon, first make an account at camelcamelcamel.com.  Then copy the item URL  to camel and ask for an email alert when the price drops to your target zone.  Since you’re planning NOW you can afford to wait for a better price.  This is important because Amazon no longer offers partial refunds if the item drops in price after you purchase it.

2016-09-14_10-44-17

5.  I also belong to a discount health and wellness club that as a side benefit has a unique shopping portal.  In addition to providing more than 500 toxin free products for my home and body at great prices, they’ve partnered with hundreds of stores like Old Navy, Target, Home Depot etc.  When shopping through this portal I have access to extra coupon codes and discounts to use in the online shopping cart PLUS I get a cash back rebate in the mail, on every purchase!  It’s only $19 a year for me to be a member, but right now they are offering a $1 special for the first year.  I can’t give all the details in this post, but if you want to know more about it, you can request info here. (Your contact info goes straight to me and no one else will se it, so be sure your best email address is included.)

A Family Friendly Yard on a Budget

Our house has so many projects! My foyer has been primed but not pained for several months now and I’m still not done with my built in bookcases or trim in the living room.  Already my heart is turning outside.  We have a couple of gorgeous months ahead of us and I would LOVE to add a firepit and some swings to our yard and just hang out there with my people.

back-yard-before

Two weekends ago we piled our driveway full of brush and yard trimmings, revealed our raised beds and split enough wood for two winters. Then last weekend we built 4 more raised garden beds, and mulched around trees and pathways.


pathway to school

Here’s a close up of the bushy area to the right after cleaning up. The yard is looking almost pretty.  The two days working together as a family was really fun and bonding, except for the poison ivy that I found. It’s the city’s job to keep the fence clean 😛 We can work on our side, but the other side remains a jungle.  I suppose there’s more privacy that way.

under the deck

Darren is talking out loud about building a seating area under the deck.  I’ve been talking about it for years and he would respond with all the reasons why it was a bad idea.  Now, it appears it is HIS idea and I’m all for it. Above is what it looks like today, sigh.  There’s a LOT of work to be done.  But I’m envisioning removing the wall covering on the side facing this, and the side facing the yard to the right.  We’d like to leave the covering on the back wall, because that is the north side and blocks the worst weather for us.

Then I’d like a slew of comfy seating and eating areas where our huge family can gather.  (Just my husband’s immediate family is 28 people.)  Something with the feel Centsational Girl created here:

901fd840058babb0f75307a4df689358

This will be the most expensive backyard project on our list because we’ll need to jackhammer some extra footings that aren’t being used anymore, and bring in several yards of gravel to create a temporary floor.  Concrete would be ideal, but it would be around $10,000 to pour a spot this big.

c472ce7d082360464e48225a33f02e20

Here’s another inspiration photo from Redoingit.blogspot.com. They have a fabulous tutorial there on making outdoor curtains from canvas drop cloth and plumbing fittings.

how-to-build-a-diy-firepit-for-60

While we save up the cash for the gravel floor, I’d like to build a fire pit like this.  I go back and forth on the kind of bottom to put in the pit. The flat stones as shown here would make shoveling out ashes a snap, but we have a couple of bags of sand that the previous homeowners left and it would make a free floor that drains well.  The stone blocks are a lot more expensive in my area than described in this tutorial (more than double) but I have seen them on Craigslist recently (I was just too slow to text and they were already sold, sob.)  While we do the necessary clean up work, I’m going to keep watching for another good deal.

with-swingset

This simple swingset can be built for less than $100, even after modifying the plans to make it taller and wide enough for 3 swings.  We had a hard time figuring out where to put the swings with all the trees and tall back fence.  Darren finally had the idea of turning it sideways (we already plan to take out the tree right by the garden beds) so the kids would have more room to swing without hitting the fence.  It’s not as aesthetically pleasing to me as one turned the other direction, but I’ll be able to see it from the house which was really important to me.


Creamy Pumpkin Mousse: A Weight Loss Recipe

I’m so excited about the flavors of autumn! Apples, cinnamon, maple, pumpkin, acorn squash….Yes please!  All of it.

Here’s a super simple recipe that is sure to please your fall cravings, but is still cool and refreshing for those warm afternoons.  It takes less than 10 minutes to prepare and is low carb.  If you’re following Trim Healthy Mama, this would be an S. The few carbs that are in it are naturally present in the Greek Yogurt and Pumpkin.

Pumpkin Mousse

Creamy Pumpkin Mousse

1 cup pumpkin puree (not pumpkin pie filling)

1 cup plain Greek Yogurt (I used fat free but any fat content is fine.)

1 cup heavy whipping cream

1 1/2 tsp pumpkin pie spice

1 tsp liquid vanilla stevia

4 packets Truvia

(If you aren’t counting carbs and just want to use sugar, I recommend 1/4 cup real maple syrup or honey to replace the stevia and Truvia.)

Put everything in an electric mixer with the whip attachment and whip until soft peaks form.  You’ll be able to see the trace of the beater through the mousse and the lines will stay when it is ready.

Transfer to 6 serving dishes and chill until ready to serve.  I’ve found my stevia sweetened things taste better when chilled for a couple of hours.  It helps the flavors blend and makes the stevia less bitter. My kids gave this 2 thumbs up even before chilling.

For a new prep-ahead weight loss meal plan every week, click here.

screen-shot-2016-09-12-at-11-21-19-am

How to Crochet Wide Pompom Trim

How to crochet wide popcorn trim

The second adorable shirt Heather bought had fringe on it and the phrase, “Life is Beautiful.”  When we were shopping, I loved how she walked right by the snarky shirts and reached for the ones with encouraging messages.

Fringe shirt 1

The swingy fringe fit her playful personality perfectly.  But the first time we washed it, it unraveled and tangled.  Boo. (The screen print looks worn but it was made this way on purpose, so it’s still smooth and soft.)  Read more

How to Repair a Screen Print

how to repair a screen print

Before school started, I took my middle school daughter shopping for a few cute shirts that would help her feel confident at her new school.  She had previously been homeschooled, then attended a small Christian school for 5 years before moving to a large public school this year.  She was going to have enough things to be nervous about, and I didn’t want clothing to be one of them.

how to repair a screen print 1

The first shirt had a large screen print on the lower back that said “love” with a smaller matching print on the front pocket.  After the first washing it looked like this, sigh.  I didn’t keep my receipt or the tags, or it would have gone straight back to the store. (The front pocket still looked perfect.)  I tried to convince Heather that the worn look was “cool” but she didn’t agree and pronounced the shirt unwearable.

How to repair a screen print 2

I had some white acrylic craft paint in my stash, so decided to try painting the words back on with a brush by hand.  I could have taped it off first, but I have a really steady hand and didn’t want to take the time.

How to fix a screen print 3

Before painting, I slid a scrap piece of foam board (cardboard would have worked too) inside to keep the paint from seeping through to the front of the shirt.  It would have been a disaster if I had skipped that part. Then started painting.  I got a few drips of white paint on the navy blue shirt, but had rubbing alcohol and cotton swabs on hand to quickly clean up any accidents.

How to fix a screen print 4

It looks almost like new, especially from a distance.  The painted texture is a little stiffer, and the flakiness of the screen print is still there under the paint roughing up the texture.  I’m a little nervous about how it will wash with the screen print the way it is.  I’ll update you as soon as we give it a try.

I’ve used this paint for stenciling on clothing before and it washes well after it’s cured.  I will cure it by letting it dry for 24 hours, then ironing it with a steam cloth before washing.  When Heather came home from school and saw it, she was really happy!


What are you interested in?

Hello there!  I’ve missed you! I really thought when August came around I’d be back to blogging every day, but it didn’t happen. I’ve been doing some work behind the scenes and it has taken all my brain power.  Things like building the cabinets for my music room, filming for a mini-class and restoring the pictures in my most popular blog posts.  If you remember, I had a major website crash last February that erased more than 2,000 pictures….a very sad day for me.  It will take me years to get all the pictures back, and I’m prioritizing the most read posts.  If your favorite post is still missing pictures, message me and I’ll put it on the priority list.

In my non-business personal life, I’ve been spending a lot of brain power on fitness.  As I’m finding the proper balance for my adrenal insufficiency, I’ve decided to start working out regularly and eating right–hopefully to lose the 35 lbs I’ve put on over the last few years while fighting the illness.  I’ve learned that I enjoy strength training a little more than cardio (as a FYM cardio = 15 minutes of high intensity interval training), bwa ha ha. strength-training-vs-cardio

I’ve been a 5 year fan of Holly Rigsby and member of the Fit Yummy Mummy Lifestyle.  It doesn’t take a lot of time to live the FYM life (20 minutes a day!), but it’s something I’ve been doing deep soul searching with while I walk the walk.  Why do I make bad food choices and when?  Can I predict it and head it off before it happens? How can I change my attitude and reframe my emotions about food?  How can I affordably treat myself without using food? I’ve been writing in my journal every day at clubFYM and getting good support from Holly and the other ladies walking the same path.  That interaction has fulfilled a lot of my need to write.

Screen-Shot-2016-08-15-at-9.20.52-AM-750x184

I can see the changes in my face!

My writing in a private journal doesn’t help you, I know.  So I’m committing to show up here and write more often.    I’ve had some topics floating around my head, but would love to know what you’re interested in. If you can spare a minute, select all the topics you would like to hear about and if you have an idea of your own, you can leave it in the comments :).

Why I Still Use Disposable Baggies

I posted this photo last week on instagram of a moment during my snack packing session for the week.  I like to buy food in bulk when it saves money, then package it up myself for the kids to grab and put in their lunches.  It only takes a few minutes and helps with portion control and limits waste.

instagram prepackaged snacks

I almost didn’t post the photo, because I was afraid of the backlash of the plastic baggies.  There’s a movement out there away from baggies and I jumped on for about a month (6 years ago) then abandoned ship and never looked back.  Here’s why: Read more

Baked Creamy Spinach Chicken Flautas

When you need an easy dinner idea, a packable lunch, or a substantial snack, I’ve got your back.  Here’s what I love about these little cuties:  everything is hidden inside.  Onions…check.  Spinach…check. My kids didn’t even notice.  Just bit right down and gobbled them up.   Sometimes you have to be stealthy with the veggies.

chicken spinach flautas 4

Baked Creamy Spinach Chicken Flautas

1 chopped onion

1 tsp minced garlic (or garlic powder)

2 cups fresh, chopped spinach

1 can, 4 oz green chilies

1 tsp ground cumin

2 cups cooked shredded chicken*

1 brick, 8 oz neufchâtel cheese

20-6 inch tortillas (I used flour, but corn works if you want to call them taquitos)

  1. Preheat oven to 400 degrees.
  2. In a large skillet saute onion and garlic until very soft.  Stir in spinach and cook until wilted. Add green chilies, cumin, and chicken.  Heat through.
  3. Push everything in the skillet to the outsides, making a whole in the center.  Put the neufchâtel cheese right there and stir it around until it softens and melts into a creamy liquidy pool. Then stir it into the chicken mixture.
  4. Place 2 Tbs of the mixture onto the edge of a tortilla and roll up tightly.  Place seam side down on a baking sheet.
  5. Bake for 15 minutes or until golden brown and crisp.

Serve with dipping sauces like: salsa, ranch dressing, sour cream, or guacamole.  For dinner add side dishes of tossed salad and cut fruit.

chicken spinach flautas 1

Zucchini Chocolate Cupcakes

At 3 pm everyone at my house gets the munchies.  I’ve taught my kids to be self-reliant when it comes to food.  It’s a habit of years of dealing with chronic illness. Now that I’m doing a bit better, I want to take back some of the kitchen control.  I like my kids learning to cook and make do, but I’m not loving the mess they leave behind.  It’s going to take some steady supervision to change the bad “clean up after yourself” habits I’ve allowed.  In the meantime, I’m being proactive by preparing after school snacks.  Rename these “muffins” and you can serve them for breakfast too :).

Chocolate Zucchini Muffins

Zucchini Chocolate Cupcakes are loaded with veggies, fiber and protein.  You can choose how you want to sweeten them.  I used a mixture of xylitol and sucanant.  To get the right texture, you should include real sugar for at least 1/3 of the sweetener.

You can also be creative with the flour you use.  I used fresh ground whole wheat flour, unbleached flour or a gluten free flour blend (if it has xanthan gum in it) will also work.  If you are using an alternate flour option, add it gradually and stop when the consistency is cake batter right.   Some flours (like coconut flour) absorb a ton more water than wheat flour and you will need quite a bit less.

Zucchini Chocolate Cupcakes

1 1/2 cups Nonfat Plain Greek Yogurt

1 3/4 cup sugar

2 eggs

1 Tbs vanilla extract

2 cups shredded zucchini

1 1/2 tsp baking soda

1/2 tsp cinnamon

1/2 tsp cloves

1/4 cup cocoa powder

2 1/2 cups flour

1/4 cup mini chocolate chips

  1. Preheat oven to 350 degrees
  2. In a stand mixer, beat Greek yogurt with sugar, eggs and vanilla.  Stir in Zucchini.
  3. Add baking soda, cinnamon, cloves, cocoa powder, stirring well after each addition.
  4. Add flour 1/2 cup at a time, stirring just until incorporated. Do not add chocolate chips at this time.
  5. Fill greased or lined muffin cups 2/3 full.  (I like to use an ice cream scoop to measure it.)
  6. Sprinkle the top of each cupcake with 1/2 tsp of mini chocolate chips.
  7. Bake for 28 minutes or until a toothpick inserted in the middle comes out clean.
  8. Cool on a wire rack for 5 minutes before removing cupcakes to finish cooling.

Nutrition Information for Zucchini Muffins

The Tryouts

I try not to worry about my kids.  With a God this big, why should I worry or fear? But I do, even when I pray and I think I’m not going to.  We’ve done homeschooling, private Christian school, and public school.  Last year I had 1 in private, 2 homeschooling, and 3 in public.  This year we are transitioning everyone to public school and it’s a little heart wrenching for me.

soccer-5-1437147-639x424

Last week, my oldest boy, who homeschooled last year, who has been spending too much time in his room, wearing pajamas, and reading books, came out of his room early on Monday.  Dressed. With shoes.  He said, “Bye mom, I’m going for a bike ride.”  I stared after him dumfounded.

Then Tuesday, he said, “Soccer tryouts at my new High School started yesterday, but it’s not too late to join.  Can I go tonight?” My son has done little more than walk from his bed to the fridge in a year, partially because of his love of books, and partially because he has sore, swollen knees from Osgood Schlatters disease.  I was happy he was out of his bed and interested in something.  I found the medical forms he would need and we showed up.

I sat in the bleachers with one other mom.  52 kids and 2 moms.  I had prepared 3 bottles for his practice: 1 with ice water, 1 with electrolytes, and 1 with recovery protein and glucose. I was terrified.  How is a kid who lies around reading books all day going to handle high school soccer tryouts?

They did nothing but run for 2 hours. Greenies, 400 sprints, 800 sprints, more greenies, then more sprints.  There was less than 60 seconds recovery time between each exercise.  I thought he might throw up. I thought I might throw up.  The other mom said, “this is exactly what they did yesterday.”  I thought, “this coach is an idiot.”  What happened to alternating active recovery days?  He yelled at the boys, “If you think this is hard, don’t bother coming back tomorrow!”   I yelled back, “You can do it, Caleb!  Finish strong!  I believe in you!”  Every other boy on the field was either wishing their mom was there to cheer him on or really thankful that she wasn’t.

As soon as I got my boy home, I filled the bathtub with warm water, epsom salts and Blue Heat essential oil blend.  I made another glucose protein shake.  I iced his knees.  I told him how proud I was.

He insisted on going back the next day.

The next day, his dad took him.  I was singing special music at the testimony service for my brother’s priesthood call to elder.  In our church no one can decide to join the priesthood.  It’s not something you can earn, study for, or choose. The call comes through prophecy. It’s a big deal and kind of rare.  While I sat and listened to the prophecy and confirmation testimonies I thought about my boy on the soccer field. Did his dad take protein and glucose and electrolytes?  Would he cheer?

I beat them home and when he walked in the door, I knew things weren’t good.  We had talked about worst case scenerios.  If you don’t make the team, maybe they would let you come to practice and work out and get stronger.  That night, Coach told him no to both.

The next morning the other mom in the bleachers sent me a text. “Cross Country meeting tonight.” Cross Country?  If Caleb had sore knees, was this the best thing for him?  But I asked him anyway.  He said “maybe,” so we showed up.  XC had started on Monday also, but would credit his running at soccer practice for the missed sessions. There were no tryouts.  If you want on the team, you’re on the team. The coach was amazing.  “We cheer everybody on, even the other team.  Grades are super important.  We are family.”  They explained that even though they work out for 2 hours a day 6 days a week, they have an alternating active recovery schedule. Finally, someone with common sense.

Caleb showed up Friday for his first practice, we left the house at 5:45 am.  One coach rode his bike moving between the front of the pack and the rear so he could keep tabs on the kids and their health.  The 2nd coach drove a car, so he could pick up the kids that were in trouble. Caleb ran for 2 hours and when I picked him up, he was smiling.  He did a jig and said, “How can I have so much energy?” I asked him how he did.  He said, “I wasn’t at the front of the pack, but I didn’t have to get in the car.” I asked him to tell me the name of 1 kid on his team, he told me 2.  Then it hit me, Caleb will start this HUGE school with friends, adults he can trust, and self-respect.

At that moment, the room started to spin, my knees went weak, my vision closed in on itself.  I had just earned myself a recovery day or three–all from worry, sigh.

How about you?  Is your family making big changes this year with educating your kids? How do you feel about it?