Dear Mama, put the jar of mayo down. This is not your fault. It didn’t happen because your house isn’t spotless. You are not dirty. And that jar of mayo? It won’t work, but don’t worry, I’m about to tell you what will.

Dear Mama, put the jar of mayo down. This is not your fault. It didn’t happen because your house isn’t spotless. You are not dirty. And that jar of mayo? It won’t work, but don’t worry, I’m about to tell you what will.
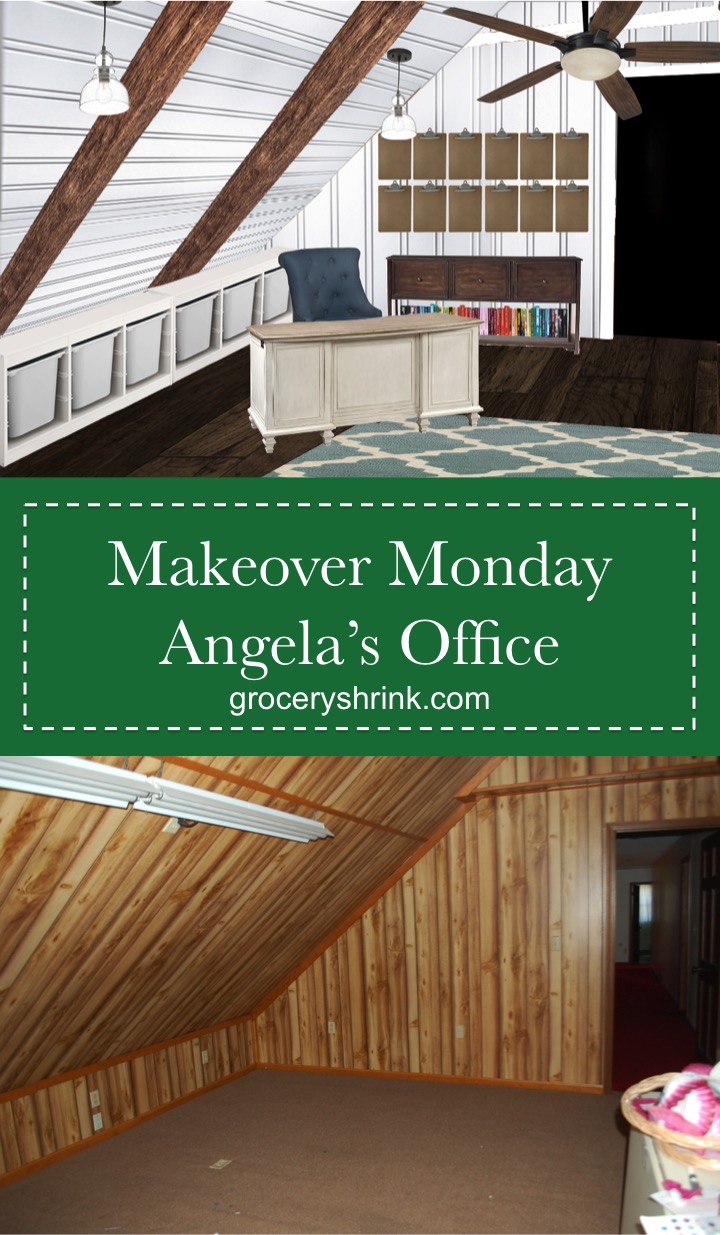
We hired help to hang the bead-board in my office last week. In preparation, I looked at several rooms on Pinterest which motivated me to turn the paneling the opposite direction it was hung before. If you’d like to see my pinboard for this room find it here.
Those inspiration pins also encouraged me to make the wood we need to use to hide the seams wider and thicker so it would look like structural beams. We had originally planned to make it all white and subdued, but the photos with contrasting wood beams really caught my eye. To make sure that was what I wanted, I drew an inspiration photo in photoshop first, and tested out some lighting options too.
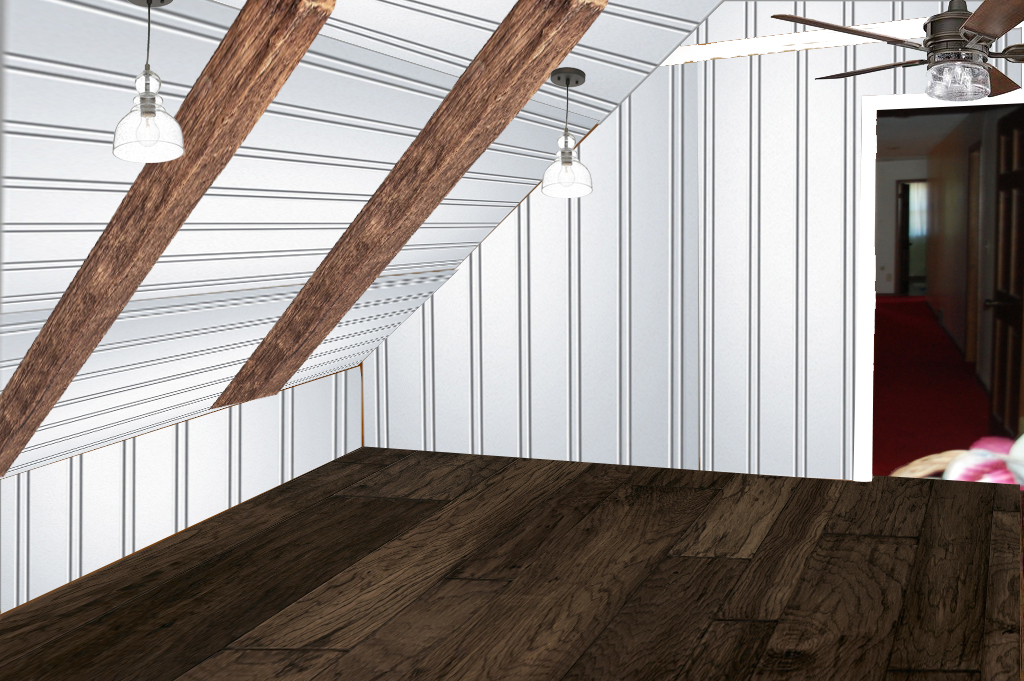
Here’s what it looked like before:
This decade of our lives, I’m calling our “construction phase” has left me searching for ways to make the house feel put together and comfortable enough for guests, even though most places don’t have baseboards, outlet covers, real furniture or paint. While we’re earning a living and enjoying our family we’re also dragging this whole remodel thing out. I’ve finally made peace with it.

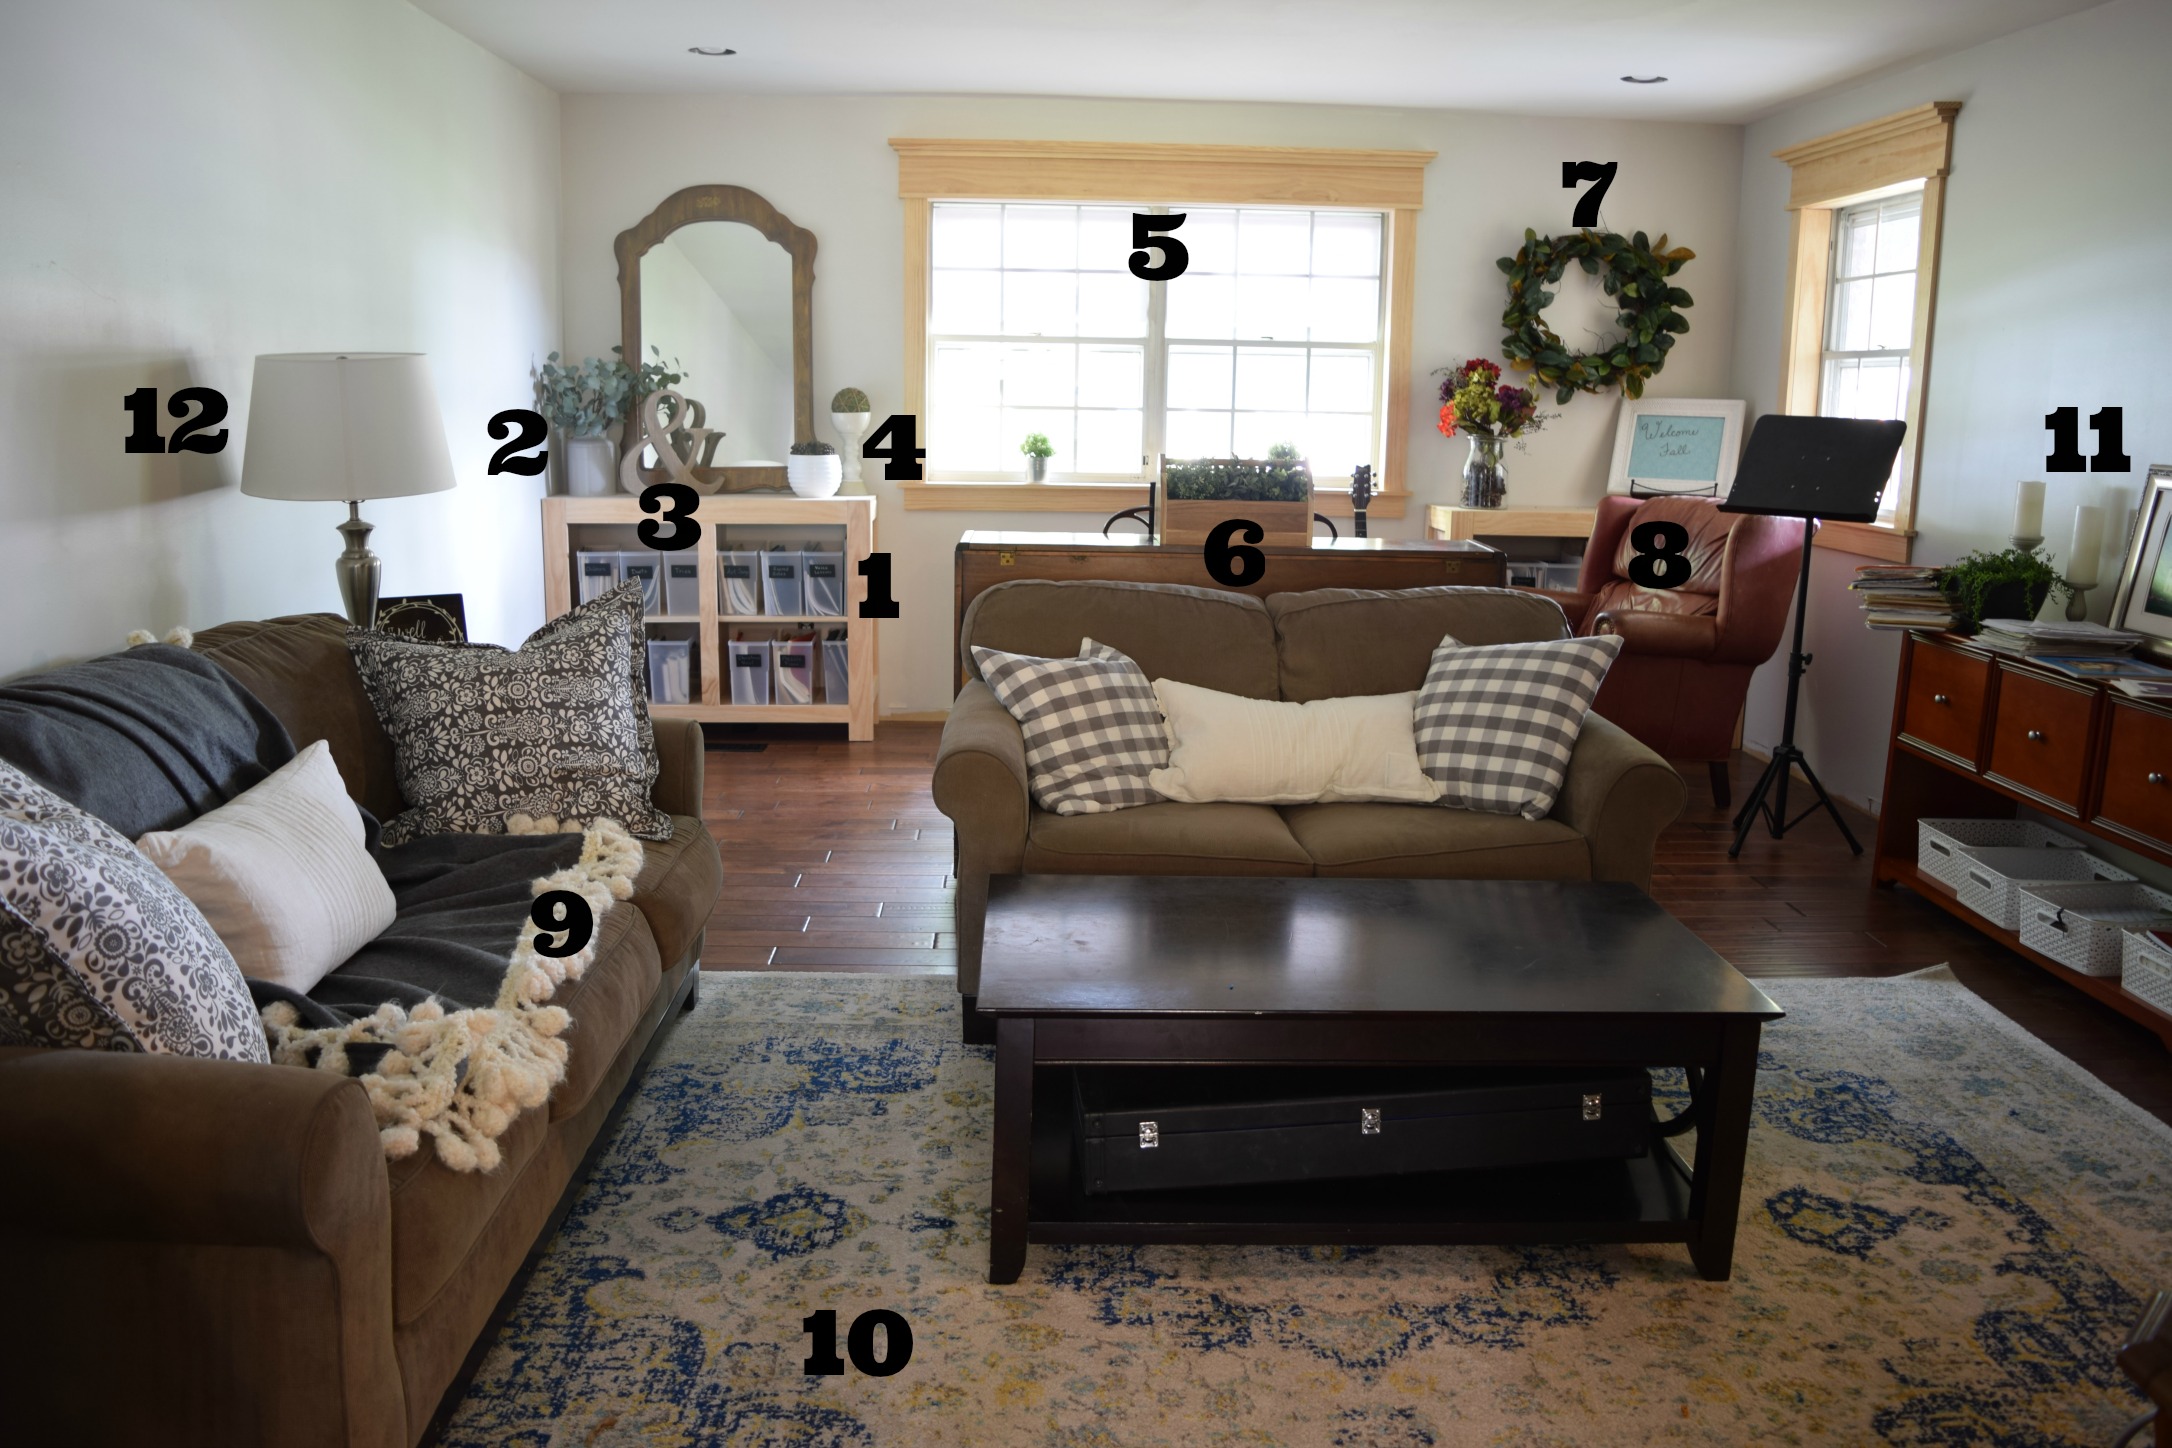
Last fall I started building bookcases with doored bottoms and hutch tops. You can see more about that here. I got the bottom frames done before our garage sale. Then I put away my wood working tools to clean out the garage for the sale. Here we are a year later and I finally drug everything back out and cut the middle shelves. In the mean time, I styled the tops of the unpainted, undoored cabinets like they were supposed to be just the way they are.
A few weeks ago, I dropped off a donation at the thrift store. I meant to just drop and go, but way up high on the back wall there was a HUGE mirror with a nicely arched top. I took one glance and thought, “That’s way out of my price range.” I turned to go, but my heart wouldn’t let me leave without touching it. I felt a little guilty asking the woman at the register for help to get it down, since I knew I wouldn’t be buying it. It was lighter than I expected. The frame was made to look like wood but was molded plastic. I looked for the wax pencil marking on the back….$15. What?!!!! Sold.
I meant to paint it, to cover up the off center 1970s decal at the top. But from a distance the darker wood warms up the space and the decal is hardly noticeable. It’s so much easier to love it how it is #lazybutton.
For help decluttering, reorganizing and styling, you should check out Havenly’s Design Services.
As I was writing down all the sources for these products, I realized how overwhelming it can be to put a room together. I’ve gathered these items over the course of 6 years, just one piece here and there using my little monthly home budget and money I earned at our annual garage sales. Nothing about the room is the way I want it to be permanently, but it’s functional for now and even pleasant to sit and visit with a friend there.
How about you? Is there any room in your home that isn’t quite finished but is good enough for now? Or tell me about a time you used something you already had in a new way to brighten up a space.
Oh Friend, I’ve struggled a bit in writing to you. I’ve been wanting to find something that truly benefits you instead of just sharing what’s on my heart, and every post I’ve started this week has put me to sleep. So back to my heart it is.
Remember 18 months ago, when I shared some inspiration photos about our basement here and here? Well, I finally starting tearing the walls down to start the process. Specifically this one beside the stairs that will become the kitchen area:
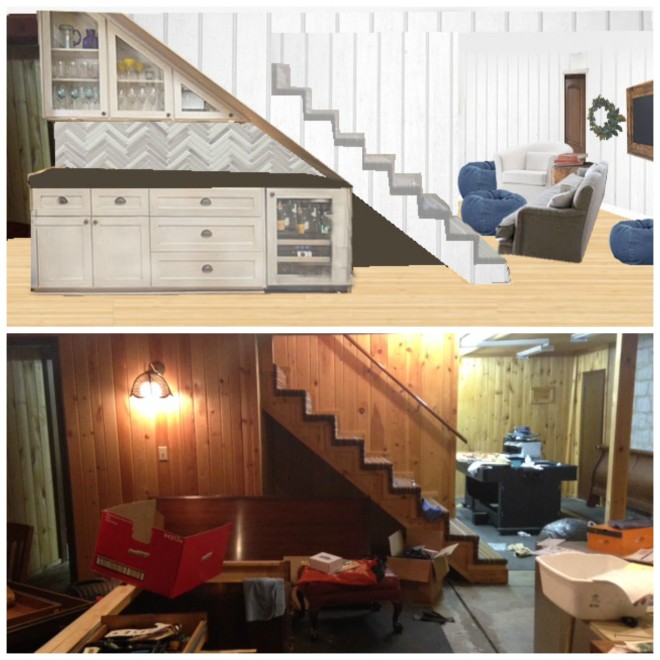
I was proud of myself for disconnecting the light and switches :). Next I need to learn how to shut off the water and pull the sink out. In the new plan I’d like to block off that door on the left and put a full size refrigerator there. Right now the fridge is in the garage, but it will be much more convenient here and give us more space to work in the garage. We’re not really moving forward with this project, but some of the demo was necessary to be able to access plumbing and electrical for our master bedroom project. And Darren said I could move forward with any of our projects as long as whatever I did was free.

I had such a productive labor day weekend, but part of me is a little sad. You see, the flooring I picked out for this space was almost $1 off per square foot the the holiday sale. It’s the first time in 18 months that I’ve seen it go on sale, and I didn’t buy it. I felt a bit of anguish at the time but it was minor compared to the disappointment I feel today now that the sale is over. When the waves of disappointment come, I tell myself all the good reasons why we didn’t buy the floor.
I’m feeling a little better now that I wrote that all down. There were definitely more reasons to not buy the floor. The only reason to buy the floor was saving $1,000 with the sale, but there’s nothing that says we won’t find another sale when we’re more ready.
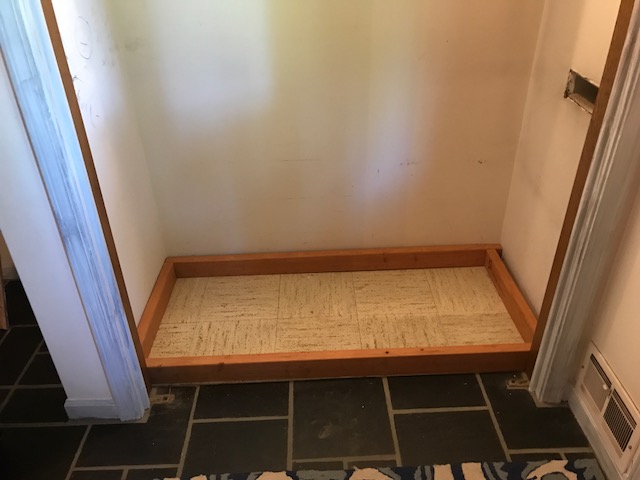
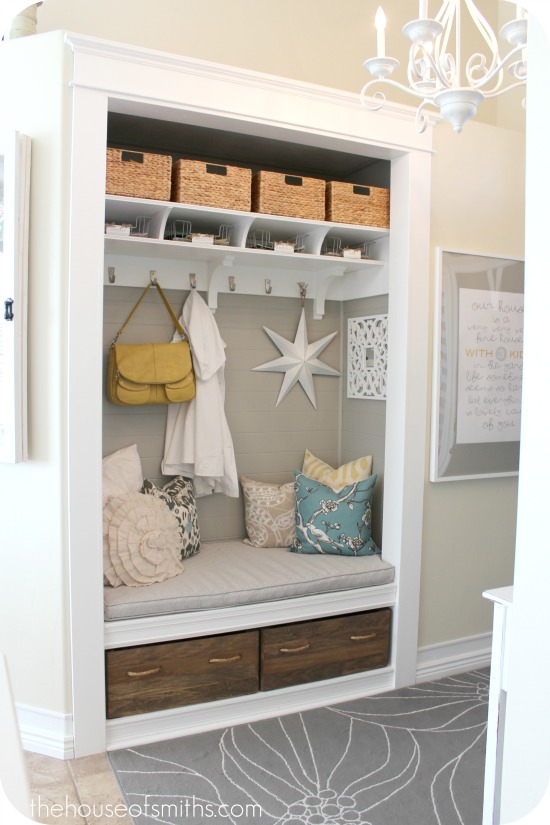
In the meantime, I’m taking the studs and pine board paneling that is too short to use in the reconstruction phase and using it to turn this front closet into a bench with drawers. Like this one from the House of Smiths.
To finish it all out, I’ll only need to buy a few trim boards and a piece of foam for the bench cushion.
How about you, have you ever bought something because it was a great sale and then regretted it? Or didn’t buy something even though it was a great sale and wondered what might have been? I’d love to hear about it.
Eating at home instead of in restaurants is the #1 way to save on food costs, but it’s not always so easy. I was visiting with another mom (while we chaperoned a field trip) about how expensive it can be to raise a family. She confessed that they get food stamps but also spend over $700 a month in restaurants for their family of 4. She knows it’s sabotaging their goals, but she feels trapped. How does a family get food on the table when they are so busy and stressed?
Planning and Preparation. The busier you are, the more important it is to have a detailed plan and scheduled in time to make it happen. If part of your meal is already done, and all the ingredients are on hand, cooking is not as big a deal.

I meal plan on Wednesday, shop early on Saturday and meal prep for the week either Sunday night or Monday morning. If you don’t have time to do your own meal planning, I offer affordable, detailed meal plans done for you. If you’d like to do your own but aren’t sure where to start, click here.
After about 6 months of prepping my meals ahead this way with the FitMama meal plans, I have some thoughts about how to make meal prepping easier. The idea of Fit Mama is to have all of my food made ahead for the week, so I can focus on the meals my family needs the rest of the time and not have to make two different things every night. Plus if my food isn’t already made before I get hangry, I will stuff my face with any and all edible substances within reach.
With Fit Mama, I eat 6 small meals a day. Prepping 36 single serving meals for the week is more labor intensive than prepping 6 family dinners. Yet, it has been the part of the program that has brought me the most success.
It’s important to choose simple when you are in the busiest seasons of your life. I’ve narrowed meals down to 3 types:
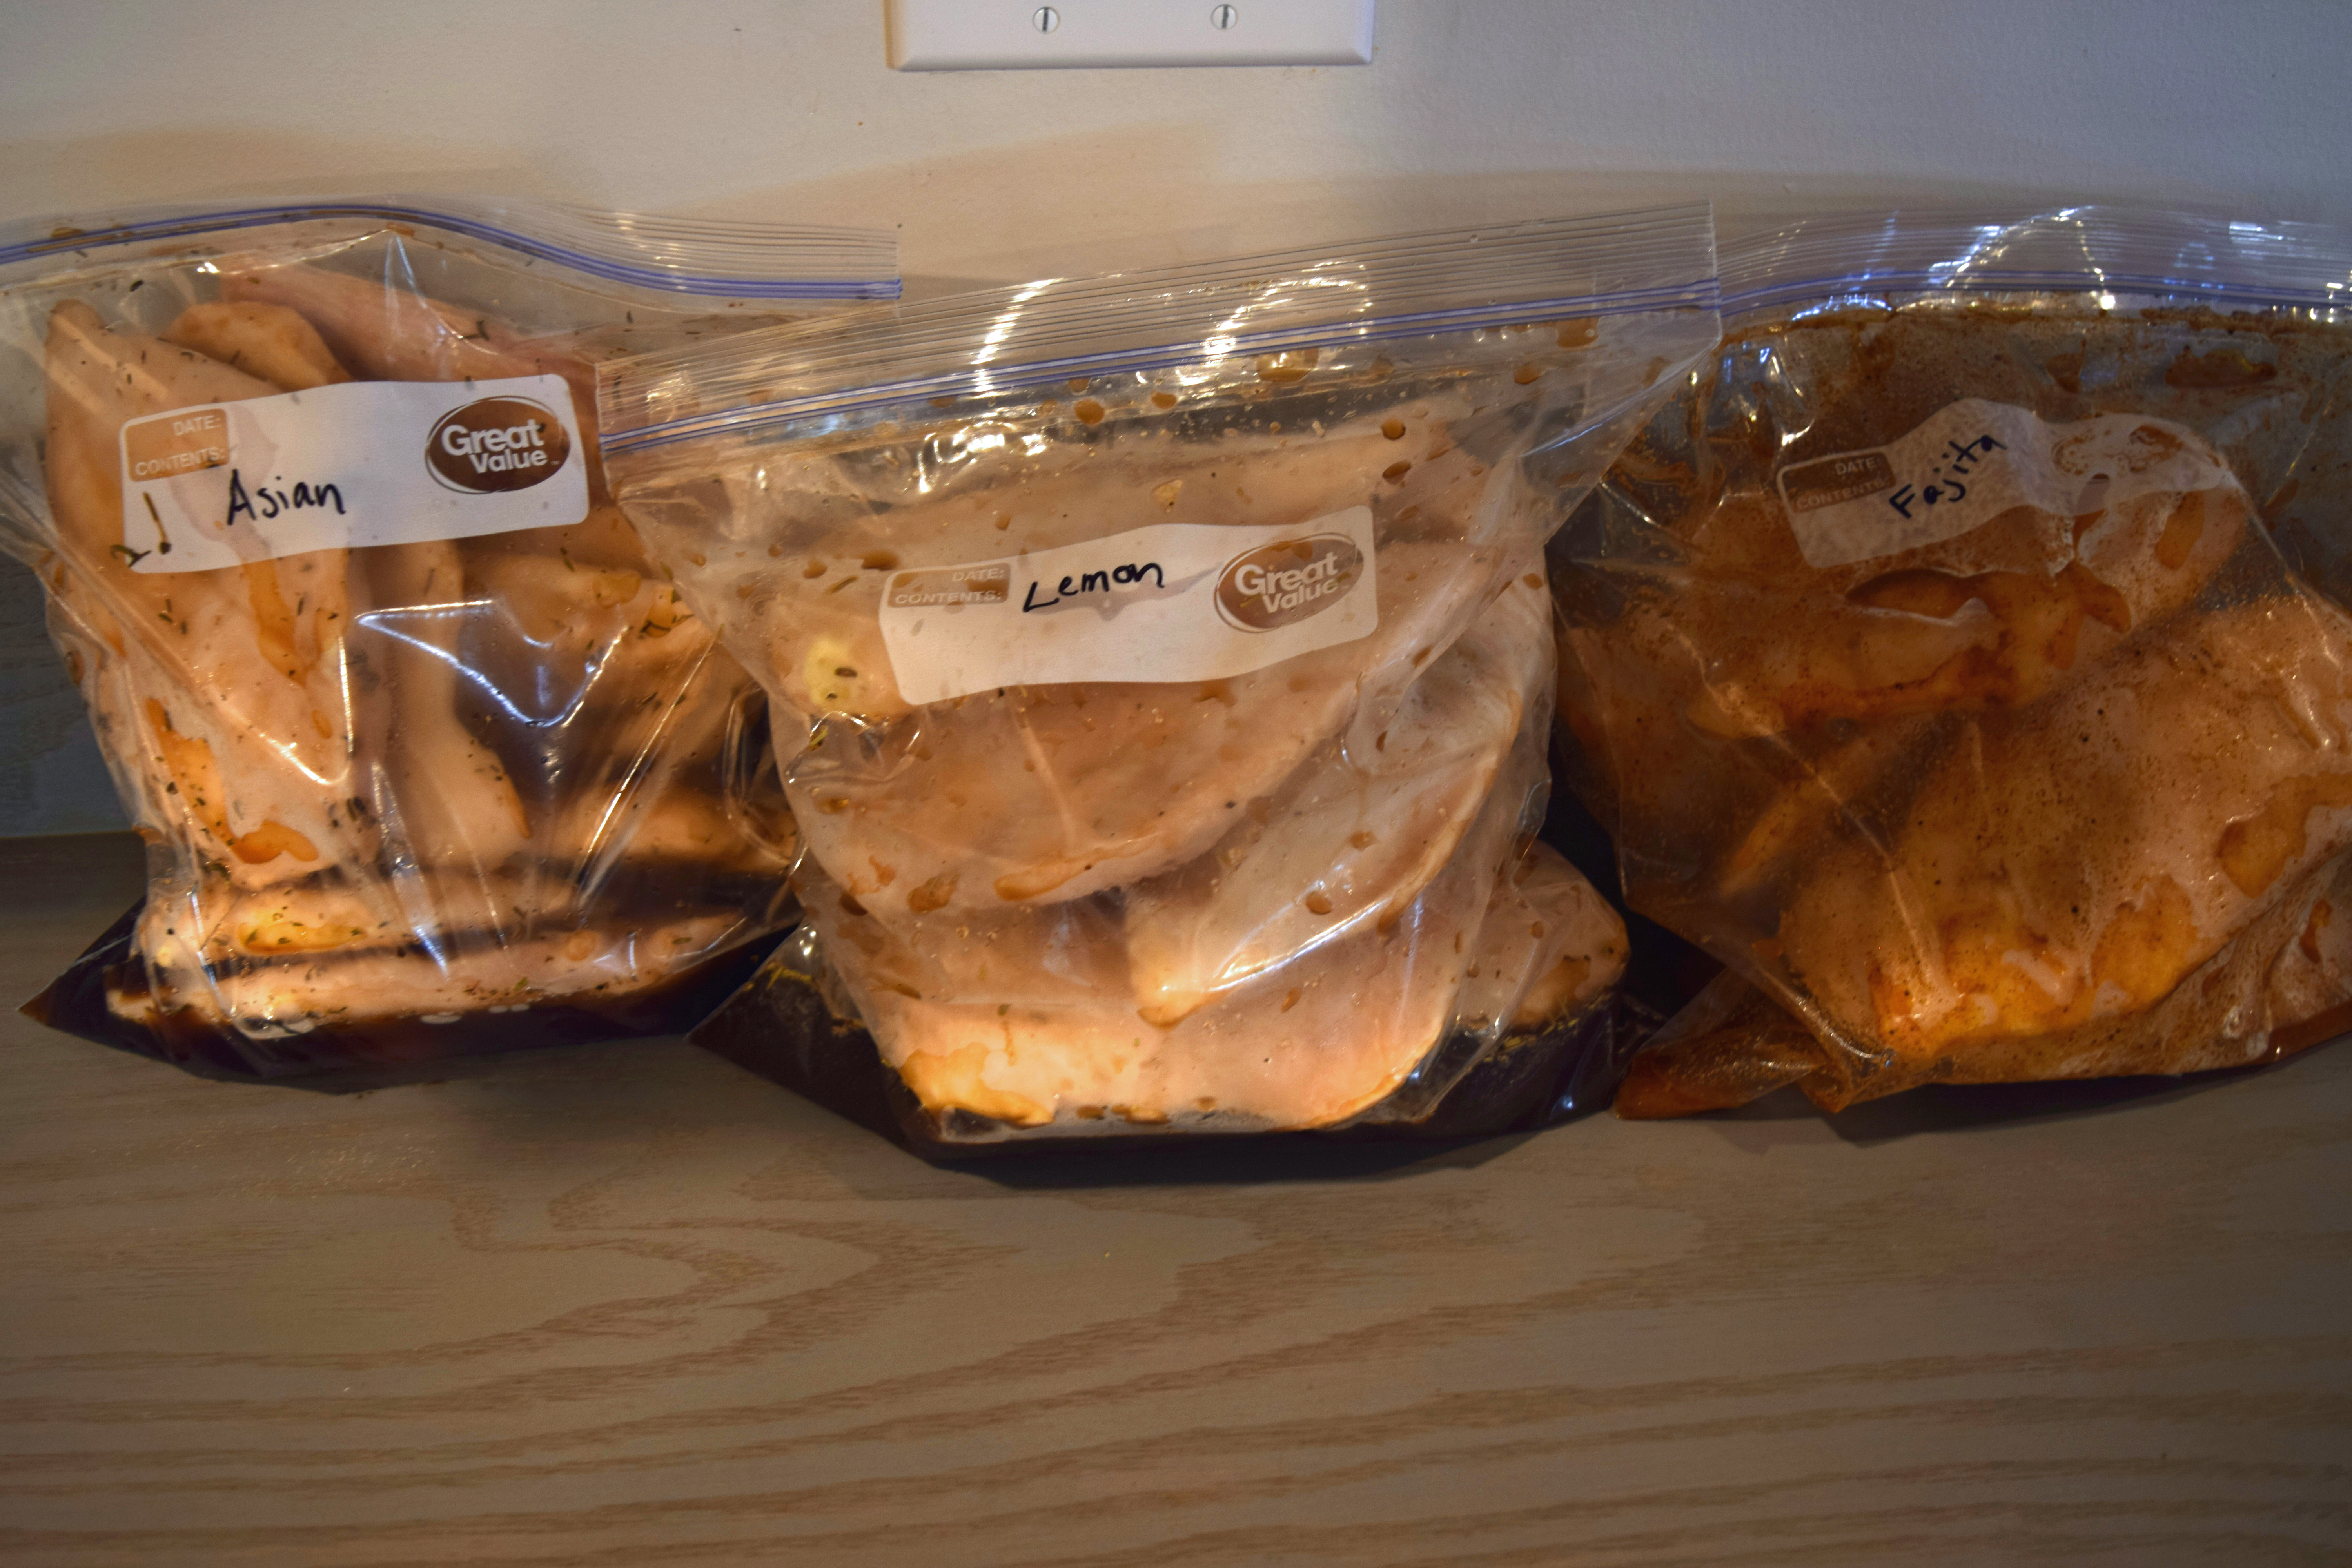 2. Then there are casseroles, marinated meats, and crock pot or one pot dump recipes that can be assembled or thrown in a bag, then cooked quickly just before meal time.
3. On the more labor intensive end of things are meals that require cooking some of the ingredients before the dish can be assembled and cooked again. For example, My breakfast stuffed sweet potatoes require pre-baked potatoes, browned turkey sausage, and pre-cooked scrambled eggs before assembling. They are delicious! But if my prep time is shorter than usual, it’s not the best choice for that week. A good option for these types of dishes is to prep the singles first, such as browning hamburger and leaving the rest of the chores for another time. It’s a lot easier for me to consider making stuffed sweet potatoes for breakfast if all I have to do is put it together for the final bake.

The other option is do to generic meal prepping. This would include cooking a bunch of hamburger in bulk and then freezing it in portions ready to throw in a meal. Or filling the slow cooker full of chicken breasts to shred. Or washing all your produce and shopping it ready to go for the week.
There’s no right or wrong way to prep for your meals as long as it feels doable to you and takes some of the pressure off when you’re the most stressed.
It’s also the perfect time to get some of the family members involved. Here’s a screen shot from a live video my boys did with me to show the FitMama members how we meal prep. The boys have learned to dice and chop and all sorts of other kitchen skills by helping me in this way.

Tell me about you. How do you meal prep? Any tips for us?
You might also like:
Today is my birthday and I thought it would be fun to show you a few of my favorite things.
The first one is an Eye-Vac. It’s a robotic dustpan. You just sweep stuff near it and it comes on automatically and sucks it up. It reminds me of the central vac dustpan system I saw on Facebook awhile back, but this one had a price that was somewhat in reach. In fact, I bought it for myself last night with a gift card I earned in my MomCeo business. It should be here by Monday—eeek! I think it will help with all the food crumbs that are a daily battle, plus make for easier clean up after home haircuts. I was also looking at robotic vacuums that are self-propelled, but I think this one is more practical for me with all the area rugs we have.

I love this dress so much that I bought 2, one in navy, and one in peach. And my 17 year old daughter got the taupe one. It has pockets and comfortable fabric. It is comfortable enough to sleep in, yet pretty enough for church. There are other versions, some with sleeves and some knee length. I’ve been thinking about a long sleeved one for the fall/winter. The sleeveless version also pairs well with a sweater or denim jacket.

These loaf pans are my favorite! Really all the pans from this line are. The bread just slides out without sticking, no grease needed. I use the muffin tins all the time, especially for little egg frittatas. No sticking! They are made from aluminum for even baking, but sealed with silicone so the aluminum never touches the food. I also have cookie sheets and cake pans from this line.

This feather top is really fun and has the trendy open shoulder look. I ordered the blue one a size up from my usual and I love how it fits.

This striped dress looks so comfortable yet trendy. I haven’t ordered it yet, but like the length and POCKETS! I’m thinking about being daring and ordering the green one. I think it would be great for fall with a denim jacket. But really, I like ALL the color choices.

All links are Amazon Affiliate links. If you decide to purchase something through the links, you pay the same, but Amazon sends me a little bit.
Families with a lot of kids don’t necessarily earn any more money than their small family neighbors. And yet, bigger cars require more gas per mile. More showers and more laundry, means more water and electricity use. An $8 ticket to the zoo isn’t a big deal if you’re only buying 4, but buying 8 is another story. When it’s time to buy shoes, it’s tough to buy 6 pairs instead of 2. Hotel fire codes require large families to get at least two rooms. Then there’s the grocery budget. What’s a big family to do?

We are steadily working on getting our income up, but while we do that, we do fewer spendy things. When kids aren’t used to a lavish lifestyle, they appreciate the little things a lot more.
We almost always eat at home, so when we go to McDonald’s it’s a big TREAT. Since it’s rare, we don’t have to let them order whatever they want off the menu to give them that feeling of excitement. Everyone gets a $1 burger, ice water, and fries to share. When we get home, if a kid is still hungry he makes a snack.
When we go to a park or festival with food vendors, we pack a cooler from home. Some parks won’t let you bring it inside the fence, so we plan to leave and have a picnic back at the car for lunch, then return to the park for the rest of our day. Sometimes there’s a food there that we can’t get anywhere else. Then we might buy some and cut it up so everyone gets a taste. If you see the 8 of us gathered around a single funnel cake happily sharing bites. Don’t feel sorry for us. The kids are thrilled. Just getting to taste it was a big deal.
We went to the zoo to see cool animals, not to eat over-priced ice cream. Replace the red words with whatever fits your situation. It helps to keep it in perspective.
The most expensive items on my grocery budget are meat and cheese. We’ve found it’s possible to halve (or at least reduce) the amounts of meat and cheeses in most recipes and still meet everyone’s protein requirements. This works great for casseroles, soups and stews. I replace the bulk with another ingredient like beans, brown rice, quinoa or vegetables.
Growing kids are always hungry. I have 3 teenagers, but the 12 year old is hungrier than all 3 teens combined. I don’t ration food at our house. There’s always something they are allowed to grab: apples, carrots, peanut butter and jelly, homemade bread or muffins, bananas, eggs, and milk. If it’s not on the unwritten, “help yourself” list, they know they have to ask. They are not allowed to eat all the leftover roast beef that I was saving for stew the next night, or snack on pepperoni or lunch meat. They can’t eat all the granola bars in the lunch packing baskets.
Breakfast should be the easiest low cost meal of the day, but food manufacturers have figured out how to make their money anyway. A serving of Bran Flakes cereal is 10 cents. Oatmeal is 7 cents. A cup of milk is 18 cents. Eggs and a slice of bread are 5 cents each. Half an orange is 15 cents….you get the idea. While a grab and go cereal bar is $1. Frozen waffles the same. Name brand fancy cereal is 5x’s the cost of plain. What we’ve found is if the food is simple, homemade, and nutritious, our kid’s happily eat what they need. But if it is pre-packaged to look fun or full of sugar, they gorge themselves.
Big family or small, what are some ways you do fun things, feed nutritious foods and still keep the costs down?
When you compare prices with a restaurant, school lunches look like a bargain, but I’m going to ask you to look again. I appreciate all the hardworking staff that make these hot lunches possible, especially when my kids forget to grab their lunch sack from home. Yet, they are a far cry from the lunches they had when all the food was hand made from scratch by women like my grandmother who was a career school baker in the ’60’s-’70’s.

In our town, elementary Lunch is $2.55 and secondary Lunch is $2.70. Per month that is $51 per elementary child and $54 per secondary. I have 2 elementary and 4 secondary students for a total of $318 per month. Since my monthly food budget, including lunches, is $650….that’s not going to work for us.
Homemade lunches aren’t free, and if they are full of name brand pre-packaged convenience foods, can cost a lot more than a school lunch. So when is it really more affordable to pack a lunch? Just for giggles, let’s take a look at some common lunch foods and break down the cost. Most of the prices are from Aldi, with a few (granola bars, fruit snacks, and cheese sticks.) from Costco. Costco and conventional grocery stores runs sale on lunch type items which can bring the unit cost down even further.
100% Whole Wheat Bread $1.50 for 11 sandwiches = $.14 each
100% Whole Wheat Tortillas $1.39 for 10 = $.14 each
16 oz Peanut Butter for $2.29 = $.14 per 2 Tbs
18 oz Jelly for $1.89 = $.05 per Tbs
24 oz Honey for $4.49 = $.09 per Tbs
Deli Lunch Meat $3.59 per lb = $.45 per serving
American Cheese $1.29 for 16 slices = $.08 each
Baby Carrots $1 per lb = $.16 per serving
Apples $1 per lb = $.33 each
Bananas $.44 per lb = $.11 each
Oranges $.50 per lb = $.12 each
Grapes $1 per lb = $.25 per cup
Welches Fruit Snacks $6 for 80 ct = $.08 each
Granola Bars $8 for 60 = $.13 each
Veggie Straws $1.89 for 8 oz = $.24 each oz
Cheese Crackers $1.89 for 14 oz = $.14 each oz
Pretzels $1.29 for 16 oz = $.08 per oz
String Cheese = $.15 each
Hardboiled eggs $.85 per dozen: $.07 each
Tuna $.59 for 5 oz: $.30 per serving
A sample lunch with PB&J, string cheese, apple and baby carrots would cost: $.97 My kids only drink water at meals, which saves on calories and grams of sugar as well as money.
If you like math, put together other sample lunches and see what you get.

When we have leftovers, I like to supplement the lunches with items such as oatmeal cookies, cinnamon rolls, whole grain muffins, whole wheat rolls, cornbread, soup in a thermos etc. I love that my oldest daughter chooses to eat lunch with her Academy Department Head, who has a microwave in his room. That allows her to pack leftovers most days since she can warm them up. She uses the time as a working lunch along with other students in her major.
Since we have so many children, I taught my kids early on how to pack their own lunches. Even the first grader packs his own, using our basket system which I detailed in this facebook live video last week.
You might also like these lunch related posts:
I did this makeover in the spring, but with only 18 summers to spend with each kiddo I decided to wait to show you until now. As I’m writing this, it’s the first official day of school and the house is empty. I have a senior! How is this possible? And a sophomore, 8th grader, 6th grader, 4th grader, and 1st grader. Today I walked my 1st grader to school and he held my hand the whole way. It’s such a privilege to share that time with him.
Jessica’s family is quite an inspiration. They live close to me and her husband, Brian, taught my kids violin lessons for YEARS. My son’s first lesson, he hid under Brian’s coffee table and refused to come out. Then screamed, “I hate you,” when we left. Good times. I escorted my kids to the car and came back in alone and said, “If I keep paying, can we come back?” Brian graciously agreed and my son now plays in the high school orchestra.
That kind of patience is worth admiring, but on top of that, Jesse and Brian are rock stars when it comes to debt free living. They paid off their small starter home fairly early in their marriage, then on a modest single income, lived there through the birth of 3 children, saving all they could until they could pay cash for a larger home in a better neighborhood. Can you imagine being a young family with no payments? It’s awesome, that’s what it is.
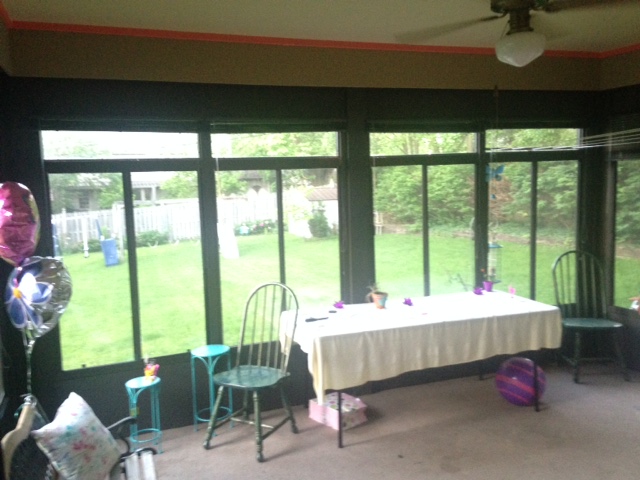
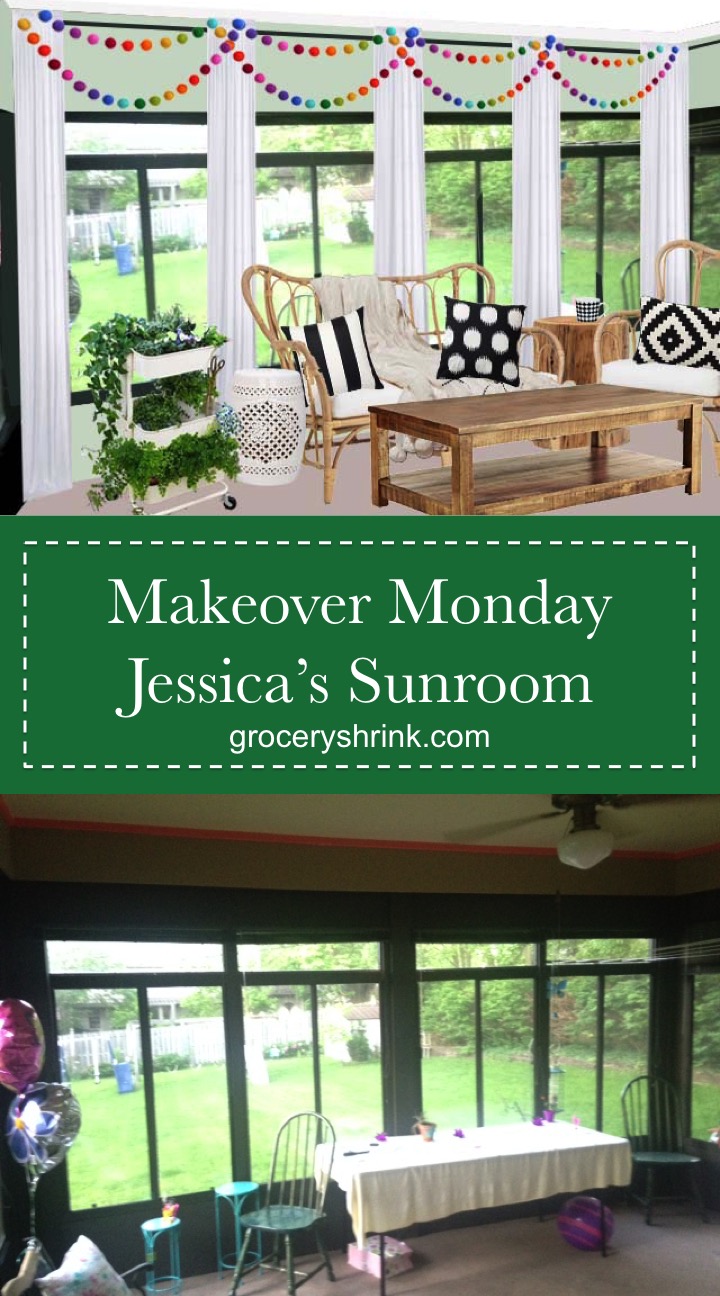
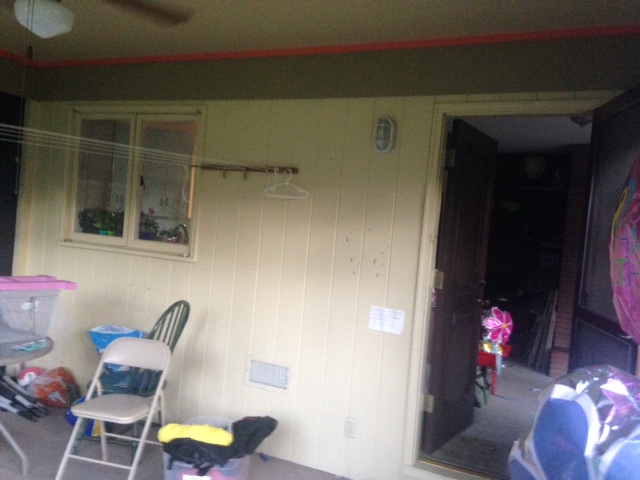
This is the view of the room standing in the back door from the living room. It has a beautiful view of the backyard and plentiful big windows. 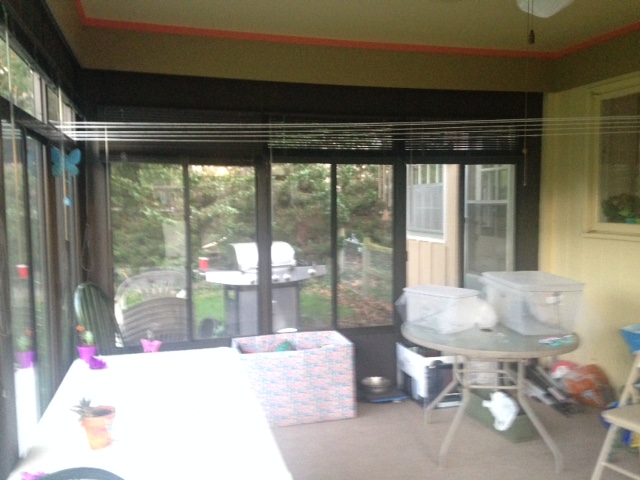
If you step into the room and look to the right, you see this.
 Standing in the doorway to the backyard and looking back towards the house.
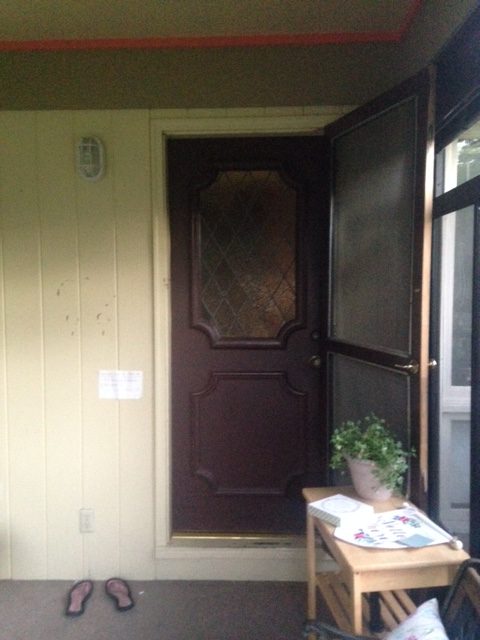
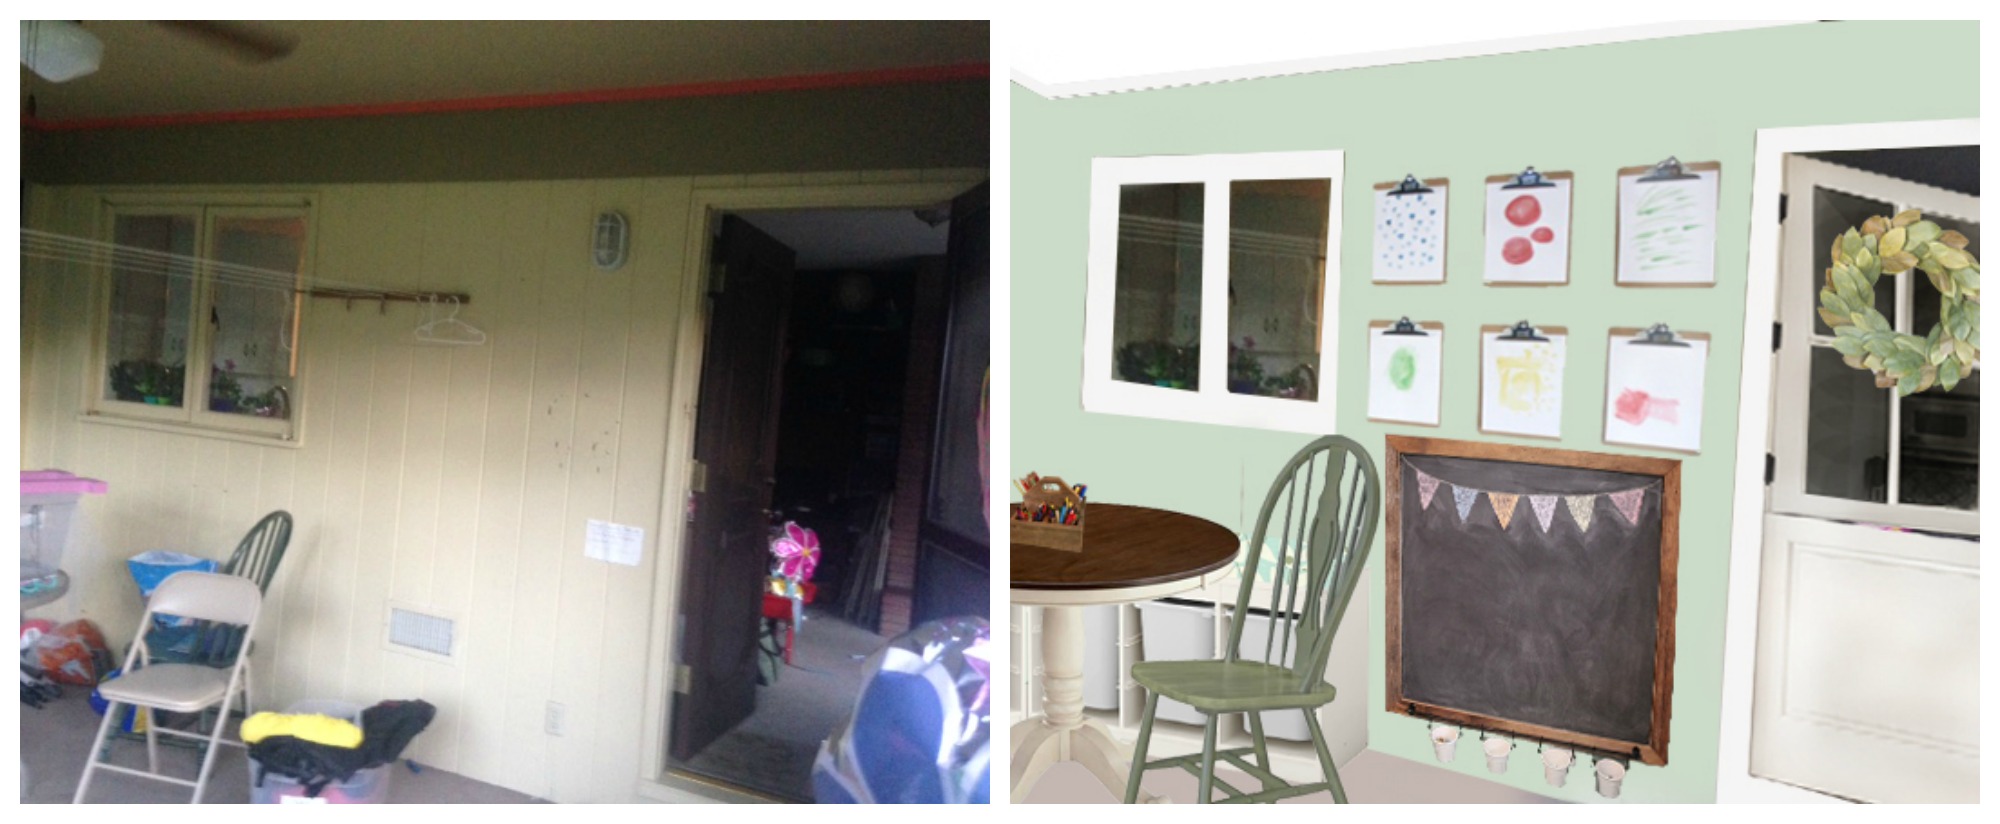
This is just a shot to show you her current door. It’s a cute shape, but we weren’t a fan of the yellow glass. Her screen door is real wood and a very cool vintage style, but it’s always in their way. They keep it propped open.
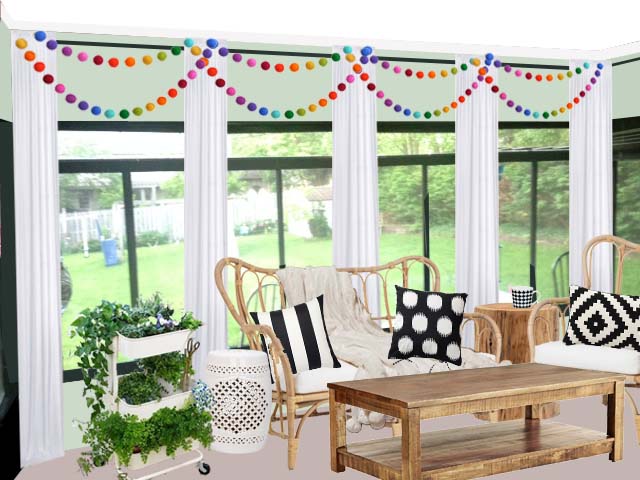
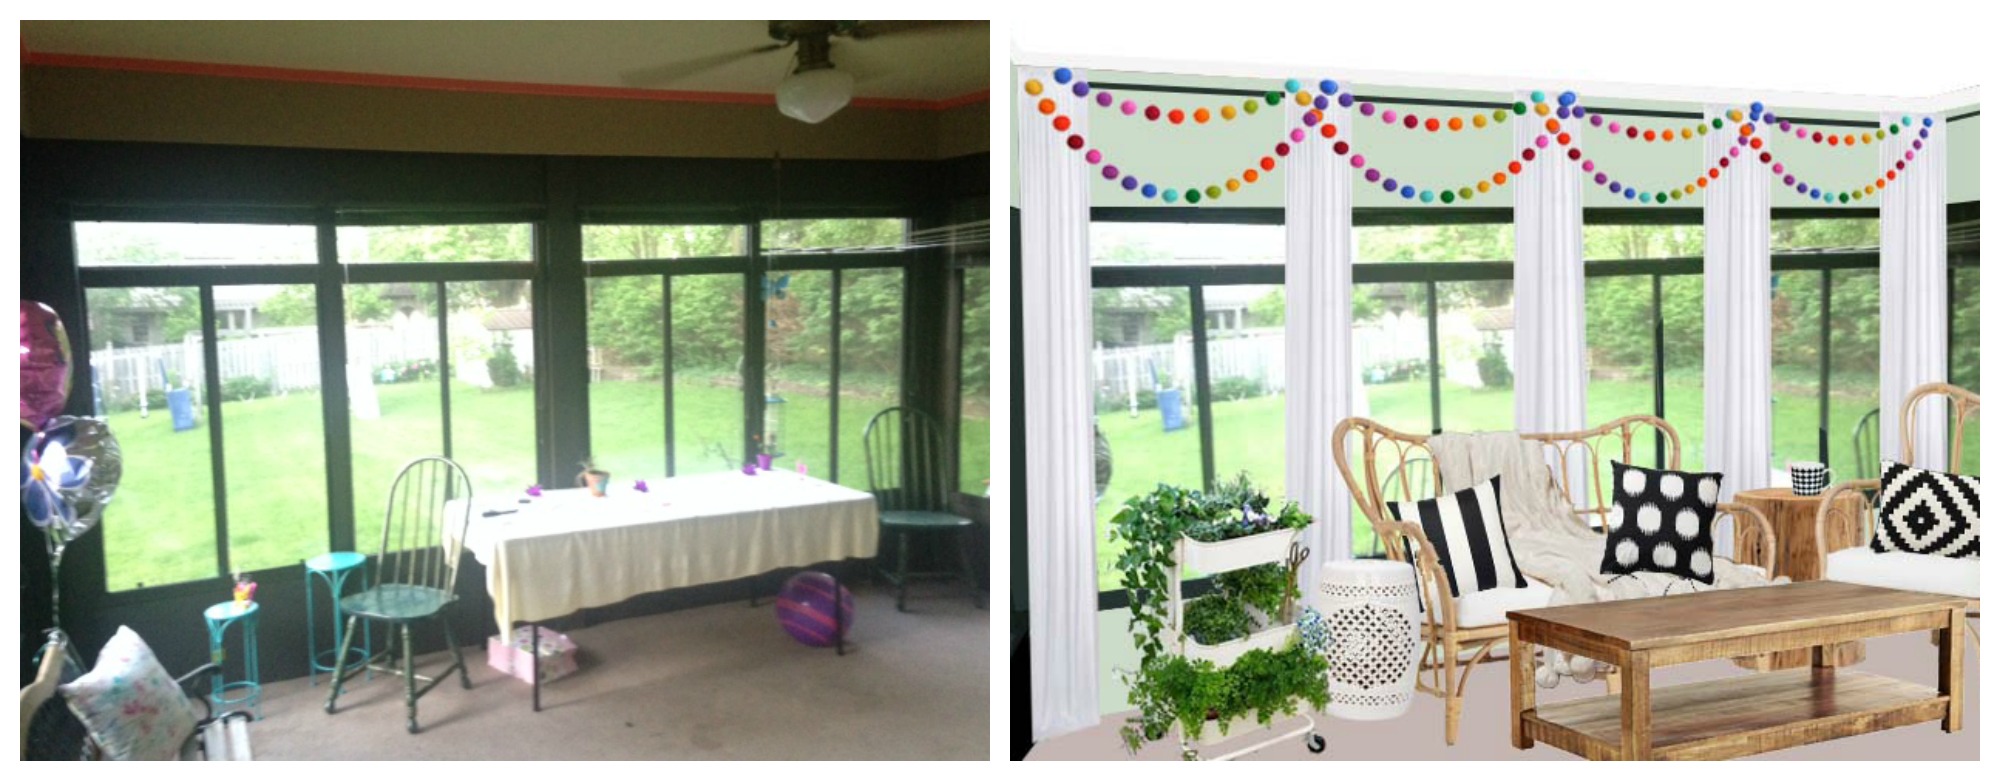
Jesse didn’t like ALL of the colors going on in the room. There are 3 different shades of paint on the wall, plus a 4th for the ceiling. AND the black windows, gray/brown flooring and brown door add 3 more colors to the mix. Her biggest concern was all the black above and below the window was vinyl and part of the window unit. Brian didn’t want to paint it because it isn’t drywall, but my philosophy is to never live with something you hate if you can paint it :). Showing him a photo of how it would look painted made a big difference.
Instead of pretending the black window frames weren’t there, I encouraged her to embrace them into a mint, black and white color scheme. I painted out the vinyl header and footer on the windows to match the walls and took the color all the way to the ceiling. Breaking up the walls with stripes of contrasting paint, like the previous owner had, only makes a room look shorter. That kind of thing should be saved for ceilings 10 foot or taller. I painted the crown molding to match the ceiling, but it could also be painted to match the walls.
Taking the drapes all the way to the ceiling minimizes some of the black while making the room feel even taller. I kept them pushed off the glass to let in as much light as possible. These drapes are just to soften the room and give a feeling of height…not to block light or the view. A rolling cart holds an herb garden that’s conveniently close to the kitchen. This is a space where Jesse can enjoy an iced tea with a friend while watching their kiddoes color in the art corner.
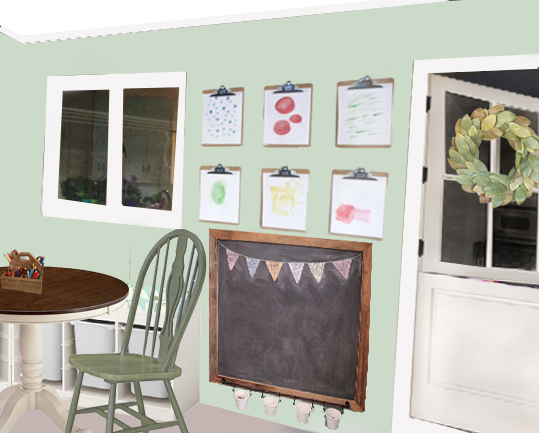
Jessica’s kitchen window overlooks one side of the sunroom. They use the room for homeschool projects, especially art and science experiments which needed storage. I used Ikea Trofast bins to create a corner bench area and added upholstered cushions on top for comfort. She can customize the size of the bins to the things she wants to organize there.
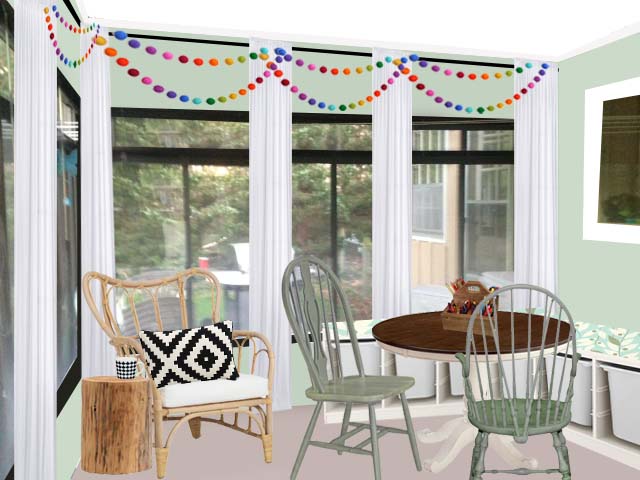
These are her original chairs painted a shade of green that’s slightly darker than her walls. The table is a similar shape and size to the one she had, but the solid wood top (no hole for the umbrella) and the pedestal bottom really elevates the piece. I recommend she search Craigslist and garage sales to find something this style and to use her original table until then.
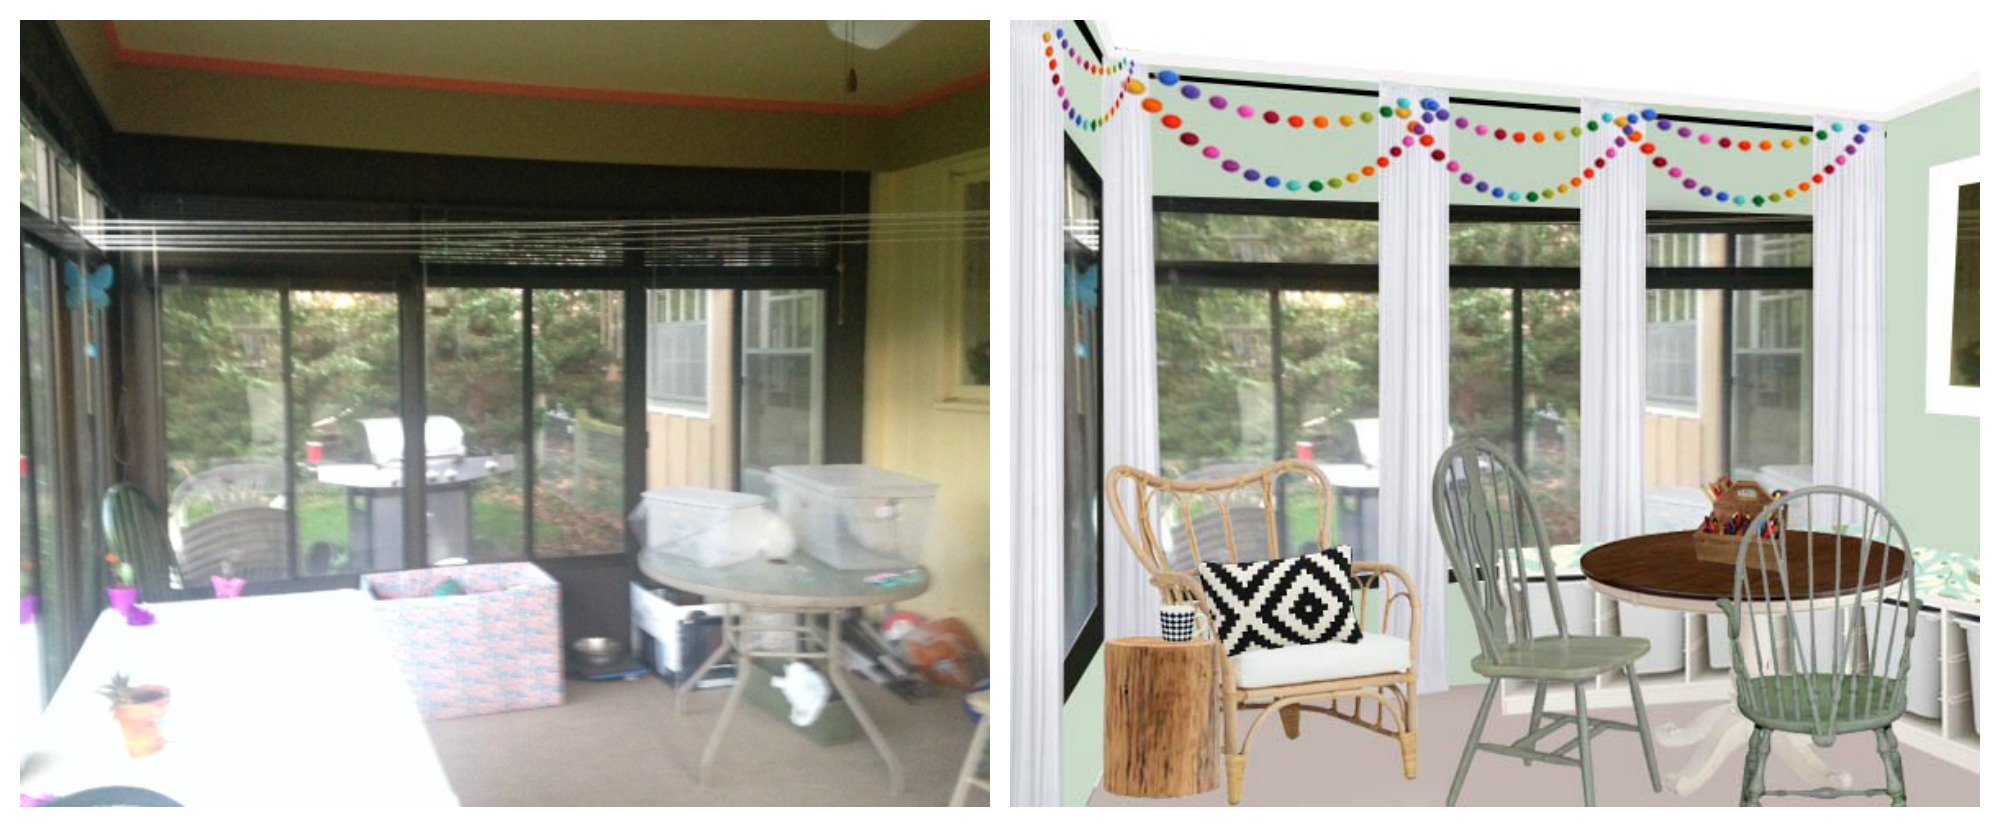
The windowless side of the room is the perfect spot for a chalkboard and art storage. Since her children are so young, I hung the chalkboard on the bottom half of the room, with bins below to hold chalk and erasers. Above the chalkboard, I used clipboards for easy art display.
Since they prefer to leave the door open to this room, I recommended a Dutch door. This allows them to keep their dog in a specific area, while still giving sight lines for Mama. That screen door was precious, and I think they should keep it for a bit to see if it has another purpose for their home, but remove it from this area for now. What do you think?
Sources:
Rolling Herb Garden Cart (White is currently discontinued, but it can be spray painted.)
Magnolia Wreath here or here or here
Some are affiliate links 🙂
Would you like your room photoshopped and featured on Makeover Monday? Send a few photos from your space to angela@groceryshrink.com and tell me your hopes and dreams for the room.
Get a full service virtual makeover complete with 3D room layout plan, 2 photoshop views, step by step work list, and source list–all in your budget. Find out more.

Learn how to use Photoshop your own designs with the Room Makeover class.
I love it when my kids are home from school for the summer. I love the no pressure, hang together, play board games, take swimming lessons, go to camp, play legos, organize a closet, and build a campfire at dusk kind of life. I hate to say this out loud, but my most favorite part is no music lessons….I want my kids to be musical, but keeping track of that many kids’ practice times and lesson times and where in the world is their book times wears on me. It’s nice to take a little break before we go at that pace again in August.

I haven’t felt like getting online much. I just want to be present with them and soak in their childhood this summer. It’s my oldest daughter’s last summer as a child…and I don’t want to miss a moment that she might give me.
My mom is doing summer reading lessons with my 6 year old. He read 70 words for his teacher in kindergarten but couldn’t read a single word for me at home. We are hoping that some time with Grandma, who is a master reading teacher, will do the trick. I know I’m a teacher too…with extra training in phonics and reading instruction….but my kids won’t work for me like they will someone else.
Two of my children and I are involved in a summer musical—Mary Poppins. I’m teaching the choral pieces and our first rehearsal was a disaster. The cast is amazingly talented and sounded amazing in spite of me…I was the disaster. Our second rehearsal is tonight and I have a better plan. Here’s to hoping I improve for all their sakes.

We are also spending the summer working on my office. We tore down the old 1970’s paneling and bought new white bead board to replace it, except we came across some ventilation/water/mold issues when we had the room opened up. So thus, our 1 week easy project has turned into months of little progress. Such has been every remodeling project in this house. I’m still not sorry we bought it, but I do wish I could snap my fingers and have the projects done like they are with the magic of television. The only big inconvenience this time is that our guest bed is now set up in our formal living room…and I’m not really sure where to go with it from here. I might need to make a rabbit trail to organize the basement and set up a temporary guest space there.

We have a new set of foster kittens. We got them because they were so wild—hissing and spitting. It took us about 5 days to be able to get close to them and now they snuggle and purr for us. We named them Cuddles, Sunny, and Snowflake. They will be available for adoption through Great Plaines SPCA in a few weeks or as soon as they weigh 2 lbs.


I’m still going strong with the meal plan service. There are a little more than 200 families that use our meal plans, and 91 of them have joined us for a Summer Fitness Challenge. If you are looking for easy weight loss meal plans and a sisterhood of accountability, we’ve got you.

Prep ahead Mandarin Sesame Chicken Salad, with easy homemade dressing and seeds that stay crunchy.
Prep ahead black bean and tomato salad–we’ll add avocado at the last minute. The chicken breast is marinating until tonight, when we’ll grill it to slice over the top. Yummo!
I’m also growing my MomCeo team. It’s really rewarding to help families with an extra income stream. If you’ve been looking for extra income from home, fill out the form and I’ll give you a call and explain what we do.
In the cracks, I’m helping my kids launch their own business, CleanKids.Club. They’ve already had several clients and find the work really rewarding.

Oh and I started a little crochet project to do when I must sit and wait for something. It’s a wheat stitch baby blanket for one of the many baby showers coming at church this autumn. Even though the beautiful boarder wasn’t included with the pattern, our local library had the book it is in. I’m using Hobby Lobby’s Yarn Bee Soft Secret yarn in Mist, a light silvery tone. It’s so soft and shiny and affordable too.
So that’s all I know since I last wrote. What’s new with you?