The Weather Worn Feather

One of my favorite parts of running a fitness challenge is gathering up the prizes! The grand prize for the Spring Challenge is this hand painted sign from the Weather Worn Feather.

The Weather Worn Feather is run by husband and wife team Melissa and Jake Lair.  They have 2 small children and started this business using their artistic gifts for their Dave Ramsey debt snowball.

In addition to running their own etsy shop their items are available at the Pink Daisy boutique in the West Market in Kansas City.  There, they also have refinished furniture pieces available for local pickup.

Check out this video showing how they hand make each piece.

We start a brand new fitness challenge in just a few weeks.  Fit Mama includes protein rich meal plans that you can prep ahead for the full week in an afternoon and daily accountability from women just like you.  When life happens, you need the right food ready to grab.

Resurrection Rolls: An Easter Recipe

While I was working on next week’s meal plan, I came across a video I made 5 years ago that was never published.  Brandon who is now 9, was just 4 years old and while I was watching the video today, Grant (5) walked over and said, “Hey, is that me?”   I’m a little envious over my hair and smaller waistline (which is coming back thanks to Fit Mama.)  This video was taken a few months after we moved into our fixer upper and about a year before the illness that would leave me bed bound for months and never quite the same physically or emotionally. It’s a little nostalgic and surreal to watch it.   I’m excited to get back to that healthy place again and each day is closer than the last.

Traditionally this recipe is made with canned crescent dough, and if you are a busy mama and the thought of making homemade dough puts you over the edge, just buy it.  Really….it’s ok.   Making your own isn’t too hard though and the dough can be made in a stand mixer or bread machine on the dough cycle.

In my meal plans, I automatically break the recipes into 4 different sizes.  It’s not that my subscribers couldn’t do the math. but I don’t want them to have to think about that.  Then they can use their energy interacting with family around a table full of good food.

Crescent Rolls

Ingredients

Servings

2 4 8 12
Butter or coconut oil, melted 2 Tbs 4 Tbs 1/2 cup 3/4 cup
Yogurt or applesauce 2 Tbs 4 Tbs 1/2 cup 3/4 cup
Eggs 1 1 2 3
Milk or water 4 Tbs 1/2 cup 1 cup 1 1/2 cups
Sugar 2 Tbs 1/4 cup 1/2 cup 3/4 cup
Salt pinch 1/2 tsp 1 tsp 1 1/2 tsp
Yeast 1 tsp 2 tsp 1 Tbs 4 tsp
Hard White Whole Wheat Flour 1 cup 2 cups 4-5 cups 7-8 cups

Cinnamon Sugar

Ingredients

Servings

2 4 8 12
Cinnamon 1/2 tsp 1 tsp 2 tsp 3 tsp
Sugar or Stevia 2 Tbs ¼ cup 1/2 cup 3/4 cup

If you are gluten free, you can try an all-purpose gluten free flour with xanthan gum in place of the wheat.  I haven’t tried it personally but the butter and egg content will help this dough stick together and it should work well.

  1. Place the ingredients for your crescent rolls in the bread machine overnight (in the order listed, except add the flour before the yeast.) Set a time delay dough cycle so that they will be ready in the morning about 1 hour before breakfast.

2. Turn your oven on to warm (between 100 and 120 degrees)

3.  Roll the dough ¼ inch thick and cut with a 3 inch biscuit cutter. OR break off a ping pong ball sized piece and flatten it into a circle with your fingers. Place a marshmallow in the middle of the dough and wrap it completely sealing the edges. The marshmallows are perfectly white, showing Christ’s purity as he was placed in the tomb. Some recipes I’ve seen have the children roll the marshmallow in butter and cinnamon-sugar showing the embalming of Christ and his anointing with spices.  We skip this step–but you can do it if you like.

4. Spritz the rolls with cooking spray or brush with butter. Roll the balls of dough in cinnamon sugar and place on a greased baking sheet. Sit the rolls in the slightly warm oven for 20-30 minutes or until they have risen slightly.

5. Remove the rising dough and preheat the oven to 350 degrees. Bake for about 15 minutes or until they are golden brown.

Before eating, instruct the children to break open their rolls. They will find tomb is empty!


Our Grocery Shrink Plus meal plans empower you to efficiently cook nutritious and cost affective food for your family. Become a member and download your first plan today.

What if we just did it? The story of our Outdoor Fire Pit

Last fall, I decided I wanted an outdoor fire pit to help burn up the yard waste and give us a place to gather in the evenings and rest.  I pinned pictures of fire pits.

I scanned craigslist for building materials, studied the yard to find the best spot, and researched how to make a level seating area.  To do it right was a little more work than I could invest and required me doing some other projects first, like cleaning up the storage area under the deck, jack-hammering out some excess concrete, digging out some established bushes, hauling in gravel and redoing part of the deck supports.   So the season came and went and we still didn’t have a fire pit.

Then this weekend, I looked at our yard and all the fallen sticks from the spring storms and the passion for a DIY fire pit hit me again.  What if it wasn’t perfect?  What if it wasn’t in the right spot?  What if it didn’t have a pebble sitting area?  We’d still have fires. We could still make s’mores and sing songs and be together.

So last Saturday, after our 4th soccer game and a wedding shower, we went to Aldi and bought marshmallows, chocolate bars and hot dogs.  Then we went to Menards and bought 30 of these stones.

It took me 15 minutes to unload the stones from the car and stack them into a fire ring.  We chose a spot at the corner of our driveway where we have been splitting wood for the last 3 years.  It has a nice base of wood chips that really should be cleaned up, but we sat our lawn chairs on it instead.   The beauty of this is the stones can be moved at any time.  There’s no mortar or concrete involved.  It doesn’t matter that nothing about the project was “right” because it can be as permanent or as temporary as we want it to be.

It didn’t even matter that we made our fire wrong.  We eventually got it to light, though the wind made that a challenge.

The s’mores on our imperfect fire tasted just as good.

This one was made from an orange marshmallow from Aldi’s Easter line. It tasted just like a wack an orange.

The kids rode their bikes on the driveway, played a game of basketball, and jumped on the trampoline.  It was so much fun that we did it again the next night.

It made me stop and think.  What if I didn’t worry about perfect and just did more things?


Makeover Your Grocery Budget in 5 Easy Steps

Thank you to everyone who weighed in on the survey.  If you missed it, you can still add your opinion.  I’ll be checking the final answers next Tuesday and working to meet the needs expressed there.

It’s no surprise that most of you are here to shrink your grocery budgets!  I love that, because food is usually the single biggest budget item in any household budget.  For most families it’s even bigger than their mortgage!  Unlike a mortgage bill that’s set in stone, the grocery budget is flexible.

As a busy mom of 6, I know how easy it is for grocery spending to get out of control. The grocery budget is the largest flexible expense in my home. I can run around the house turning off lights and unplugging appliances but won’t save nearly as much on electricity for my efforts as I do when I manage my food spending well. Currently our food budget for our family of 8 is $630 a month. This is just food—not cleaning supplies or shampoo. Our food budget includes $30 for my husband to buy lunch making ingredients to keep at work. With 31 days in the month we average $2.50 per person per day or $.63 a meal.  When our kids were in private school, our food budget was $400 a month.  We have 3 teens (and 3 younger kids.) It wasn’t easy, but it was possible.  It’s ok to make your budget reflect your current income and bill situation and then increase or lower it as the situation changes.


I’ve been helping families reduce food spending for the last 8 years and have found the average family overspends on food enough to buy a cruise ticket every month. Some could buy 2. Let that sink in for a minute.


Real food with plenty of produce is important to me. I just shop for it differently than most. Awhile ago I went to a freezer-cooking day with friends. We all had the same recipes, same shopping list and went home with the same amount of food. The others spent between $200-$350, I spent $85. We made multiple meals of Bacon Butternut Squash Casserole; Creamy Spaghetti Squash; Pesto Stuffed Chicken Breasts; and homemade meatballs and marinara. One family shopped at a local chain grocery store, another at Sprouts, a third at Costco, and I shopped primarily at Aldi supplemented with a few items from my home pantry.

When I’m shopping, I spend a few seconds on every item looking for the best value without compromising health. For the freezer cooking day, I made a few substitutions that didn’t change the final outcome of the recipes. For example a pound of bacon was $3, a bag of real bacon crumbles was $1.50. Prepared Pesto sauce was $1.50, the ingredients to make my own pesto were more than $10. Before choosing to buy prepared pesto I made sure there weren’t any preservatives or questionable ingredients. One of the recipes called for a block of provolone cheese. Aldi only carried provolone slices, but they were half the price of buying a block of cheese anywhere else. I bought the slices and tore them into pieces instead of grating cheese from a block. My final recipes turned out just as delicious as the others.

Here are the basics to our low budget.

  1. Use Cash. We put our grocery money in an envelope and when the money is gone, I’m done for the month. I like to save a bit in a separate envelope for the last week of the month. Just to make sure we can still buy milk and eggs.


2. Know what things Cost. Is that “sale” actually a good price? I have a head for numbers and pay attention to food prices. If I didn’t I’d write them down in a pocket notebook. Then when prices drop significantly I recognize the deal.

3. Stock up when the prices are at their lowest. When I see that good deal, I buy enough that I won’t have to buy until the next sale.

4. Meal plan with the food I already have on hand. I call it reverse meal planning. Instead of shopping from a list of recipes, I shop for the best deals I can find, then meal plan around those foods.

5. Buy necessities first, rare treats after. Everyone likes a treat now and then, but it’s easy to spend too much on cookies, chips and soda and not have enough money for healthy foods. I buy the essential foods first. Then if I have money left, a treat or two is ok.

Once we get used to thinking about grocery shopping in a new way, it becomes second nature to spend less without sacrificing nutrition.   If you’d like to find out more, I hosted a whole month of learning to reduce food costs here.


I’m a Budget-Compliance Motivator, but…

I still want you to have a beautiful life.  I want you to celebrate birthdays, have family vacations, reliable cars, and a beautiful home that reflects your personal style.  I want you to have nice clothes, to eat healthy food, to give good gifts and invite people over.  I want you to make memories with your family, to support missions and causes that tug at your heart and to be generous in unexpected moments.   But most of all I want you to fall sleep quickly at night, knowing there are no bills coming in the mail that you won’t know how to pay.

Do you ever read social media posts and look at the beautiful pictures of vacations, new cars, remodel projects, and family outings and wonder, “How in the world are they doing that?”   I do.  I wonder and then remember, that I have a bigger than average family with bigger than average medical needs, and an aversion to debt that makes us weird.  I can’t compare my life to theirs; it just doesn’t make sense.

Sometimes we need a voice to reassure us that, “Everyone’s not doing that.”   And sometimes we need new ideas for ways that we can re-route our money so that more of the things that matter to us are possible.  And when we’ve dug as deep as we can with our time and creativity, sometimes we need ideas to get more money.

I want to be that friend in your life, the one that tells you it’s more than ok to live simply.  To help you remember that the most important things in this life aren’t things. To help you with ideas when the money just isn’t there this time.  The one that smiles with you in solidarity over the clothing rack at the Goodwill.   The other mom at the zoo with the packed lunch from home.

How can I be most helpful to you? Choose as many as you like.

Makeover Monday Jenna’s Living Room

Happy Monday! I met Jenna in the Cozy Minimalist facebook support group and she offered to let me use her living room pictures for a post here.  They are getting new wood flooring installed soon and she was excited to get a different perspective for her space.

I love her fireplace and that the brick is already white! The window you see peeking on the left is a pass through to the kitchen.

You can see it more clearly here.

The opposite side has a beautiful glass slider to her outdoor living space.

There’s a nice blank wall to the back of the room.

Jenna didn’t give me much direction for the room, except that she wanted it to be light and bright.  That’s my favorite kind of room :). First off I gave everything a coat of fresh paint in Benjamin Moore’s Decorator’s White.  It is very light with a slight gray/green undertone.

To keep it from feeling too cold or plain, I added texture and warmth with wood pieces, linens, and colored sofas.  With a neutral sofa base and added color with fitted slip covers, she can enjoy the splash of color without committing long term on an expensive piece.

I moved her TV above the fireplace so she could add more seating. I recommend using a Pull-Down TV Wall Mountso it can still be viewed at eye level and pushed back and covered with the barn door sliders when company is over.  The sliders have magnolia wreaths for a touch of green.

I added a thicker mantle from distressed wood to better balance the size of her beautiful fireplace. Here’s a tutorial to do it on the cheap.  another similar tutorial And filled her fireplace with decorative birch logs.  If birch isn’t plentiful in her area, she can mimic the look by dry brushing white chalk paint onto regular logs.

I used curtains on the doors to add softness to the room.  Hanging them high and wide gives the illusion of taller ceilings.  It also covers blank  wall so Jenna won’t need as much art work.   Throw pillows turn the hearth into additional seating, perfect for gatherings with lots of kids.  And the ottoman can be used as a coffee table with the addition of a wooden tray to stabilize beverages or pulled to the side for even more seating.  I’ve seen ottomans this style with a lift up top for blanket storage inside.

Here you can see the impact of the curtains on the doors a little better.  They are hung all the way to the side, so they don’t interfere with door access.  I had trouble finding a blue sofa at just the right angle, but I recommend she pull it closer than she had her sofa before.  Just to the edge of the door area, for easier conversation and better TV viewing.

Since pulling the sofa closer will leave her blank wall with a gap (I’m guessing there will be 3-4 feet behind the sofa.)  She will have room to install bookcases floor to ceiling with classic crown molding. This explodes her storage potential while still giving room for someone to walk behind the sofa and select a book for reading.  Bookcase photo and tutorial from Centsational Girl.

Finding the right angle of sofa in the right colors was a big challenge. That’s why all the blues are a little different, but you get the idea.  I like having one in a lighter shade of blue than the other, to keep the space from feeling too matched.  With the curtains, sliders, and bookcase, there’s only one place for artwork left.  I think Jenna should make it ONE big piece that she loves.  I put this watercolor piece in for an example, but she could do anything, even paint something abstract herself.

I noticed Jenna had a nice bold green in her kitchen, so wanted to show her what it would look like if she decided to go with Green instead of blue.  (She’d have to pick out different curtains.)

Just for giggles, here are some side by side photos for you.

Additional Sources:

Would you like your room photoshopped and featured on Makeover Monday?  Send a few photos from your space to angela@groceryshrink.com and tell me your hopes and dreams for the room.  It’s free 🙂 

Get a full service virtual makeover complete with 3D room layout plan, 2 photoshop views, step by step work list, and source list–all in your budget. Find out more.

room-makeover-short-banner

Learn how to use Photoshop your own designs with the Room Makeover class.

Post contains affiliate links.

The Secret to a Quick Up-do That Stays Put

Warm weather is coming and when it’s humid out, there’s no better feeling than pulling your hair up off your neck.  If you have littles or a busy lifestyle, you need a way to do it quickly that will stay.  I used to use a circa 1994 claw clip.  It is fast and secure, but you can’t lean your head back.  Driving in the car is no longer comfy and forget about floor workouts.

Flexi-clips from Holly at Lilla Rose  change all that.  You get the same fast updo–without uncomfortable bulk on the back of your head.

They are known for staying put, when other clips fail.


The clips are good for a casual half up, or even to dress up a pony tail. They have other hair accessories too, such as jeweled bobby pins, U pins, bun sticks, and headbands.

Holly is representing Lilla Rose to earn money while she stays home to raise her daughter, and generously donated 3 flexi-clips to our Fit-Mama challenge. The top 3 ladies will each get one in their prize package.

I really love this chunky set.

And this headband.

And these pins.

For more hair ideas follow Holly on facebook and shop her store here.


Makeover Monday: Grace’s Kitchen

Grace was a camper in my cabin many years ago when I was a counselor at Jr. High camp.  She has always been tender hearted and giving, a true beauty inside and out.  They recently expanded their family of 6 to a family of 8 with the addition of two foster children, and their 3 bedroom, 1 bath house felt a lot smaller.

The doorway to the left of the stove is where the old dining room door was.  Now that it’s walled off, her fridge can go there.

This winter they sold their home and moved to a fixer upper just a few streets over from me.  The whole family pitched in together to wall in the dining room to make another bedroom. They also added another bedroom to the one already finished in the basement.

The wall straight ahead needs to come down.  It’s a load bearing wall, with ductwork and electrical in it, so it’s not a simple job.

Grace hosted a youth activity at her home a few weeks ago and invited my kids to join in the fun.  When I dropped them off, I was super excited to peek at the new digs.  She had two living rooms side by side. They turned one into the new dining room since the existing dining room was now a bedroom.  She mentioned her dream of taking down the wall between that room and the kitchen and adding an island for a more open feel and more workspace, and I offered to show her what it might look like in photoshop.

For her kitchen I removed the scalloped window trim and painted her upper cabinets white and the lowers navy blue.  And gave her copper drawer pulls, faucet, and mixer to warm up the space. The navy runner is from Dash and Albert.  The new fridge is tucked next to the stove, giving her room to blow the wall out to the left.

Here’s a side by side view.

In the dining room, I rebuilt her built in cabinets to be symmetrical, then gave them the same navy/white combo as her cabinets to make it feel like one big room.  I used a chunky beam to support the house with the wall gone and moved her duct work to the east wall. The electrical outlet can go right on her island between the two rooms.  Her fireplace got an update with white paint and a chunkier mantle.  Her original dining room table is already the perfect style and size to pop right back into the room, and with the table in place, she can put in a signature light fixture over the table.

Her original ceiling is tile, but since the wall is coming down anyway, I suggested they put drywall up instead.  I replaced her mini blinds with bamboo shades and simple white Ikea curtains.  I love her original floors, but with the wall down and the kitchen floor not matching, I showed them what it would look like to use vinyl click floor instead.  It looks like wood but it’s 100% waterproof and less prone to scratches than wood floors.  That’s a good combination with a lot of young kids around.

Would you like your room photoshopped and featured on Makeover Monday?  Send a few photos from your space to angela@groceryshrink.com and tell me your hopes and dreams for the room.  

Get a full service virtual makeover complete with 3D room layout plan, 2 photoshop views, step by step work list, and source list–all in your budget. Find out more.

room-makeover-short-banner

Learn how to use Photoshop your own designs with the Room Makeover class.

Makeover Monday: Peggy’s House

Peggy has a nice open floor plan with a kitchen, hearth room, and dining room all connected.  It has beautiful built ins and lots of windows, but it still felt dark to her.

She asked for advice in the Cozy Minimalist community for the hearth room only, wishing she could paint the built in cabinets and fireplace white, but afraid it wouldn’t look right with the black cabinets.

We were all distracted by her upper kitchen cabinet blocking the line of sight.  She had made it a lot better by removing both sides of the doors to allow some light through. She stores bowls in it that she uses frequently and was not excited to give up the storage.  I made a little photo for her so she could envision what it might look like all opened up with the white she was craving.

I removed the hanging cabinet and painted her remaining upper cabinet white. Matching crown molding around it would tie it all together even better.  Then added a floor to ceiling built in cabinet, a simple box made from plywood with doors and crown moulding, where her shorter bookcase was before.  Build it with free plans here. This would give her back the storage she lost without taking up any more space.  Just for giggles I added matching doors on her existing bookcases with the white mantle and mirror.  I also switched out her light fixtures for a modern farmhouse look.   I used her existing mirror over the fireplace, but I think a big round mirror would look even better.   Here’s the before and after side by side.

Peggy was concerned about the expense of refinishing the ceiling under the cabinet, but her ceilings are perfectly smooth.  In this situation, the ceiling is usually finished underneath and all she would need to do is fill in the screw holes with some quick dry spackle and touch up the paint.  I didn’t change her paint color in the new picture, but all the white accents make it look darker than when it was by the black.

Would you like your room photoshopped and featured on Makeover Monday?  Send a few photos from your space to angela@groceryshrink.com and tell me your hopes and dreams for the room.  

Get a full service virtual makeover complete with 3D room layout plan, 2 photoshop views, step by step work list, and within your budget source list. Find out more.

room-makeover-short-banner

Learn how to use Photoshop for your own designs with the Room Makeover class.

Little Chocolate Pots

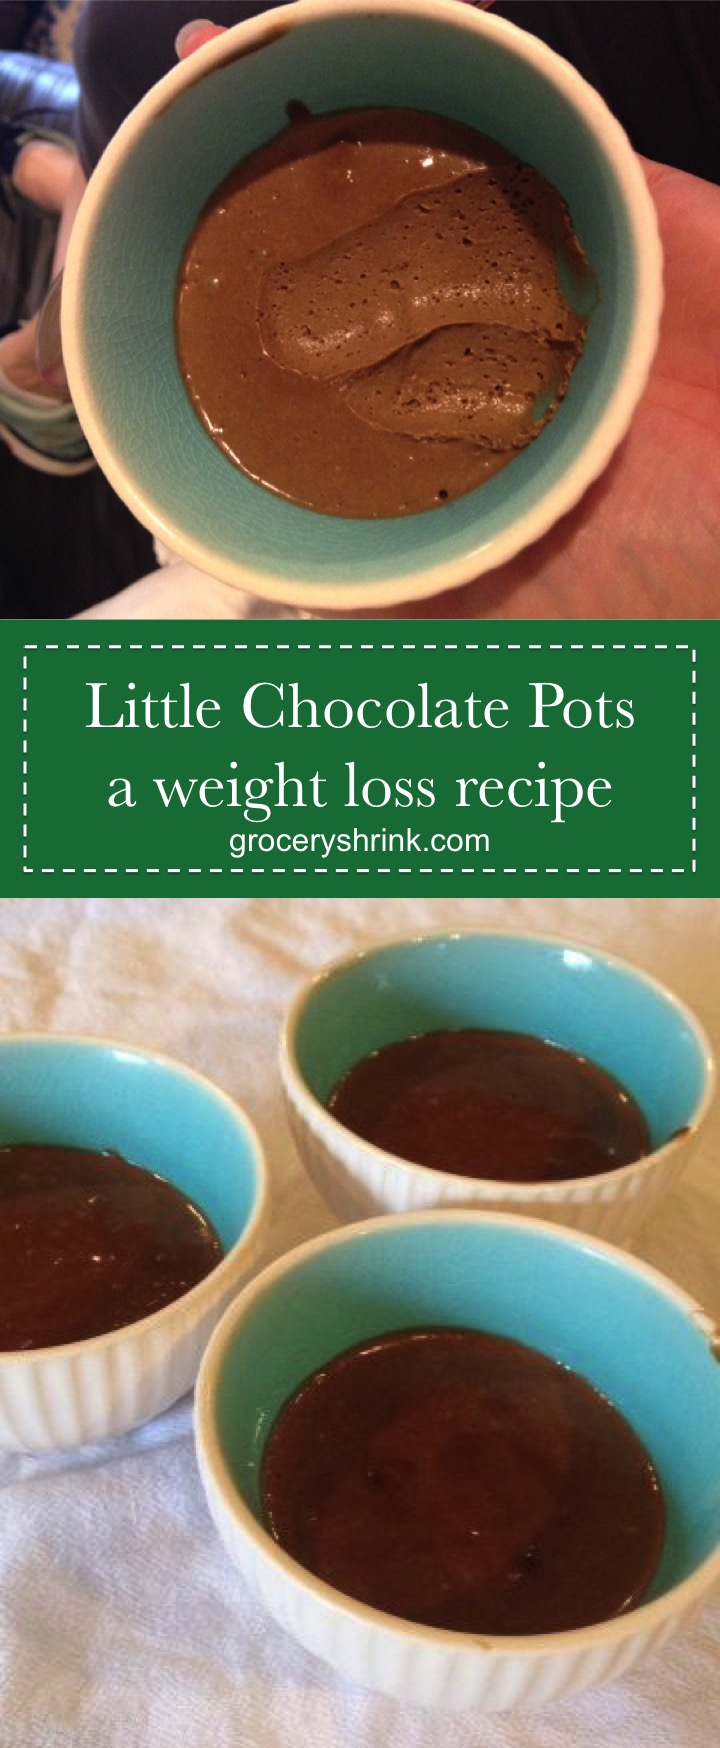
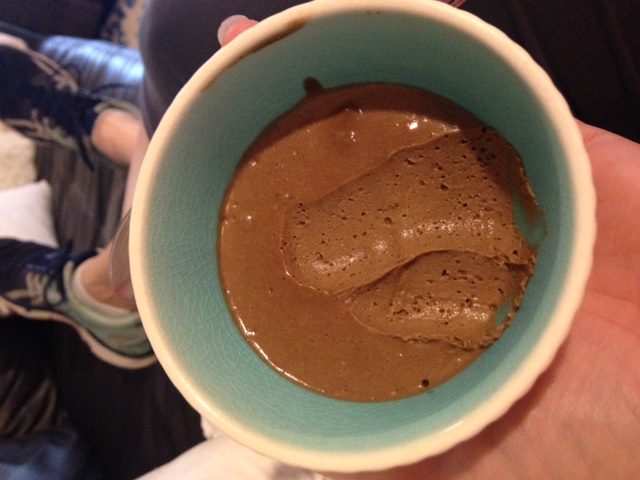
This recipe has changed my week.  It’s one of the rare “health” foods that my kids are crazy about. I tested it for next week’s FitMama meal plan and thought I had double what I needed.  But my oldest daughter is singing a solo at district contest for the first time today and Monday she walked in the door a complete emotional wreck.  When I handed her a little chocolate pot, words were no longer necessary.  I loved knowing it was a tiny bowl of superfood to nourish her adrenals and her brain.  It wasn’t a false stab at comfort food that would fill her body with garbage and drag her down further.

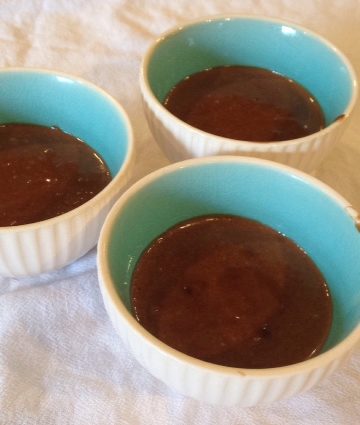
The tiny little bowls were from Big Lots.  At $2 each they were an affordable splurge.  I love the texture in the stoneware on the outside and the crackle glaze inside.

The only unusual ingredient in this recipe is Xylosweet.It’s a sugar free sweetener derived from probiotics+corn that I feel ok about using.  It tastes like sugar without messing with your blood sugar. You can use any sweetener you prefer or have on hand.  Another good choice is Monk Fruit In The Raw.  You can also use Truvia, but if you find it bitter, pick one of the other two.

Superfoods:

Coconut Oil: thermogenic to boost metabolism; nourishes the brain and helps memory; reduces inflammation and boosts the immune system; nourishes skin, teeth and hair; anti-fungal and anti-microbial

Unsweetened Cocoa Powder:  Rich in fiber, protein, and anti-oxidants; boosts metabolism

Collagen:  Builds strong hair, skin, and nails; soothes the lining of the intestines and helps with digestions

Eggs:  Full of protein, vitamin A, Vitamin B and zinc.  Good for your eyes, brain and heart and reduce the risk of metabolic syndrome.

Cinnamon: Boost metabolism, helps regulate blood sugar, good for the heart and aids in circulation

Little Chocolate Pots

½ cup refined coconut oil, melted*

¼ cup ground xylitol**

Pinch salt

¼ cup unsweetened cocoa powder

¼ cup collagen

2 large eggs, room temperature***

½ cup hot water with ¼ tsp cinnamon****

1.Add all but the eggs and hot coffee to a blender and blend well.

2.Add eggs and blend well, one at a time. (If your eggs are too cold, the coconut oil will solidify too soon.)

3.Slowly drizzle in hot coffee while blending. Blend well. The hot coffee will “cook” the eggs.

4.Pour into 6 small ramekins. Cover with plastic wrap and chill at least 2 hours or until firm.

6 servings: 242 calories; 21g fat; 9 net carbs ; 7g protein

*Refined coconut oil does not have coconut flavor. If you LOVE the taste of coconut, you can use unrefined pressed coconut oil. MCT oil won’t work, because you need it to harden when cooled.

**You can use any no calorie sweetener you prefer. I grind my xylitol in a little coffee grinder. It helps it dissolve better. If you are subbing all the sweeteners with honey, this is not the meal plan for you. The fat burning process with these specific ingredients rely on no sugars

***The temp of the eggs is super important here. I didn’t remember to take mine out ahead of time, so I ran some really hot water in a mug for each egg and dropped them in. They stayed in there for 3-5 minutes and were warm enough for this recipe.

****You can change the flavor by subbing hot coffee or mint tea

If you are looking for a weight loss plan that works with your busy schedule.  Check out FitMama. The food is prepped ahead so it’s ready to heat up and eat whenever you need it.  Healthy food could soon be as easy for you as grabbing a bag of chips.

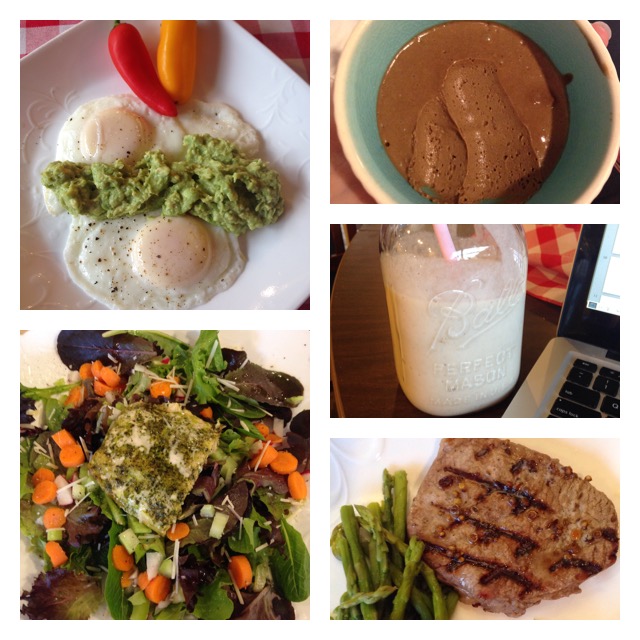
Here’s the meals for the first day for the March 12th Fit Mama Plan.  We have a private facebook group too, so if you need help with ingredient substitutes for preferences we’re on it :).

Breakfast: Guacamole Eggs

Snack: Little Chocolate Pots

Lunch: Salmon Chef’s Salad

Snack:  Giant Frozen Eggnog

Dinner: Grilled Steak with Asparagus and Whipped Cauliflower

Snack: Hot Creamy Peppermint Sipper

This post contains affiliate links.  Thanks for supporting us :).