The Risk of Painting Brick


There are a lot of things I love about our family room.  It’s open concept so we can see the kitchen from our comfy sofa.  It’s big with lots of options for furniture placement.  It has yummy hand scraped hardwood floors and French doors leading out to a sunroom and deck.family-room-2015
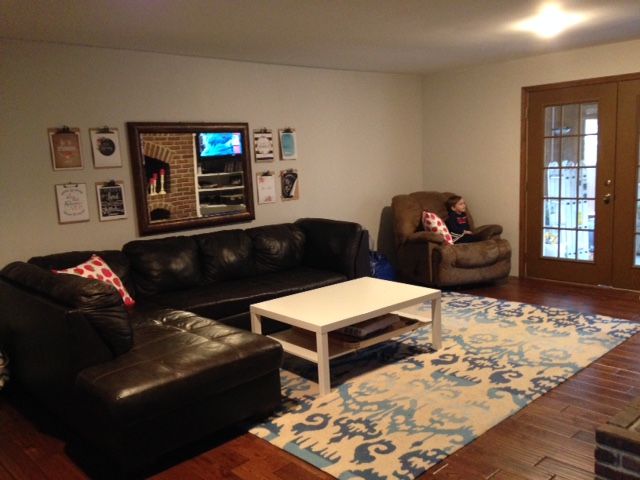
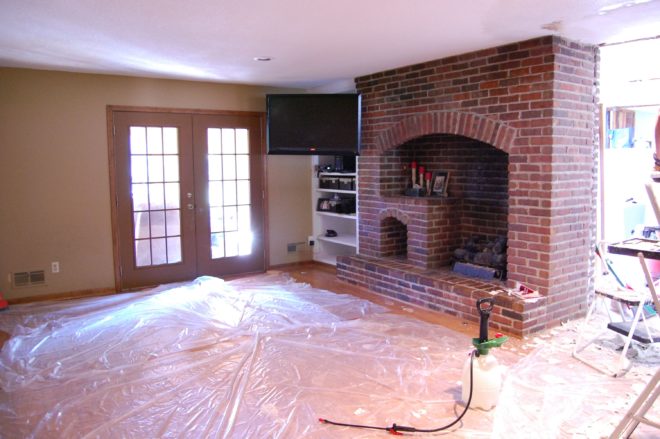
The room has a unique fireplace that was constructed from the bricks removed during the demolition of the old stock yards in downtown Kansas City.  The bricks are a good color tone with enough variation to give texture and interest without being gaudy.
fireplace-before

The room is dark.  It’s landlocked and even during the lightest part of the day, needs a light on for normal activity.   Even with the lights on it feels dark.

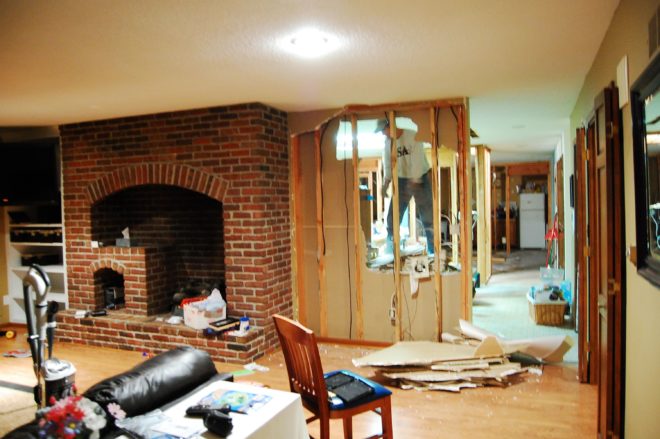
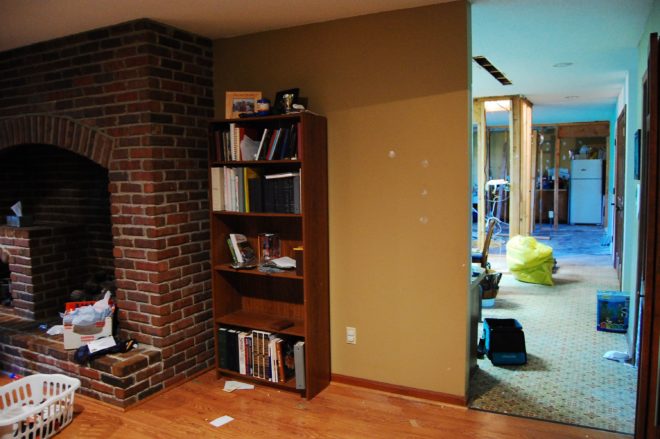
It was even darker before we painted over the dark olive beige with a pale gray.  Painted the trim white, and took down the wall between the family room and the kitchen.
dsc_0605

dsc_0613

My gut has been telling me the dark brick has to go if I ever want a light and bright space. It’s so massive that it absorbs a ton of light, and the inside is stained black from soot.  I’ve tried several methods to clean it up, but it’s deep into the porous surface of the brick.  I’ve lightened it some but the stain is still there.
white-french-doors

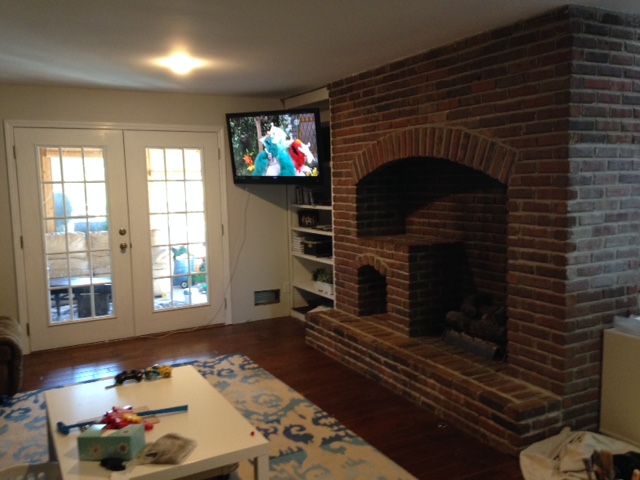
In a last ditch effort to save the brick, I decided to paint the french doors white to bring in as much light as I can.  It helped a bunch and every time I walked by my heart gave a little leap of joy.  As much as the little things we did improved the space, it only made the dark brick stand out more…and not in a good way.
fireplace-end

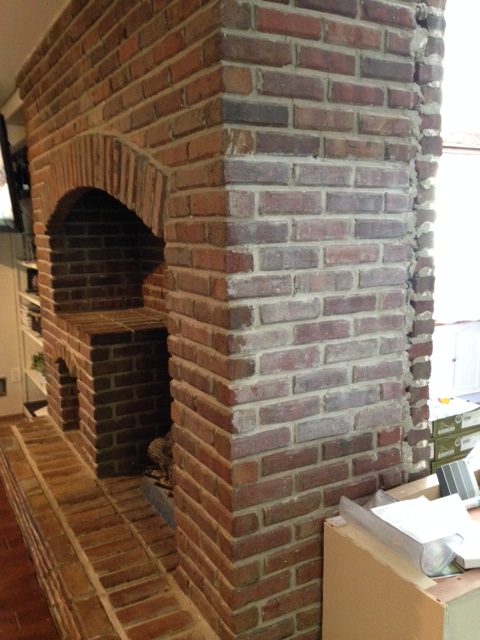
When we took down the wall between the rooms, there was an unfortunate seam in the brick never meant to see the light of day.  I was imagining seeing the cute exposed brick wall from the front doors….but that seam is NOT cute.   We plan to cover it with a floor to ceiling chalkboard with a wide white frame all the way around. SOOOO since I was going to cover it up completely, I took a risk and tested a white wash technique first.

I loved it and hated it at the same time.  My mom told me it looked dirty, but my online friends from the Cozy Minimalist class told me it was beautiful.  I finally got up the nerve to start on the part that would be seen.

brick-part-way

I spent a few hours painting, and then wore out.  You can see the top left corner and the inside has been done.  At this point, I was pretty sure my mom was right and I had ruined it.  Then I remembered The Nester telling us, “You can’t ruin something you already hate.”  It took several weeks for me to find the nerve to finish the project.  I decided if I hated the whitewash look I would paint it solid white.
fireplace-and-moss-letter

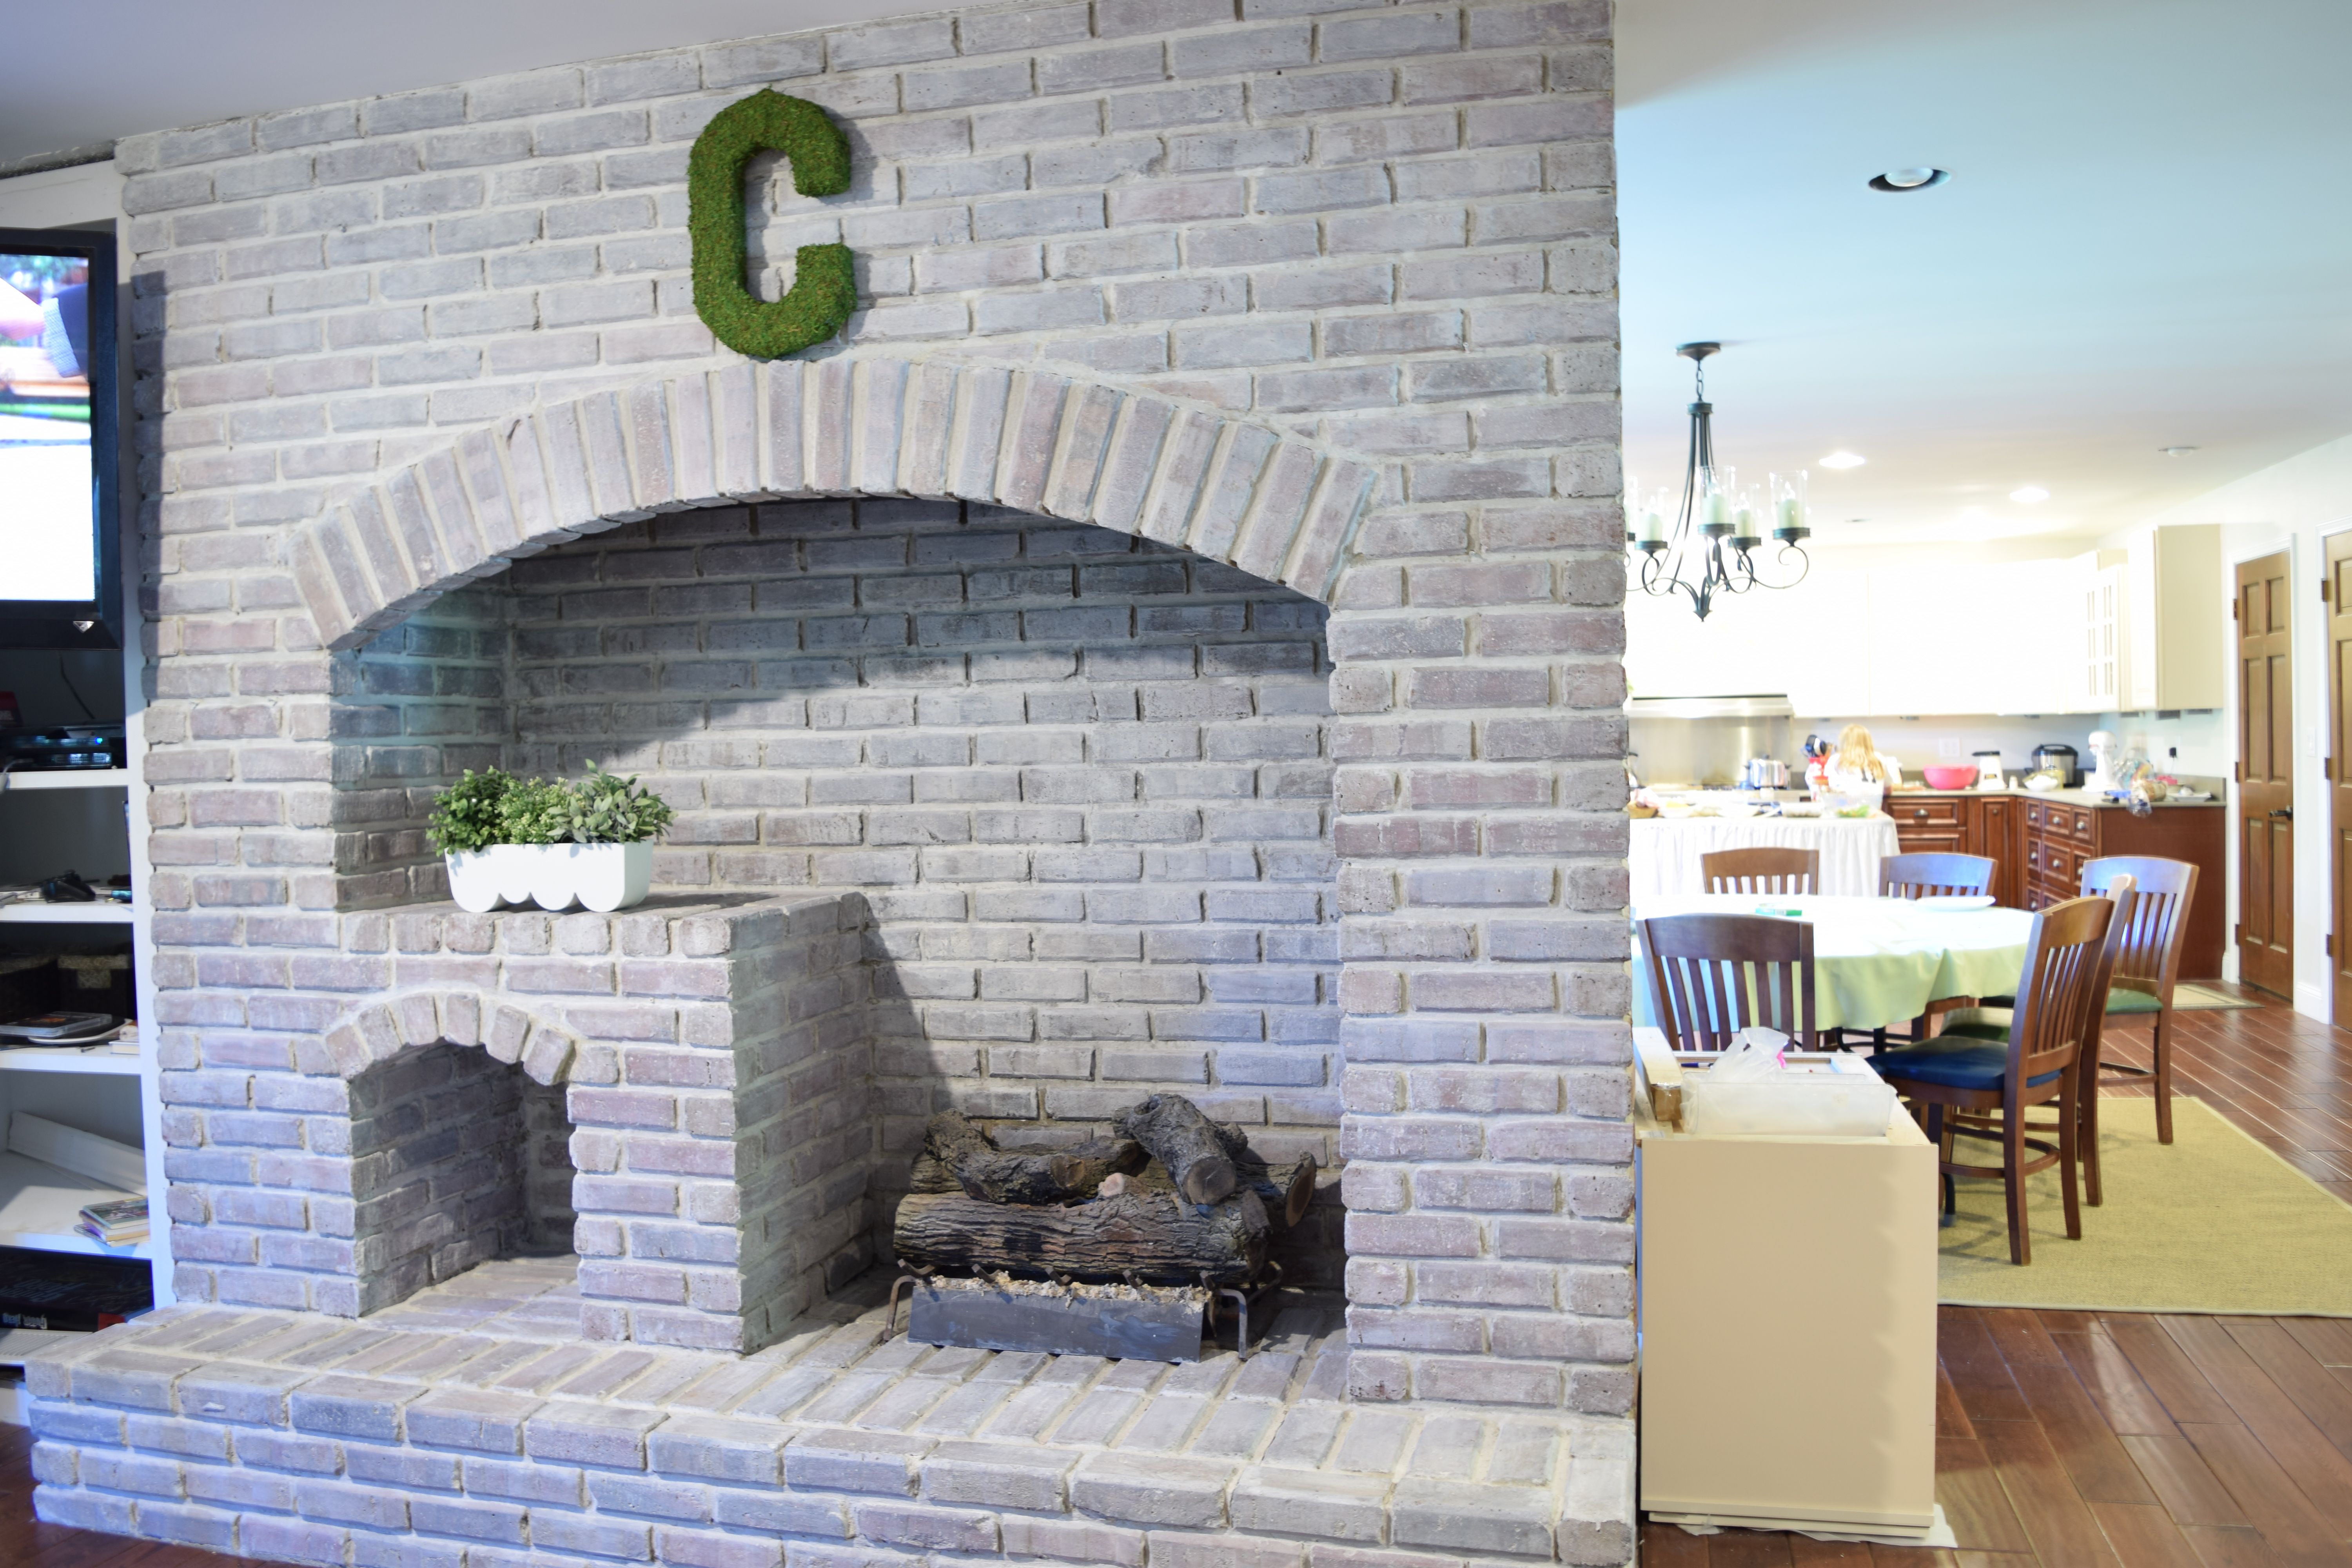
The paint I chose tends to settle during the painting process, so the fireplace got lighter and lighter as I went on.  I had to go back over the places I started with to make it blend with the rest of the brick.  It ended up lighter overall than I had planned, but I love it anyway.

This is just an iphone picture, and doesn’t do the space justice.  The brick finally feels like it goes with the rest of the room.  I quick made a moss covered monogram to hang on the new whiter brick, and have plans to style up the space more with inspiration from here and here.

I’m KEEPING the original brick on the backside where it is exposed in the dining room.  Here’s a picture of the back side of the fireplace back during our construction phase.  I can’t believe I’ve never taken a picture from this direction “finished.”  Ok, we aren’t finished yet, my buffet table on the brick wall is still those stacked flooring boxes with a tablecloth on it. But we’ve made progress since this.
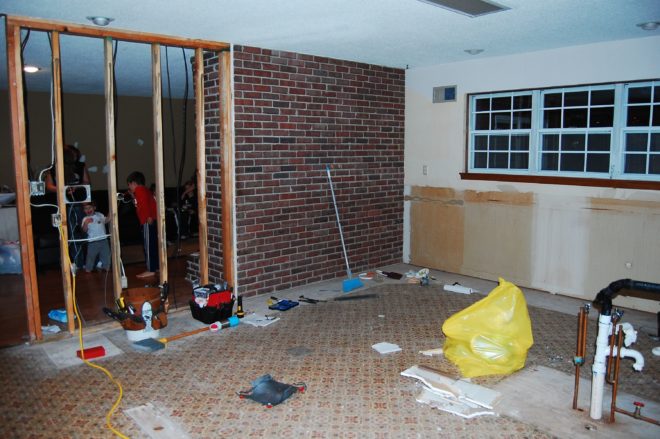
dsc_0672

Choosing the type of paint for the brick was a challenge.  Brick is hard to strip paint from, no matter what.  Latex paint CAN be removed from brick with this stripper or this one, but latex paint is not heat friendly.  My fireplace has a gas insert, and while it is too expensive for us to use right now, we have hopes one day to make it more efficient.  We didn’t want to permanently eliminated our option of ever using the fireplace again.  I thought about using latex only on the outside and using heat proof grill paint on the inside, but it only came in black.  Painting the massive inside of the fireplace black would fight against my goal of light and bright.

While searching for paint that is heat friendly, I came across milk paint.  Milk paint is permanent on brick. It soaks into the pores and becomes one with the material.  It doesn’t bubble, crack or peel when exposed to high temperatures.  And unlike traditional lyme white washing, milk paint won’t rub off on hands or clothes once it’s cured.  Going with this option meant never being able to go back to raw brick again.  That’s scary for me, because I’m kind of fickle when it comes to decorating.  I took the risk because letting fear trap me into keeping a look I hated was worse than never being able to go back.

There are lots of different brands of milk paint.  I chose this one because it keeps longer than the rest while still being REAL milk paint. Some milk paints are only good for 24 hours after mixing up, but this one lasts 6 weeks.  (I loved having a time limit though, or I might not have finished even now.)  The paints that are “like” milk paint but not really made with milk, I didn’t trust.  I wasn’t sure they would have the heat proof quality I was looking for.

The paint instructions say to mix it equal proportions with the powder and water.  I did that first to make sure the powdered mixed up well, then added 2x more water for a whitewash look.  My finished formula was 1/2 cup paint powder to 1 1/2 cups water. I brushed it on with a natural bristle brush, stippling it into the texture when necessary, then used an old flour sack tea towel to wipe it off.  The wiping off part was key to an even texture and removing brush strokes.

Just for fun, here’s a before and after:
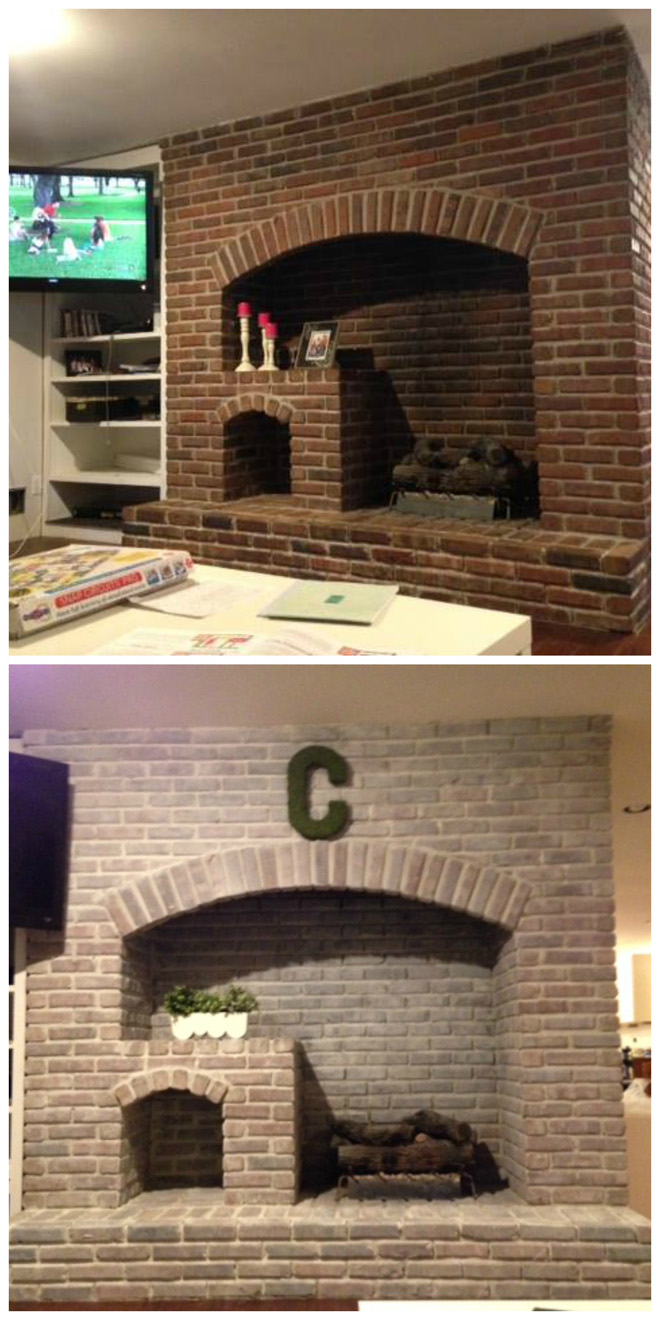
fireplace-before-and-after

P.S.  Thank you for making it safe for me show you my imperfect house and imperfect pictures.  I’m holding back the urge to point out all the flaws. I know no apology is necessary–because we’re friends like that.


How to Make Everyone Insane….

Answer: Start a bunch of home improvement and don’t finish any of them….. In the midst of the insanity I can see life getting a little better bit by bit, so I keep doing it.

I reached a point where I couldn’t take it any more….the disorganization, dirt and 45 year old carpet with disintegrating pad.  I dove into a bunch of projects pretty much simultaneously. We don’t have much of a budget for each space so we’re doing some unorthodoxed things…like thumbtacking placemats over windows, painting sub floors, and cutting curtains in half so we can have 2.  In the past few weeks:

1.  Caleb’s room: Removed carpet and wallpaper. Painted walls and subfloor. New rug, new bedding, new curtains, new desk, lego organizational area. Still need: Lego desk, dust ruffle….and doors.  Doors would be really nice.

Calebs room before and after

2. Painted the Family Room French Doors white and started to white wash the fireplace. Bought supplies for a giant chalkboard.

family room 2015

family room fireplace

Plus that cabinet on the ground, to the right, with all the stuff on it belongs on top of the fridge.  We now have the screws in hand to take care of that. Happy Dance. The chalkboard will cover the end of the fireplace that the cabinet is leaning against. It has an unsightly seam on it that use to be hidden under a wall.  We discovered it when we opened up the floor plan and it’s been visible from the front door for 2+years.

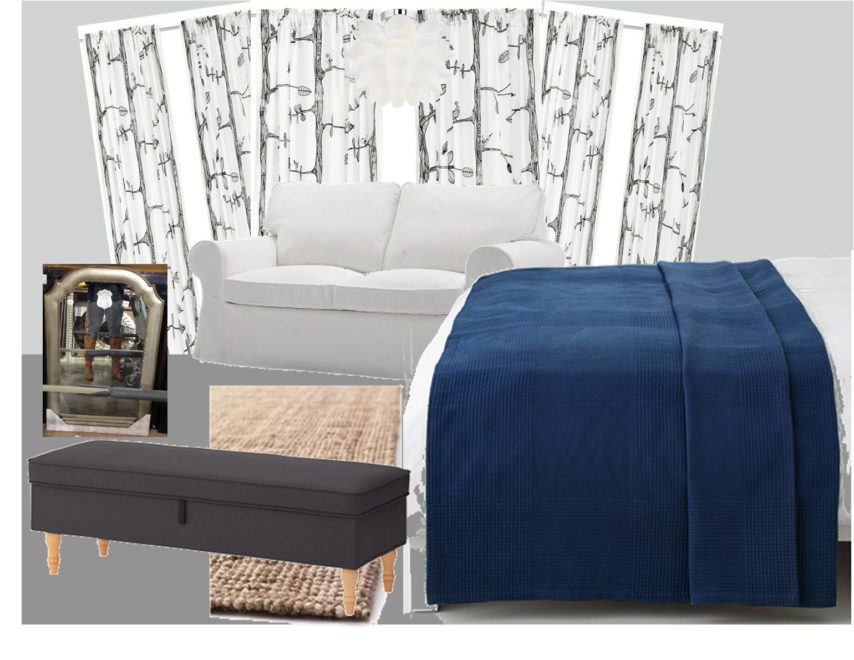
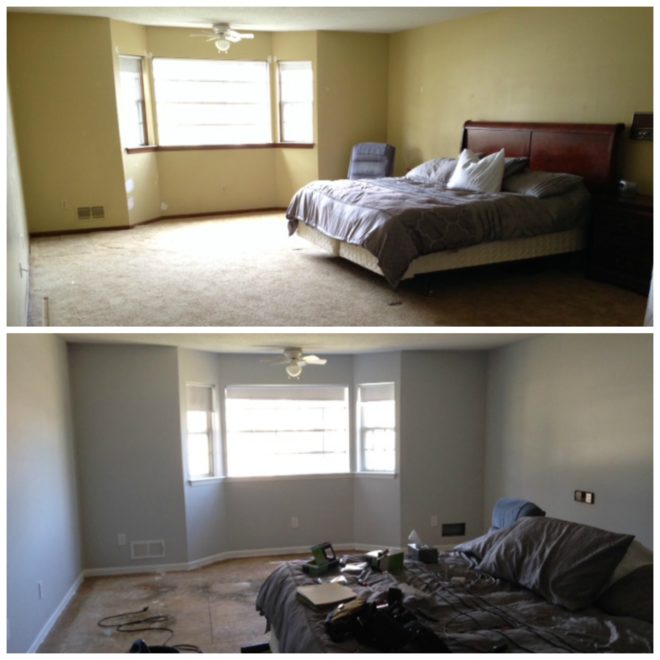
3. Master Bedroom: Removed Carpet.  Painted subfloor. Deconstructed bed. “new” rug, sofa, curtains, light, lamps, mirrors, side table, plants…..Still needs pillows and artwork….later

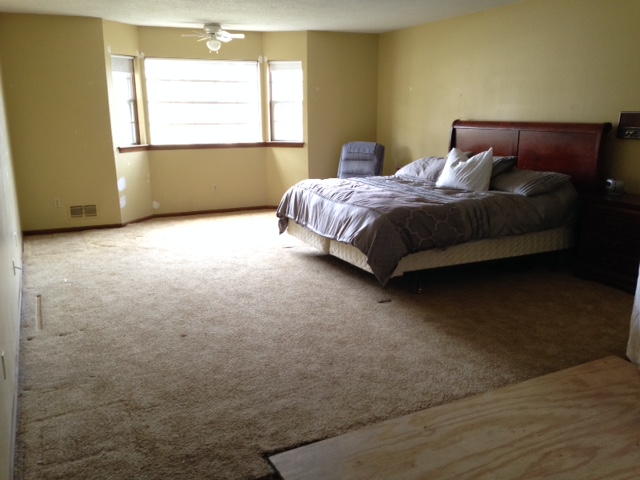
Master Bedroom before and after

4.  Girl’s Bathroom: Removed wallpaper and popcorn ceiling.  Still needs Skimcoat, paint on walls and trim.  New faucet, new toilet. Tile around sink area.  Refinish tub and sink top so they will be white.  Shower curtain, window shade and bamboo blind. Towel hooks…..don’t make me go on.

Girl's bathroom mood board

5.  Entry: Took carpet off stairs (I did this before Christmas actually.) Still needs a coat of stain on treads and bannister and white paint on trim. Still need to paint walls…but parts of the room will need scaffolding…

12481_10206462857233179_6967099384590296891_n

All of these jobs are on a gentle pause while I figure out how in the world to do the next steps.  When I get stuck in one space, I start on the next one.  It’s a bad habit.

In the meantime, I’m getting ready for our Spring Concert, taking the choir to World’s of Fun for a play day, and preparing graduation music.

Totally Unrelated News: I’m 1 contact away from earning a trip to ATLANTIS BAHAMAS with MomCeo.  If you are at all mildly curious about how I earn money with MomCeo, put in your info and let me give you a call.  I would be super sad to be this close and not qualify for the trip, plus I think it would really bless your family too.  Atlantis is the place Dave Ramsey took us when we were finalists with his Total Money Makeover Contest.  I can’t express how awesome it would be to go back as a successful small business owner.

New Project: Girl’s Bathroom

I’ve started on a new project in our house, and I haven’t finsihed Caleb’s room, my room, or the entry.  This makes my husband crazy.  He works differently than I do (slow and careful), and I need him to do a couple of things before I can move on in the other areas.  It could take him awhile to get to it, and by a while I mean months to years. While I wait for him to get a “round tuit” I get busy somewhere I have the skills to tackle. PLUS I’m learning new skills so I don’t have to rely on him for as much.  For this project I need to learn how to wire a GFCI outlet and change a faucet….I’m so thankful for YouTube.

DSC_0003

We have two bathrooms upstairs to service all the kid bedrooms. One we’ve named the “boy bathroom” and this one is for the girls.

DSC_0002

It is green, green, green. Green shower/tub, green toilet, green walls, green wallpaper, green towel bars and hooks, and green floor. Combine that with the dark wood, and it’s a bit dreary.

DSC_0007

It’s narrow and crowded without any linen storage, too.

Floor

I’m keeping the floor, it’s made of thick vinyl tiles that look like glass cubes.  The previous owners chose to accent the olive color in the pallet, but I’m hoping to bring out the emerald and pale blue instead. DSC_0009 DSC_0008
We’ve already started removing the wall paper and found some mold issues behind it.  There is also some serious drywall trouble around the shower and window areas caused by there not being a working exhaust fan for years.  We fixed the ventilation, so it’s safe to make some repairs.

Girl's bathroom mood board

Here’s a mood board to show you what I have in mind.

I’m going to finish scraping down the popcorn ceilings, and removing wallpaper backing, but for now we’re headed to the zoo :).

P.S.  I really love that wallpaper, but it’s $150 a roll.  1 roll could make a nice impact in the space, or I could try to fake it with a bird stamp.  What would you do?

Master Bedroom Refresh

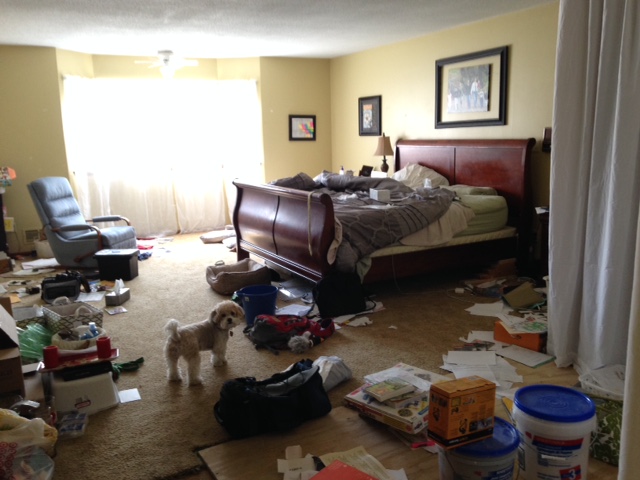
I’m feeling a lot better and dove head-first into a new project.  As part of the Cozy Minimalist course with the Nester that I’m taking, I had to choose a room for my project.  I got that assignment while laying on my bed in this:

And I thought, “This is the room I hate most in my house.”  I thought this room was off limits, because to do anything in here I needed to move our doorway first.  Why paint when you’re going to redo the drywall, right?  Then I thought I’d better scrape down the popcorn ceiling and get a drywall guy over here to skim coat it so that the mess of that didn’t ruin my newly painted walls, but that was going to cost $$$.  And then we needed our plumbing fixed so we could put up the walls that will be there forever….which would be about $9,000, and 5 years of saving.  So I sat in this horrible space in my own mess and felt sorry for myself.

Then I thought, why not?  This has to get better or I’m going to go crazy. If nothing else I could clean.  So I picked my bedroom as my project room.  Our first official assignment was to quiet the room.

It only took me a couple of hours.  Seriously?  What was I waiting for?

With the walls all cleared off like that, I thought about painting.  It wouldn’t be too much trouble, really.  And if I have to wait 5 years on all that other stuff, why not? I used the leftover paint from my son’s room.

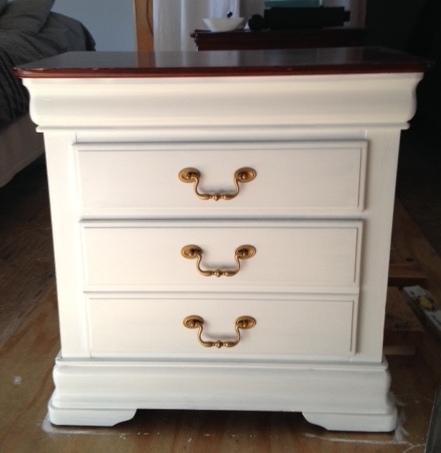
After the walls were done, we ripped out the carpet and painted the trim too.  I mean, at this point it was super easy to do it with hardly any furniture in there and all. While I was waiting for the trim coats to dry, I  decided to paint my nightstand.  It’s the same paint….and the brush was already wet.

I left the top the original finish and used gold leaf rub and buff to brighten up the drawer pulls.

I’ve been tired of my footboard for awhile, so Darren found a set of bed rails in the basement and switched our bed to that.  Our headboard will still work with this system.  I have plans to update the headboard a bit, and now it makes sense to get a bench at the foot of the bed for putting on shoes and storing extra bedding.  I’ll also need to make a bed skirt.

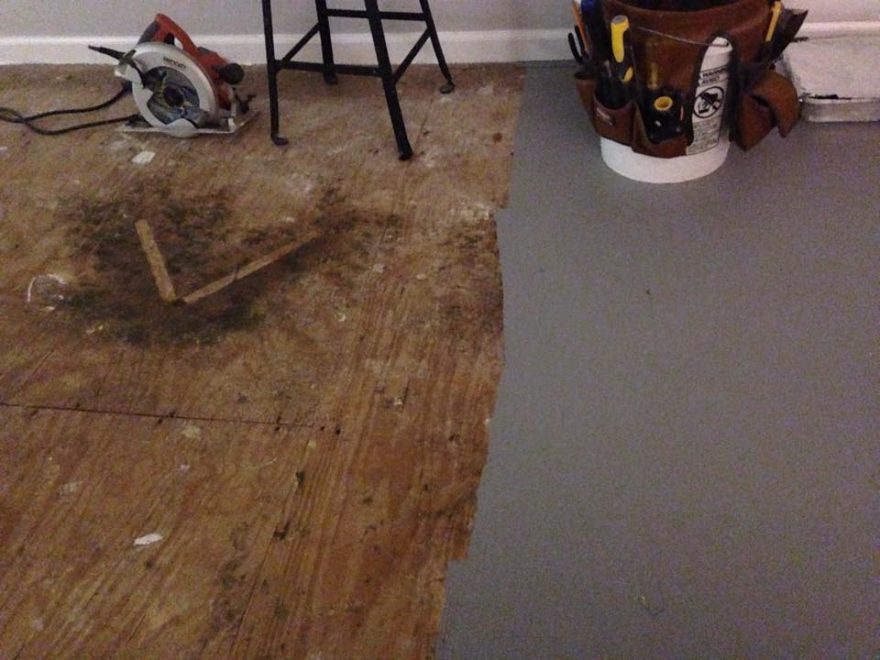
Then, the room looked so good, I went to work on that horrible sub floor. There were chunks out of it, staples everywhere and bits of the carpet pad had adhered to it.  It looked like camo flocking.  I did my best with a paint scraper, pliers, wall spackle to fill in  the missing chunks, and then painted it.  I could load up the roller with paint and fill in all the little holes and cracks since gravity wouldn’t make drips on the floor like it would on walls.

While I was running my errands I slipped into Old Time Pottery just to see how much mirrors would be.  I’d like to hang some over our newly painted nightstands, to bounce around light.  They had these gorgeous mirrors, but the frames were scratched up.  On a whim I went to customer service and asked if they gave discounts on damaged merchandise and they gave me 25% off on the spot.

We’ve wanted to get rid of the ceiling fan for 3 years and this seemed like a good time to shop for one.  I found this blog post with ideas.  It was several years old, but #3 caught my eye.  When I clicked over it was on sale 50% off with free shipping and free returns.  Sold.

I like to put rugs down when I paint sub floor, but my budget for this project is super tight.  After buying the light and the mirrors, I was feeling a touch of buyers guilt. I checked rugsusa.com, but even with the 75% off sale I couldn’t make a decision. Then I checked craigslist and found a 9×12 jute rug for half of the lowest price I could find anywhere online.

We are planning a garage sale next week and I hope to raise the cash to buy the rest of the items from the mood board above (I’m basically going to give my life savings to Ikea.)  If you don’t hear from me for awhile, I’m cleaning out my garage.  If you thought the before picture of my bedroom was bad…..the garage is much, much worse.

Plywood Countertops Revisited

It’s been a few months since we finished our plywood countertops, and they aren’t as awesome as I was hoping.  You can see the planning stages here and the finished product here.  The marine poly has scrubbed off in places.  It’s not flaky or chipped so you would notice, but it’s wearing through in places (probably from lots of washing) where we are seeing bare wood and water is getting in.  The seams are the worst.  I might have been better off if I had caulked the seams with paintable caulk instead of using wood putty…..but in any rate, it’s a mess.

I’ve heard of wood countertops working for other families, but not for any families with 6 kids and a kitchen that sees as much action and messes as ours does.

I signed up for the Nester’s Cozy Minimalist class (love it so far and the first class isn’t even until tomorrow) and another student recommended this:

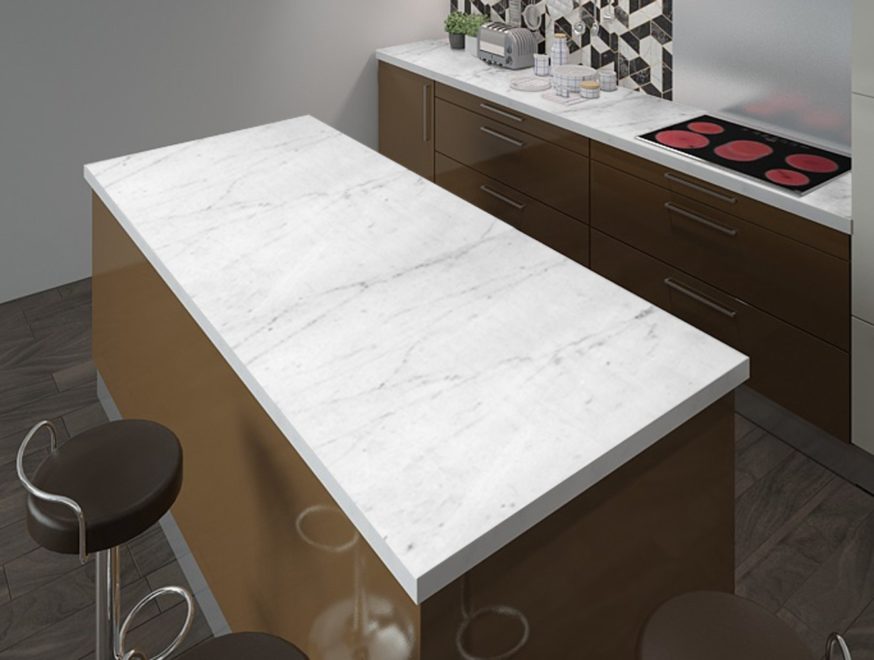
It’s a pvc adhesive film that is super durable and looks like real stone.  Some people have to touch it to believe it isn’t real.  This would seal up our wood and help our temporary countertops last as long as we need them to, probably more than 10 years.

There are some good youtube videos showing how to use it.  Would you ever do something like this?

Are you Spring Nesting?

Friends, I’m a mess.  I caught a cold on the 2nd day of Caleb’s room redo and have been laying around like a unmotivated college student ever since.  I breezed through illness season this year because of the new vitamins I’ve been taking, but finally dropped.  Stress + sick kids + no sleep = Sick Mama.

All this time lying around (I used both lying and laying in this post because I can’t remember which is correct to save my life and I’m too lazy to Google it) has been well spent watching Hawaii 5-0 reruns on Netflix while researching home sprucing ideas on multiple open tabs.

These will be making an appearance in our home soon:

hexago smart tiles

I’m also looking into options for this fireplace:

IMG_0708

I can leave it as is and replace the candles and picture with a huge green plant likely from IKEA (fake but realistic looking) and the smaller cubby with white sticks and make teepee sticks to cover the gas logs for summer.

97fd6d3415213765989b3896341762a1

Source

and

598990acd74625603f1673fe7e44bd03

Source

OR I could lightly whitewash it…a cheap but fairly permanent option:

4719c8fb77cdd8b43e0370041ea75cd2

Source

If I use latex paint I could remove it later with Peel Away.  Heat would ruin it though, so I’d need to keep it away from the fire box area.  I could use Milk paint instead, but it will become one with the brick and not be removable at all.  On the other hand, it’s heat proof and I could move right into the firebox with it.

This room is really dark and I’d love to brighten it up and (remove the soot marks–already tried scrubbing those off and it didn’t work.)  What would you do?

Caleb’s Bedroom Budget Details


I’ll be honest.  I didn’t have a set amount to spend on Caleb’s room. The goal was just to do it as cheaply as possible without so much DIY that it would get overwhelming. I was dealing with cash, so before I made a purchase I really weighed whether this was the best use for the money.  There were several times I was standing there hemming and hawing about whether I should buy something or not (desk, bird pillow), and I told myself, “It’s for your son….just do it.” I can be really cheap at times, then at other times just spend the money thinking I’ll be happy I did later.  (Which isn’t always the case.)

I haven’t added it all up before I do it live right here….I’m a little scared to see the total. What’s a good room makeover budget anyway?  The little things add up quickly for sure. I could have easily spent an extra $1,000 if we had done the hardwood floors and removed the ceiling texture….so I’m calling this a win for now :).

Item Store Details $
Duvet fill Target Twin Down alternative 20.00
Curtain Rods Target 2 brushed nickel café rods 7.18
Paint for walls Home Depot Behr Sterling (2 gallons) eggshell 58.12
Floor Paint Home Depot Behr Anonymous (1 gallon) 27.98
Grass Plant and pot Ikea Fejka and Socker 4.78
Gray textured pillow cover Ikea Gullklocka 7.00
Stripe Pillow Cover Ikea Vargyllen 5.00
Bird Pillow Ikea (Already stuffed–not online) 5.00
Black Frames Ikea 7 Nyttja 14.00
Black Box with lid Ikea Kassett set of 2 6.99
Desk Lamp Ikea Barometer 29.99
Trundle Mattress Ikea Moshult 79.99
Floating Shelves Ikea Lack black brown 39.98
Desk Ikea Micke Black brown 69.99
Desk Chair Ikea Snille 19.99
Area Rug Rugsusa.com Keno ACR177 Rug 229.20
Total 625.19
Stuff I had from before
Duvet Cover Target Clearance/Discontinued 15.00
Supplies for lego desk Home Depot saw horse brackets 14.00
2x4s * 2 6.00
Hollow core door 27.00
Pillow inserts Cargo Largo 2* Pottery Barn 20×20 feather inserts 10.00
Total 687.19

There was some additional expense for printing the pages at home.  Ink and paper are not free, but I’ve never figured out what it costs to print a page.  (Some things I’d rather not know so I can happily print in ignorant bliss.)  We do have a printer with the cheap refillable Costco cartridges.

I also plan to go back to Ikea and grab him a Trysil nightstand for $39.99.

And a Svarta trundle bed for $79.99.  We often have extra guests and the kids have been dragging our extra mattress from bedroom to bedroom.  It will be nice to have one just for this space.

After I finished building his desk, I turned the page and found the instructions for building it the other way, you know, so the cord hole would be right by the outlet, forehead smack! I think I’ll move the lamp to the nightstand anyway, so it won’t be a big deal. It still would have been handy for his laptop though.

This bird pillow made me giggle. Caleb smiled when he saw it. I like it when he smiles, dimples everywhere.

Here are all the textures of pillows together.  I almost didn’t buy the bumpled gray one, but then I remembered “texture” being one of the things to add interest to the room. I’m glad I got it.  To be honest I almost didn’t buy any of them, but I already had the pillow forms at home and Darren was making comments about putting them in the yard sale. These were Potty Barn brand feather inserts that I got for a steal. It seemed right to give them a useful purpose.

This is the beginning of his lego wall.  He spent a long time getting his collection all sorted out into the bins (which are $8 for a 4 pack and can be ordered online from Home Depot.)  The rails they hang on are bright yellow, but you can’t see them when the bins are put away.

The floating shelves are to store his finished creations until he’s ready to make something new. (He used to store these treasures on the floor, ouch!) He also has some airplane and car models for the top shelf.  The black boxes hold his lego manuals, Boy Scout guides, and his favorite drawings.


I’m going to make this work table for him to put under the bins and have all the parts with one change. My table top is a hollow core door that I’ll paint with the leftover floor paint.

These are 3 of the pictures from here. (The ones on either side of his window are from here too.  I love putting up scripture for him to look at and be inspired by.) I’m going to grab another frame and put a fourth one up to fill the space out better.  He has a poster sized map of South Dakota that he bought on vacation with my parents. I’m going to grab a matching frame for it and put it somewhere too.  It means a lot to him. The stick of bamboo in the corner was Caleb’s first addition to the room.  I’m not sure what it is about boys and sticks.

If you’re wondering where all the rest of his stuff is, it’s in his closet.  His closet is 6 x 13 with tons of shelves which is handy for keeping his room clutter free.  His dresser is in there with his toy shelf.  That room is in desperate need of tidying up, a task for another day.

Moving Caleb In

I couldn’t wait to see what the room looked like with the curtains and rug in place.  I used a pair of $3 cafe rods from target since the curtains were just for decoration and not to cover the window.  The curtains were leftover from our other house. I made them from sewing strips of sheets together and had always intended to make 2….but that was a LOT of work.  4 years later I cut that thing in half so I could put it on either side of the window.  Tab tops aren’t as popular now, so it was easy to stitch the tabs to the back for hidden hangers.

Striped curtainsHe also has a roller shade for privacy. One of the trips to the hardware store was to have it cut to fit the window.  That trip I also grabbed some white outlets to replace the almond colored ones shown here.

curtains and rug

I love how it looks with the rug!  I’m wishing I had ordered the larger rug….but once the furniture goes in, it should be ok.

DSC_0019

The bed :).  I wanted to stain it dark (Java), but that would take a lot of time from the 24 hour makeover.  Maybe later.  We have plans for a trundle and a velcro bedskirt. I think all that stuff will minimize the gap between the rug and the bed.

DSC_0020

My pile from Ikea.  I LOVE building Ikea furniture.  (I’m not being sarcastic.) The duvet cover came from Target’s clearance rack, not Ikea.  I bought it a long time ago knowing I wanted to do gray and white in his room.

DSC_0021

Oh the bed!  I love how the duvet covers looks with everything.  The pillows were an impulse buy at Ikea ($5-7 each.) The gray one has lots of texture. The bird one makes me giggle.

DSC_0023

He finally gets a big boy desk :).  His old desk was a $5 garage sale find for 1st graders that I spray painted. This one is an Ikea Micke.  It was still cheap, but definitely an upgrade. It took me awhile to make a decision on this desk because there’s no drawer stack.  There are two really wide drawers right under the work surface though and

That’s as far as I’ve gotten today.  Caleb is working on sorting his Legos and I’m trying to talk Darren into hanging the Lack shelves.  I started to do it myself, but the instructions recommended finding a stud.  I found Darren :).

I also have lots of scripture printables from this blogger. I printed them at home on card stock and put them in $2 Ikea frames.  I plan to finish hanging all of that stuff tomorrow.

Just for fun here’s a before and a “so far” after:

Calebs room before and after

I can hardly move….

Sunday night we started by removing everything out of Caleb’s room.  It’s so refreshing to start clean!  (He’s still sorting what to keep and what to get rid of so his space stays organized.)

Then we ripped up that 45 year old red shag carpet, and peeled the wall paper.  He liked the wallpaper and it was in excellent condition, but I had an older boy, calmer environment in mind.  And the shag was starting to disintegrate.  It was high quality stuff with a nice jute backing, but every time we vacuumed it filled the tank with red yarn. Read more

24 Hour Room Makeover

Whoops!  Where did last week go?  I had good intentions to write all week, but I spent it doing stuff instead.  What stuff, you ask?

Ikea applaro-drop-leaf-table-outdoor-brown__0131142_PE285689_S4

This month is all about focusing on our homes, and I got a little email from Ikea letting me know that the Applaro outdoor dining table I’ve had my eye on is on sale this month.  It looks like it will seat all 8 of us for just $100.  Last year we ate out a lot, but crouched around our furniture-less deck on lawn chairs.  I’ve been hoping for a dining table deal all year.   I didn’t have $100 in that fund, so I gathered up a bunch of our clutter and took it over to a garage sale my Mom was having with her friend.  They were really hospital to let us join in.  I made just enough to buy the table plus tax…..I hope to go get it tomorrow :).

Then we had a little bout of stomach flu.  My son woke us up Tuesday morning and said, I have good news and bad news….I threw up, but I saved the bed.  My brain doesn’t work quickly at 3am, but it didn’t take me long to figure out he meant the 45 year old red shag carpet was toast.

200ACR177A

So I spent the week planning a 24 hour bedroom makeover, that we’re doing today (since the kids are off school and we have extra hands.)  The first thing I did was check rugsusa.com and see if they had a rug to fit our theme:  Gray, black, white, with an arrow theme.  This one was 70% off and I ordered it with part of the remodel funds we gathered during the spending freeze. (I ordered it Tuesday and it was in my house by Friday!)

When we did Heather’s room, I figured out that even cheap $1 a square foot flooring can add up quickly when you add the necessary underlayment ($500 later!)  So our plan is to just paint his plywood subfloor and throw the rug on top.  There will be about 2 feet around the edges that the rug doesn’t cover….it should be awesome.

Here’s his room before:

Caleb's room before


I’d better go get busy!